My Maruti 800 Carb (1991): Now Restored!
- Thread Starter ss80
- Start date
- Status
- Not open for further replies.
Re: Restoration of Maruti 800 1991 (Tonnes of Pics Uploaded)
As this is for a business,
i suggest you straightly get in touch with Rt office and do these name transfer. As i am usual visitor to RT office here Kerala for my official purpose, i know the charge difference. Usually these consultants will charge 5 times bigger charges than the actual and some of the amount will go to the govt officials. But the same time, for FC you better give vehicle to consultants, that they'll do this in single day, where you have to go for at least 3 full day.
Thread Starter
#18
Finally the gas tank is out (play area ready )
Managed to pull out the tank before sunrise & here are the updates...

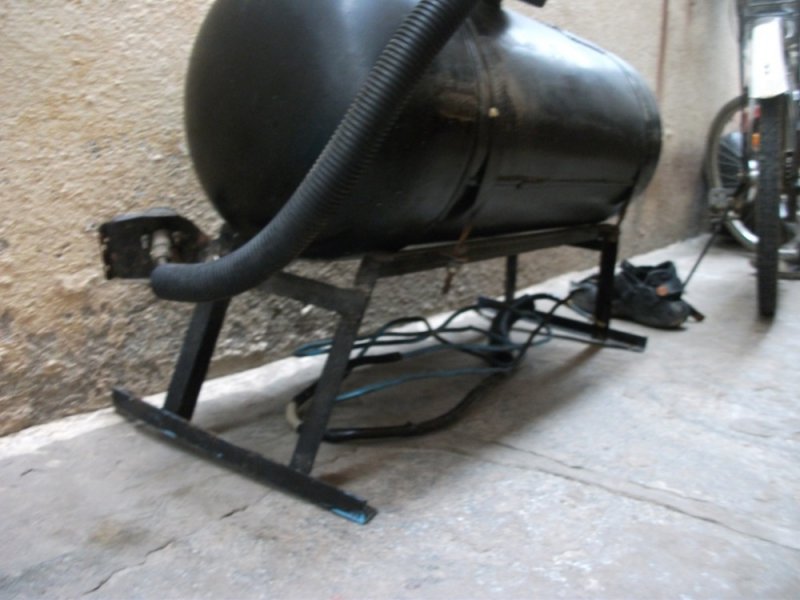
The gas lines (Copper tubes, easy to bend, not safe to reuse this)


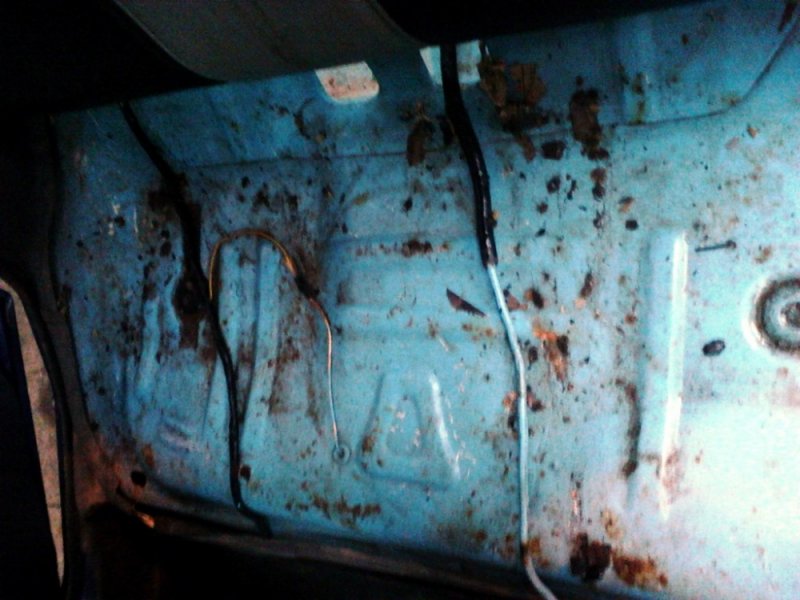
The empty holes now on the floor due to the gas tank mount, it had previously


Removed the back seat to check floor condition (nasty surprise = water + mud + newspaper!)


more pics

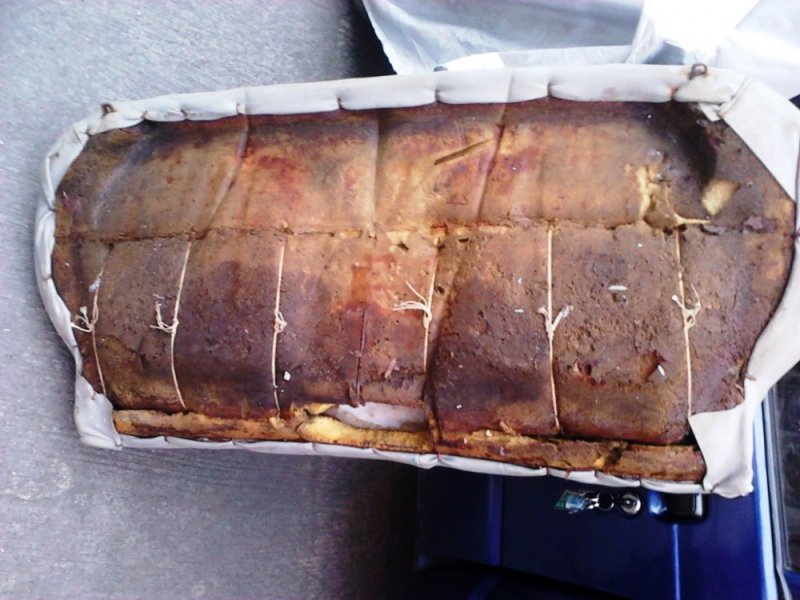
The mats & plastic cladding out

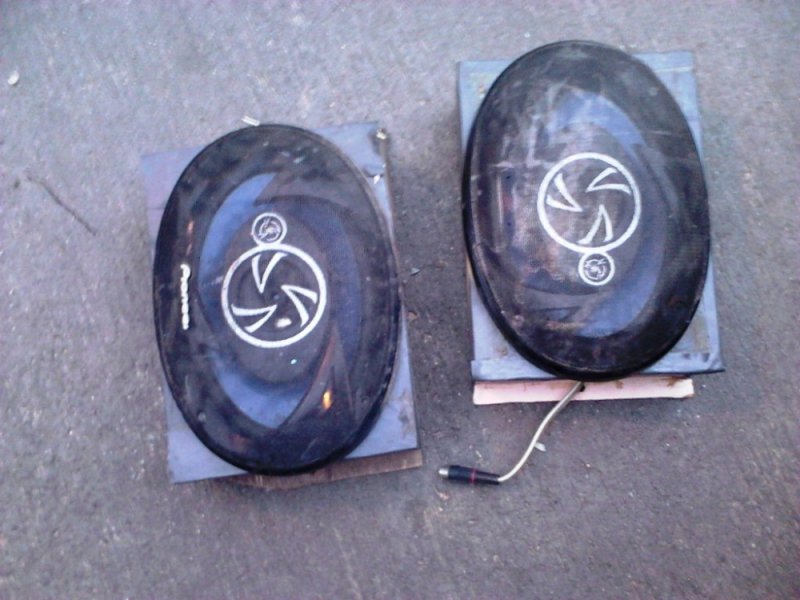
The most horrible speakers seen so far & fit in the least expected place
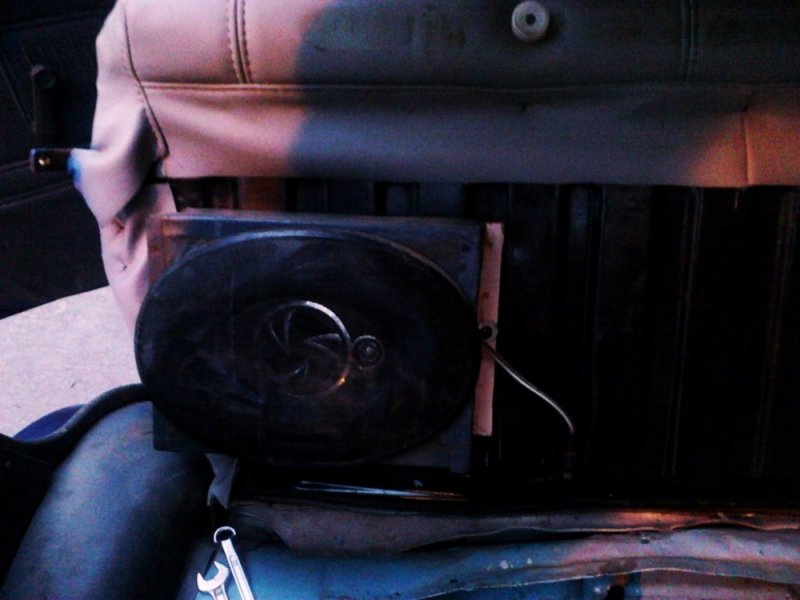

They are out too..
Here is the dyno spec sheet (sorry for blurry pic, my digicam has given up)

Managed to pull out the tank before sunrise & here are the updates...
The gas lines (Copper tubes, easy to bend, not safe to reuse this)
The empty holes now on the floor due to the gas tank mount, it had previously
Removed the back seat to check floor condition (nasty surprise = water + mud + newspaper!)
more pics
The mats & plastic cladding out
The most horrible speakers seen so far & fit in the least expected place
They are out too..
Here is the dyno spec sheet (sorry for blurry pic, my digicam has given up)
Thread Starter
#19
The Dynamo Challenge
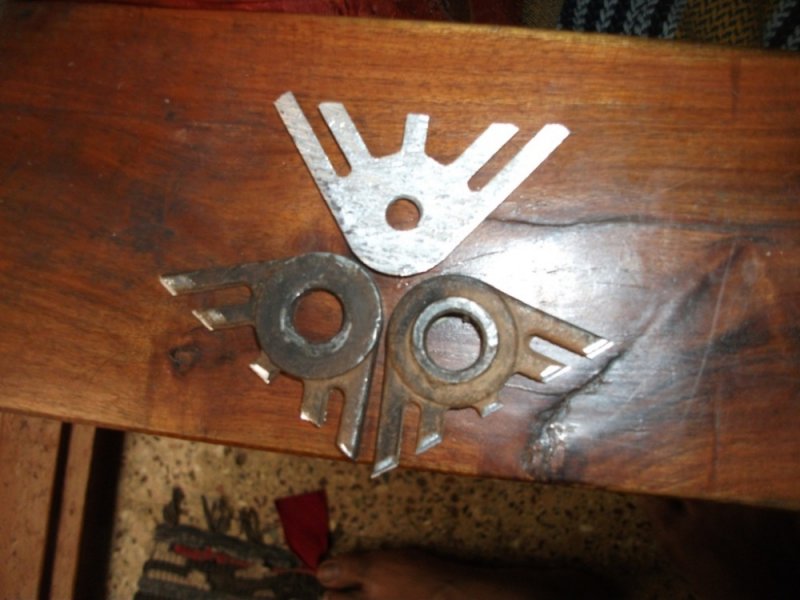
My father helped me in reducing the size of the mounting area on the WagonR alternator, by cutting it with axa blade & later a little sand paper work. Here are the updates...
The pieces cut out from the alty
Now the alty looks like this,


Still the Alty does not fit on the stock mounts see the 1mm extra clearance required in the pic


Took a file & started rubbing off the welded nut in the mount, to create extra space in for the alty to sit in.


One problem solved & here is the next, the top mount wont fit now, so will have to come up with something soon for this too.

The hole in the alty & the mount adjustment gap are not lined properly...

Placed an ad on Quikr for the LPG kit to be sold & waiting for response from them too..
My father helped me in reducing the size of the mounting area on the WagonR alternator, by cutting it with axa blade & later a little sand paper work. Here are the updates...
The pieces cut out from the alty
Now the alty looks like this,
Still the Alty does not fit on the stock mounts see the 1mm extra clearance required in the pic
Took a file & started rubbing off the welded nut in the mount, to create extra space in for the alty to sit in.
One problem solved & here is the next, the top mount wont fit now, so will have to come up with something soon for this too.
The hole in the alty & the mount adjustment gap are not lined properly...
Placed an ad on Quikr for the LPG kit to be sold & waiting for response from them too..
Re: Restoration of Maruti 800 1991 (Tonnes of Pics Uploaded)
ss80,
Man, amazing work accompanied with detailed snaps. It feels that you rejoice every moment you spend working on the car!
ss80,
Man, amazing work accompanied with detailed snaps. It feels that you rejoice every moment you spend working on the car!
Re: Restoration of Maruti 800 1991 (Tonnes of Pics Uploaded)
What !!![[surprise]](https://www.theautomotiveindia.com/forums/images/smilies/Surprise.gif "Surprise [surprise]") Cutting the alty with axa blade ... Why dint you take it to a lathe to get it done.
Cutting the alty with axa blade ... Why dint you take it to a lathe to get it done.
For the adjustable mount (top) mine was bent accordingly. Just remove and hammer it accordingly.
What about the pulley ? I would suggest you to get the waggy's alty pulley machined to fit v belt. It has a set of advantages too, smaller the pulley it runs on higher rpm than the engine so you wont face shortage of power at idle speed. I have the same issue now. This helps in lesser load on engine in idle & low rpms. Also engine vibration can be controlled..
What !!
Cutting the alty with axa blade ... Why dint you take it to a lathe to get it done. For the adjustable mount (top) mine was bent accordingly. Just remove and hammer it accordingly.
What about the pulley ? I would suggest you to get the waggy's alty pulley machined to fit v belt. It has a set of advantages too, smaller the pulley it runs on higher rpm than the engine so you wont face shortage of power at idle speed. I have the same issue now. This helps in lesser load on engine in idle & low rpms. Also engine vibration can be controlled..
Re: Restoration of Maruti 800 1991 (Tonnes of Pics Uploaded)
hi ss80
nice work done![[clap]](https://www.theautomotiveindia.com/forums/images/smilies/Clap.gif "Clap [clap]")
i need to install kit in my 800 if u dont mind can i take yours (you removed from your car)
if possible
hi ss80
nice work done
i need to install kit in my 800 if u dont mind can i take yours (you removed from your car)
if possible
Thread Starter
#24
Pause for today
My problem is I spend almost 13hrs at work (includes travel) & then I am free for few hours before I sleep. this way I am sleeping when the usual welding & milling shops are working & when I am awake they are yet to open shutter. So may be I have to do this one too as a DIY.
Thanks a lot
I am struggling to remove that pulley, not sure how I am going to take it out.
As you know I am selling it for money, so I would prefer someone in Bangalore itself who can collect it from my home & get it fixed somewhere. I purposely discarded the copper tubes, connectors (for picture sake I ha dlept it with me) of the LPG kit as it would be a big risk for the buyer to use them again, I am not sure what kind of buyer will buyer will buy that kit, so dint want to give an opportunity for someone to do a fatal cum cost-cutting act. I guess couriering it will add unnecessary cost to it & we both would lose money on it.
Waiting for the alty to fit into the car, then planning to spray the floor with 3m under rust coat, it might look like this car. (pic below) In the meantime I am also thinking of dismantling the alty & cleaning the outer aluminium case with thinner ro something like that.
Why don't you get that top bracket made at the milling center?You just need the curve to be a bit higher.
ss80,
Man, amazing work accompanied with detailed snaps. It feels that you rejoice every moment you spend working on the car!
Man, amazing work accompanied with detailed snaps. It feels that you rejoice every moment you spend working on the car!
What !! Cutting the alty with axa blade ... Why dint you take it to a lathe to get it done.
For the adjustable mount (top) mine was bent accordingly. Just remove and hammer it accordingly.
Is it really that simple? so do I need to drill & make that hole a big bigger to fit the alty?
What about the pulley ? I would suggest you to get the waggy's alty pulley machined to fit v belt. It has a set of advantages too, smaller the pulley it runs on higher rpm than the engine so you wont face shortage of power at idle speed. I have the same issue now. This helps in lesser load on engine in idle & low rpms. Also engine vibration can be controlled..
Cutting the alty with axa blade ... Why dint you take it to a lathe to get it done. For the adjustable mount (top) mine was bent accordingly. Just remove and hammer it accordingly.
Is it really that simple? so do I need to drill & make that hole a big bigger to fit the alty?
What about the pulley ? I would suggest you to get the waggy's alty pulley machined to fit v belt. It has a set of advantages too, smaller the pulley it runs on higher rpm than the engine so you wont face shortage of power at idle speed. I have the same issue now. This helps in lesser load on engine in idle & low rpms. Also engine vibration can be controlled..
hi ss80
nice work done
i need to install kit in my 800 if u dont mind can i take yours (you removed from your car) if possible
nice work done
i need to install kit in my 800 if u dont mind can i take yours (you removed from your car) if possible
Waiting for the alty to fit into the car, then planning to spray the floor with 3m under rust coat, it might look like this car. (pic below) In the meantime I am also thinking of dismantling the alty & cleaning the outer aluminium case with thinner ro something like that.
Attachments
-
 57.7 KB Views: 2,175
Thread Starter
#25
First Failure
I tried to open the dynamo to clean it but failed, as the pulley just wont come out. SO went ahead & dipped in thinner & did some brushing. A lot of muck came out of it but when I tried to tighten all the bolts I got to know that there is something wrong & that pulley is not rotating freely.
Here is the procedure to destroy a alternator![[cry]](https://www.theautomotiveindia.com/forums/images/smilies/Cry.gif "Cry [cry]")

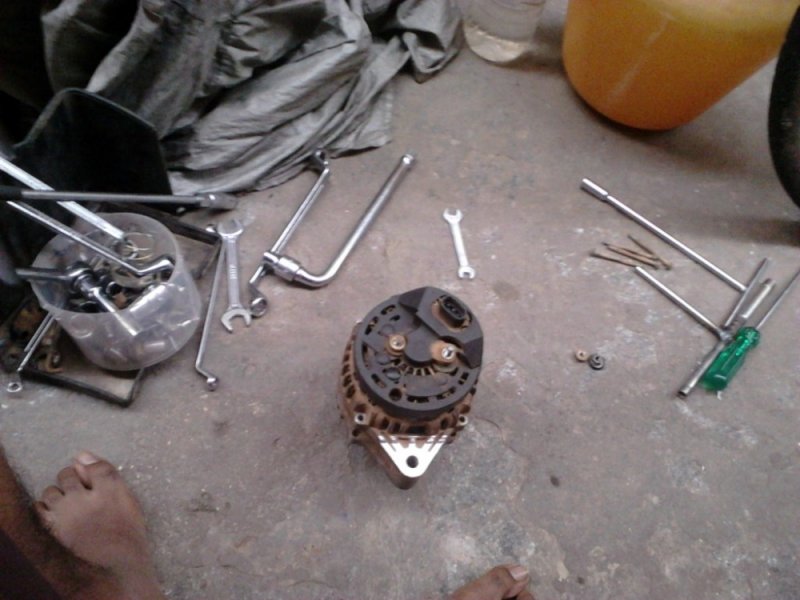


I took the alternator to the auto electricals shop & later to the lathe - sorry cant open it. I took it to my known friend on J.C.Road who told me the exact problem with the alternator, my thinner idea has literally melted some parts within the alternator & 90% chances are there that the rectifier wont work now. Replacing rectifier will cost more than 1K, pulley swap just not possible without opening the whole alternator.
Some news about alternators:
1. Always skip MICO/Bosch dynamos for such mod purposes, as their design is such that the pulley cant be swapped to a different type one without expensive labour (not all but the one that I have is always troublesome)
2. Maximum parts sharing happens between TVS alternators, so its very easy to swap pulleys etc
3. Easiest to fix, cheapest to buy as used one is the Denso (least troublesome as per the electrcians words)
This is a major set back as I had just managed to get the mounting etc properly bent & filed to fix the new alternator. Also dumped my old cheap speakers as an exchange for the alternator socket (Yes! I got that too). Now since the dynamo has gone kaput, I am planning to get back to the regular one/ a refurbished Zen (denso make) dynamo.
So there goes my 2K to the bin![[frustration]](https://www.theautomotiveindia.com/forums/images/smilies/Frustration.gif "Frustration [frustration]") & a couple of days of sleepless hard work.
& a couple of days of sleepless hard work.
I tried to open the dynamo to clean it but failed, as the pulley just wont come out. SO went ahead & dipped in thinner & did some brushing. A lot of muck came out of it but when I tried to tighten all the bolts I got to know that there is something wrong & that pulley is not rotating freely.
Here is the procedure to destroy a alternator
I took the alternator to the auto electricals shop & later to the lathe - sorry cant open it. I took it to my known friend on J.C.Road who told me the exact problem with the alternator, my thinner idea has literally melted some parts within the alternator & 90% chances are there that the rectifier wont work now. Replacing rectifier will cost more than 1K, pulley swap just not possible without opening the whole alternator.
Some news about alternators:
1. Always skip MICO/Bosch dynamos for such mod purposes, as their design is such that the pulley cant be swapped to a different type one without expensive labour (not all but the one that I have is always troublesome)
2. Maximum parts sharing happens between TVS alternators, so its very easy to swap pulleys etc
3. Easiest to fix, cheapest to buy as used one is the Denso (least troublesome as per the electrcians words)
This is a major set back as I had just managed to get the mounting etc properly bent & filed to fix the new alternator. Also dumped my old cheap speakers as an exchange for the alternator socket (Yes! I got that too). Now since the dynamo has gone kaput, I am planning to get back to the regular one/ a refurbished Zen (denso make) dynamo.
So there goes my 2K to the bin
& a couple of days of sleepless hard work.Re: Restoration of Maruti 800 1991 (Tonnes of Pics Uploaded)
As advised before you could have cleaned the alty only on outside.
But no issues, get the atly I will try to get it working..
Pulleys can be changed.
As advised before you could have cleaned the alty only on outside.
But no issues, get the atly I will try to get it working..
Pulleys can be changed.
Thread Starter
#27
Thread Starter
#28


Thread Starter
#29
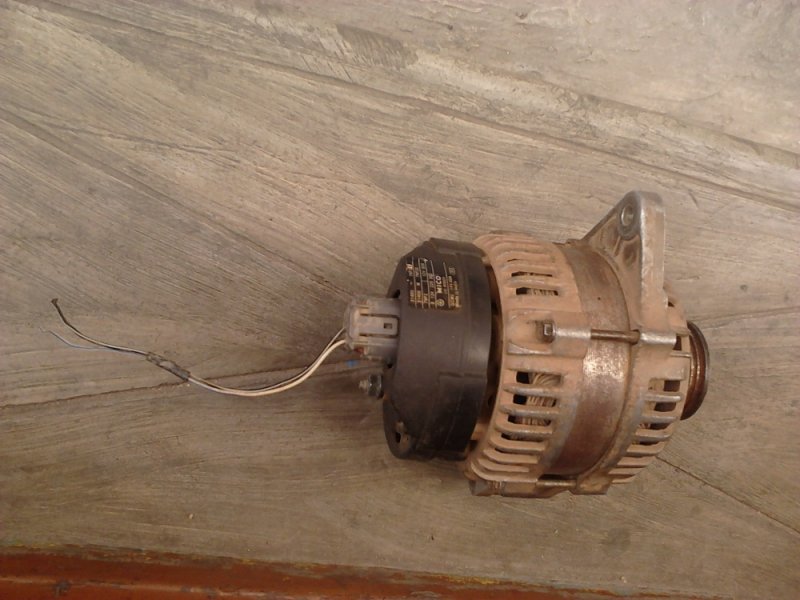
Almost new dynamo bought
After thinking about it for sometime, I felt the fight with the used dynamo will only delay the restoration further. So went ahead & contacted a known person who wanted to sell his sparingly used (less than 2months used) TVS Lucas dynamo.
Here are the pics:-
TVS LUCAS
12V 40A


The condition is really good (not much dirt/anything of that sort. Price was a bit high but then its better than all other options I have at present. The other 60A dynamo will take time to get fixed & once that is ready, that will get into this car for sure.
After thinking about it for sometime, I felt the fight with the used dynamo will only delay the restoration further. So went ahead & contacted a known person who wanted to sell his sparingly used (less than 2months used) TVS Lucas dynamo.
Here are the pics:-
TVS LUCAS
12V 40A
The condition is really good (not much dirt/anything of that sort. Price was a bit high but then its better than all other options I have at present. The other 60A dynamo will take time to get fixed & once that is ready, that will get into this car for sure.
Re: Restoration of Maruti 800 1991 (Tonnes of Pics Uploaded)
Good decision of switching to another dynamo. As the alternator is an electromagnetic device, i think, immersing it in thinner is not good. Special tools may also be needed for alternator work. Moreover, you might have checked for pulley position before purchasing. Because Alternator pulley plays vital role, smaller the pulley more the RPM of Alternator, so more current. Latest pulleys are made with sheet metal which are light weight, as the old ones are with cast steel. With little knowledge I am saying these and Correct me if i am wrong. The new one you bought seems to be decent, with which you can proceed for your restoration.
Good decision of switching to another dynamo. As the alternator is an electromagnetic device, i think, immersing it in thinner is not good. Special tools may also be needed for alternator work. Moreover, you might have checked for pulley position before purchasing. Because Alternator pulley plays vital role, smaller the pulley more the RPM of Alternator, so more current. Latest pulleys are made with sheet metal which are light weight, as the old ones are with cast steel. With little knowledge I am saying these and Correct me if i am wrong. The new one you bought seems to be decent, with which you can proceed for your restoration.
Last edited:
- Status
- Not open for further replies.