DSLR - How To Make Your Photos Stand Out.


Thread Starter #1
Joined
Jan 17, 2011
Messages
1,736
Likes
2,545
Location
Hosur/Chennai
Hi,

We have a threads on 'your best photographs' and 'DSLR thread".

In the best photographs thread, we just post pictures and people either say "wow" or simply keep quiet.

In the DSLR thread, we talk about which camera we are buying or something like that.

We have a lot of good, experienced photographers going by the pictures posted in the threads.

It would be great if they provide some comments and constructive criticism to help others to improve their photographic skills.

What I mean is, C&C on exposure, composition, HDR, etc.

Members like jayadev, Vikram31, Nuvo, codename47, (just to name a few), can pitch in and help others.

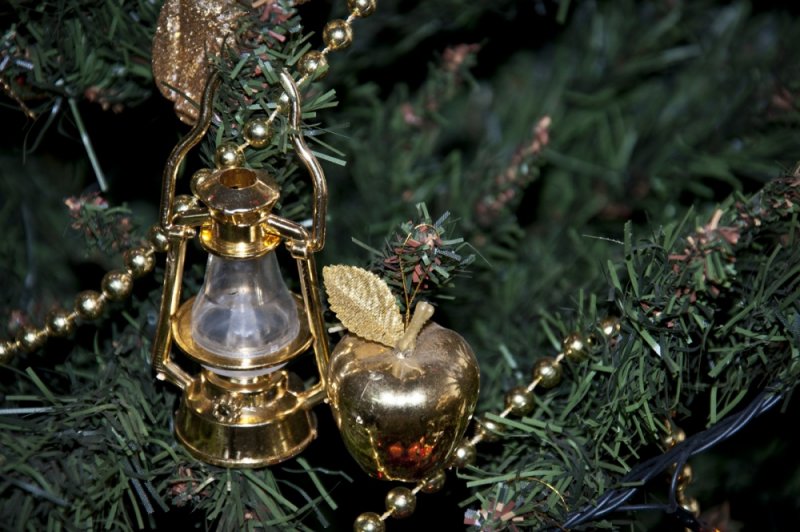
For starters I am putting up 2 shots I took this Christmas for C&C. Both in auto mode, as I do not yet have a tripod to take low light images.
 

Attachments

Last edited:
Joined
Aug 22, 2009
Messages
2,977
Likes
27
Location
India
well this will be very knowledgeable thread for newbies if experts post their views!! can they send any spl. tips for using normal cams also?? :tongue:
 
Thread Starter #3
Joined
Jan 17, 2011
Messages
1,736
Likes
2,545
Location
Hosur/Chennai
I am now learning the Rule of thirds.


The rule of thirds is a compositional rule of thumb in visual arts such as painting, photography and design. The rule states that an image should be imagined as divided into nine equal parts by two equally-spaced horizontal lines and two equally-spaced vertical lines, and that important compositional elements should be placed along these lines or their intersections. Proponents of the technique claim that aligning a subject with these points creates more tension, energy and interest in the composition than simply centering the subject would. - wikipedia

You can read more from the internet.
 
Last edited by a moderator:
Joined
Nov 13, 2011
Messages
398
Likes
30
Location
City of Pearls
The ROT is just a "Rule" many of the photographers & Painters sometimes shift away from even applying the rule. However for beginners this helps understand composition in various areas easily.
 
Thread Starter #5
Joined
Jan 17, 2011
Messages
1,736
Likes
2,545
Location
Hosur/Chennai
More about the Rule of Thirds from digital-photography-school.com. I find this website a good place to learn tips about composition, exposure, DOP, etc.

"Perhaps the most well know principle of photographic composition is the ‘Rule of Thirds‘.

The “Rule of Thirds” one of the first things that budding digital photographers learn about in classes on photography and rightly so as it is the basis for well balanced and interesting shots.

I will say right up front however that rules are meant to be broken and ignoring this one doesn’t mean your images are necessarily unbalanced or uninteresting. However a wise person once told me that if you intend to break a rule you should always learn it first to make sure your breaking of it is all the more effective!


What is the Rule of Thirds?

The basic principle behind the rule of thirds is to imagine breaking an image down into thirds (both horizontally and vertically) so that you have 9 parts. As follows.

200604301314.jpg

As you’re taking an image you would have done this in your mind through your viewfinder or in the LCD display that you use to frame your shot.

With this grid in mind the ‘rule of thirds’ now identifies four important parts of the image that you should consider placing points of interest in as you frame your image.

Not only this – but it also gives you four ‘lines’ that are also useful positions for elements in your photo.

200604301317.jpg

The theory is that if you place points of interest in the intersections or along the lines that your photo becomes more balanced and will enable a viewer of the image to interact with it more naturally. Studies have shown that when viewing images that people’s eyes usually go to one of the intersection points most naturally rather than the center of the shot – using the rule of thirds works with this natural way of viewing an image rather than working against it.

200605022117.jpg

In addition to the above picture of the bee where the bee’s eye becomes the point of focus here are some of examples:


200604301255.jpg

In this image I’ve purposely placed the head of my subject on one of the intersecting points – especially his eyes which are a natural point of focus for a portrait. His tie and flower also take up a secondary point of interest.

200604301258.jpg

In this shot I’ve placed the subject along a whole line which means she is considerably off center and therefore creating an additional point of interest. Placing her right in the center of the frame could have resulted in an ‘awkward’ shot.

In a similar way a good technique for landscape shots is to position horizons along one of the horizontal lines also as I’ve done with the following shot (I’ll let you imagine the lines).

IMG_2790.jpg

Using the Rule of Thirds comes naturally to some photographers but for many of us takes a little time and practice for it to become second nature.

In learning how to use the rule of thirds (and then to break it) the most important questions to be asking of yourself are:

What are the points of interest in this shot?
Where am I intentionally placing them?
Once again – remember that breaking the rule can result in some striking shots – so once you’ve learnt it experiment with purposely breaking it to see what you discover.

Lastly – keep the rule of thirds in mind as you edit your photos later on. Post production editing tools today have good tools for cropping and reframing images so that they fit within the rules. Experiment with some of your old shots to see what impact it might have on your photos."

courtesy www.digital-photography-school.com
 
Joined
Dec 1, 2011
Messages
3,155
Likes
2,036
Location
Pune
Excellent thread, great insights, can i also suggest tips on usage of iso etc or also publish it with the photos ?
 
Joined
Dec 1, 2011
Messages
3,155
Likes
2,036
Location
Pune
Attempted to take some shots of flowers closeup playing with the focus, HR, experts please suggest whats the best setting to go about doing something like this (no post processing done)

IMG_0622.jpg

IMG_0623.jpg

IMG_0625.jpg

IMG_0635.jpg
 
Last edited:
Thread Starter #9
Joined
Jan 17, 2011
Messages
1,736
Likes
2,545
Location
Hosur/Chennai
Nice shots.

If you are taking Raw, I would recommend some post processing to enhance the image. I prefer taking Raw, where I control the processing, instead of Jpg where the camera does the processing.

While taking flowers, won't it be better to have the camera low and take the shot of the flower standing out against the sky, if possible, where the background won't be cluttered? (ofcourse it depends on where the flower is facing...)

A shallower DOF would help in making the subject stand out.

I would not put the 3rd picture in the close-up category...

For the 4th picture I would have zoomed in or moved in closer to get a composition similar to the one below with a reduced the DOF, focused on one of the flowers. BTW, you are the best to judge as you were there and know the lighting and conditions at the time of clicking.[:)]

IMG_0635_a.jpg

We tend to have our visual focus in the viewfinder only on the subject while shooting. It will help us a lot if we study the areas around the subject in the frame before we click to see if there are any disturbing elements in the frame.

Take your time also to move around and take shots from different angles and then compare different compositions. (We will have this luxury only with stationary subjects)

Just my thoughts....

Great going.... hope to see many more Macro shots from you.
 
Joined
Sep 17, 2012
Messages
354
Likes
82
Location
Bangalore/Hosur
Good inputs with regards to Grid and moreover have seen most of some good photographers i know shoot in AV mode (aperture priority) mode when shooting portraits for blur effect, but i feel M mode (manual)bring the best out of you by trying all possible variations and i learn something more everyday when i shoot in M

Adding up some how i felt that the Grid and AF doesn't work fine and its should be done in MF when you try to make your image stand out using the rule of thirds

@Highway Ranger nice thread mate and a really good initiaitive by you

All please share some ideas and insights which you discover something new while you shoot in this thread there is no stop in learning when it comes to photography
 
Last edited:
Joined
Nov 10, 2012
Messages
1,121
Likes
472
Location
Bangalore
First of all, a big thank you to Highway_Ranger for this topic.
Secondly, thanks Iron_Rock for bringing the topic back in top. (Many deserved threads go unnoticed).

Very good initiative for those who want to find out the mistake and learn the composition.

@Iron_Rock
Loved the first photo. It would have even more appealing if the background was blurred (shallow depth of field)
Second pic :- Nice flower, but something distracts me. may be a different angle would have been better ? Or rule of third ? Zoom out ?
Third :- Nothing special - looked like a normal pic to me (sorry for being harsh)
Fourth : - Nice flowers again . As Highway_Ranger said, it would have been better if you had a zoomed tighter frame (with only background)

Please mention the camera /lens used .
If you guys wanted to try out lens before buying, there are many lens rental stores in Bangalore. just 250Rs onwards per day. I suggest you opt for that before buying any lens.

Thanks again for a good topic
 
Thread Starter #13
Joined
Jan 17, 2011
Messages
1,736
Likes
2,545
Location
Hosur/Chennai
Adding up some how i felt that the Grid and AF doesn't work fine and its should be done in MF when you try to make your image stand out using the rule of thirds
In my camera the center AF point is the sharpest. So I focus on that and then recompose...

Thanks HR will do!
Btw which post processing software do you use - what factors are typically played around ?
I use Adobe Camera Raw. If you are using the same, I can tell you the parameters that I normally adjust.

I mostly tweak the tonal adjustments, recover a bit of highlights and shadows and remove Lens chromatic aberrations/lens profile corrections. I find the HSL/Greyscale tab in ACR very useful, more so when we convert the image to greyscale. I apply a wee bit of sharpening in Photoshop after resizing.

@Iron_Rock
Second pic :- Nice flower, but something distracts me. may be a different angle would have been better ? Or rule of third ? Zoom out ?
To me the flower looks flat - no depth. That may be because it has been taken at that angle and the lighting. A different angle like you said should bring out more depth...

Thanks guys. We are all learning all the time and good to know different points of view. Only practice, and patience can make us better....... Don't forget to have fun and keep clicking...
 
Joined
Dec 1, 2011
Messages
3,155
Likes
2,036
Location
Pune
Thanks HR, Appus I am new to the DSLR world, so bear with me. Do share tips on reducing DOF and generally, hope to keep this thread alive and flowing.
 
Joined
Nov 10, 2012
Messages
1,121
Likes
472
Location
Bangalore
Thanks HR, Appus I am new to the DSLR world, so bear with me. Do share tips on reducing DOF and generally, hope to keep this thread alive and flowing.
Which camera and lens you use ? There are like plenty of nice tutorials (eg:lynda) where you actually feel watching it completely without yawn / sleep [sleep] (Some are dedicated to the particular camera)


I have lens of 70-300 without VR (cheaper, just 6K) 3.5 to 5.6 and 18-105 (stock) for my D7000

Normally, I zoom it from a distance with minimum aperture value (maximum aperture) i can select.

I am very bad at photoshop /color correction etc.
 

Top Bottom