The Mammoth GT - Royal Enfield Continental GT - November 2014


Thread Starter #106

deville_56

Honoured Member
Joined
Sep 11, 2009
Messages
2,974
Likes
4,815
Location
Trivandrum
December 2021 - Breaking the Brake

2021-12-19 14-52-49.jpg


Brembo calipers

2021-12-19 15-01-32.jpg


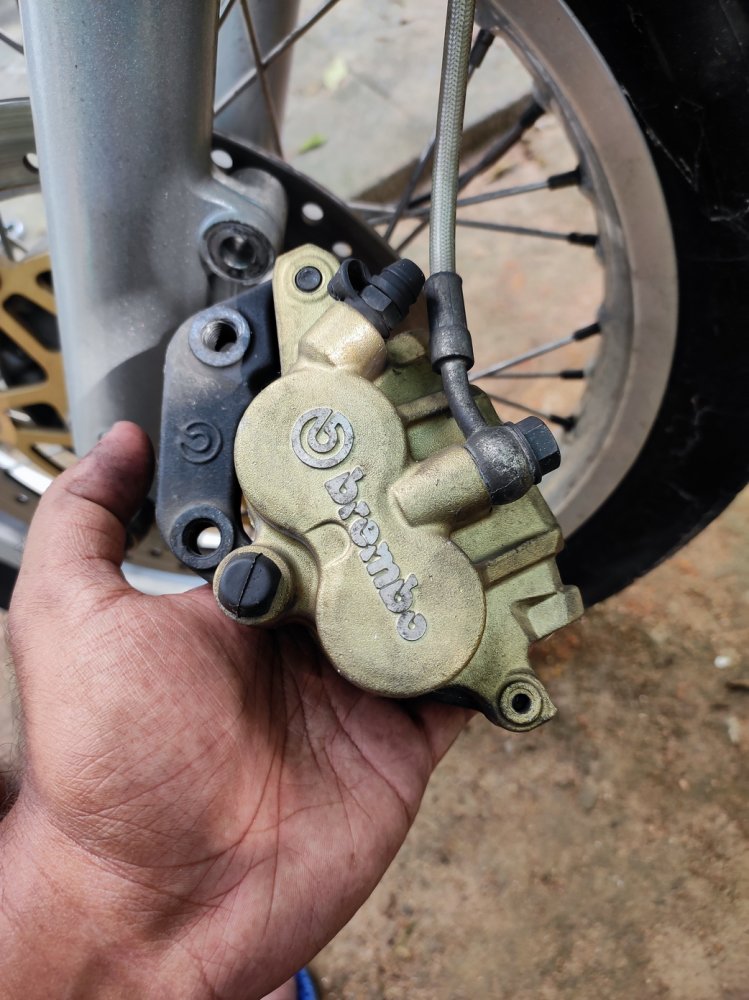
and worn out Brembo pads at 18k km.

2021-12-19 15-01-39.jpg
2021-12-19 15-01-41.jpg


Removing the caliper pin was a bit tricky. It won't budge like normal after removing the clips. You have got to hammer it with a small screwdriver bit (nail here) for it to pop out.

2021-12-19 15-05-59.jpg
2021-12-19 15-06-09.jpg


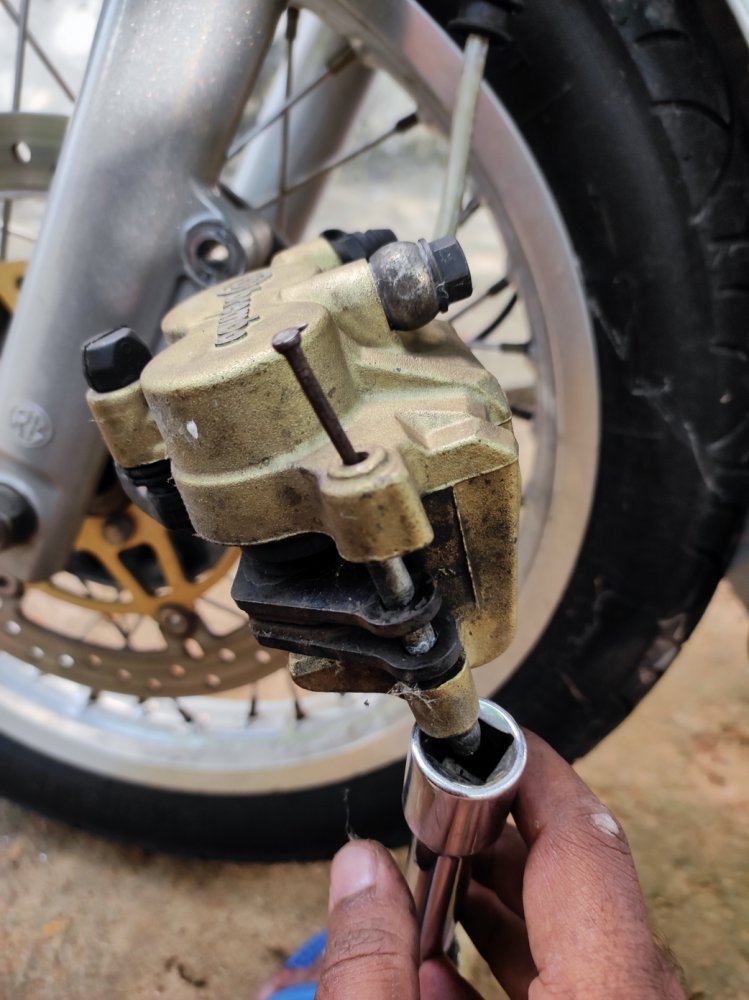
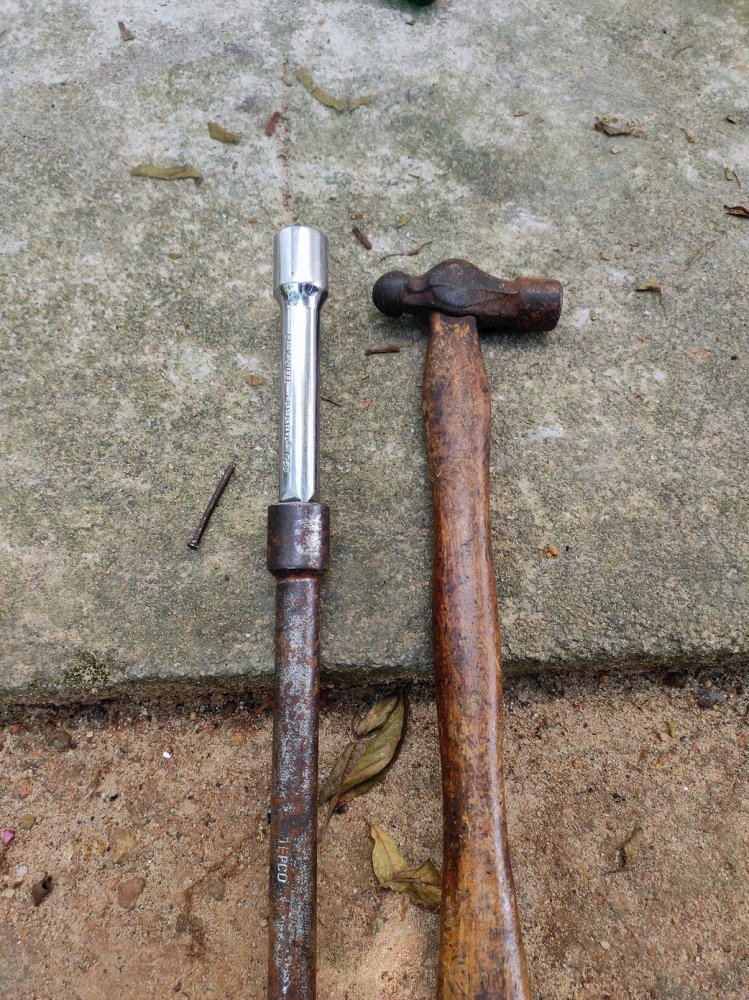
You need something to support from bottom while hammering. Used combo of 1/2 inch extension for that.

2021-12-19 15-06-39.jpg


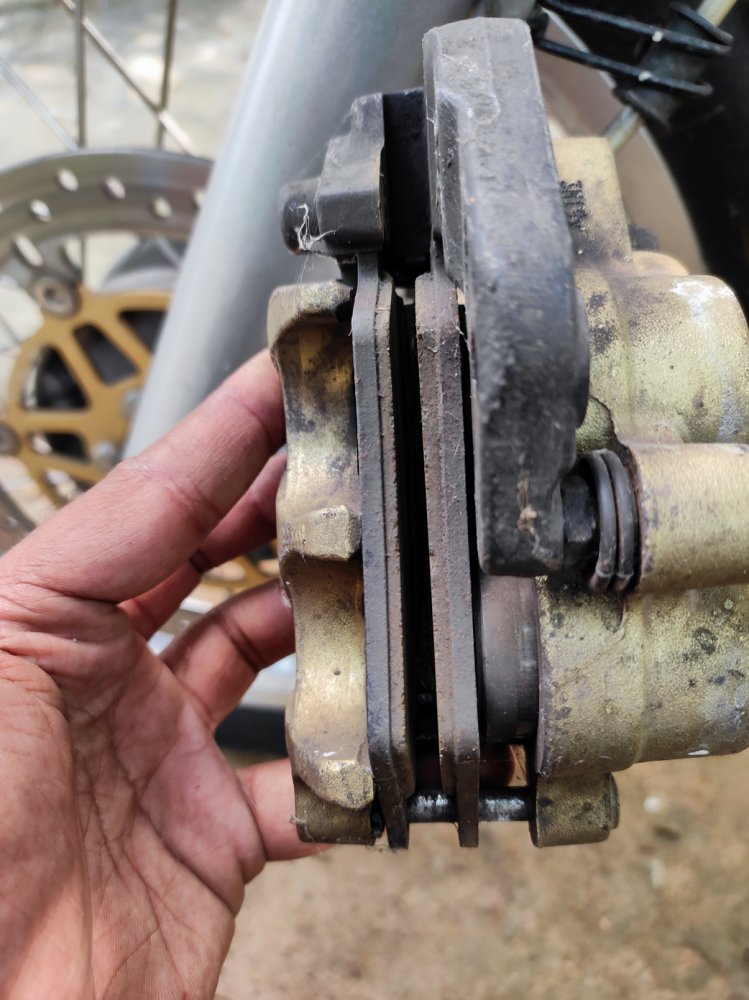
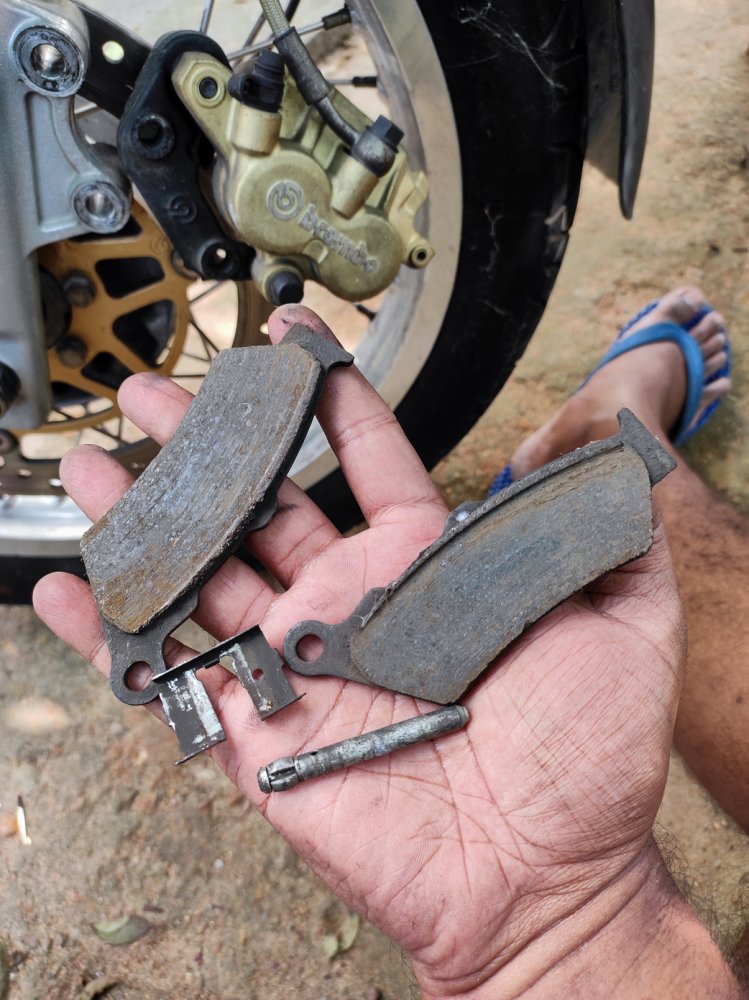
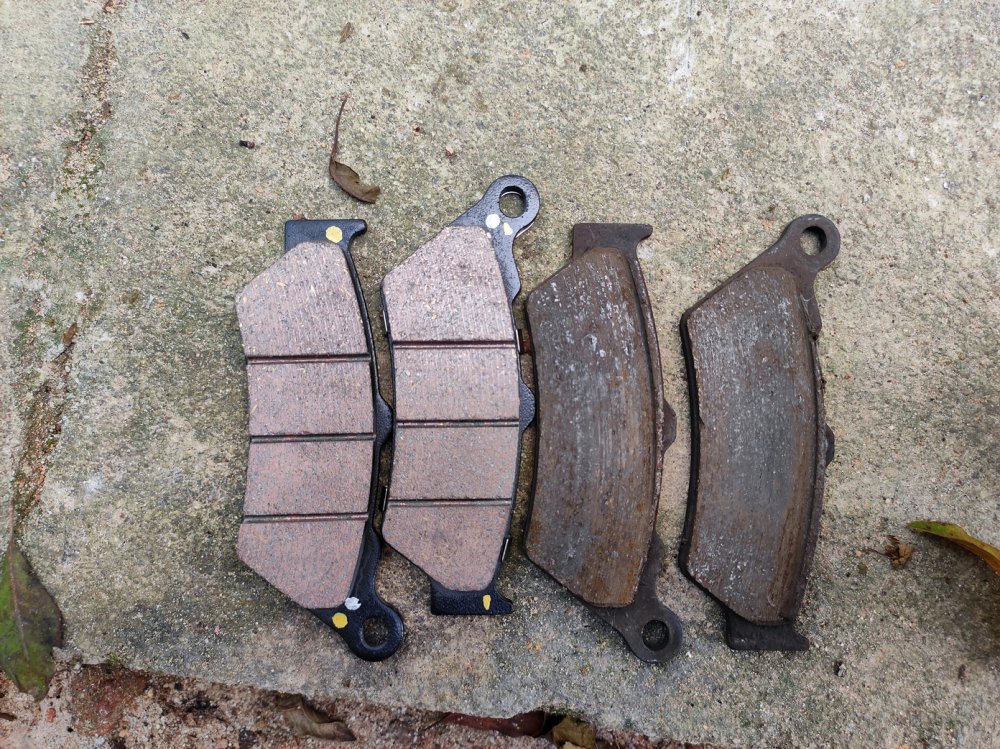
Condition of the pads. Wear indicator just made contact on one pad and the other had some more left. Perimeter was not making proper contact due to design flaw.

2021-12-19 15-07-09.jpg


Pistons got spacers.

2021-12-19 15-07-17.jpg


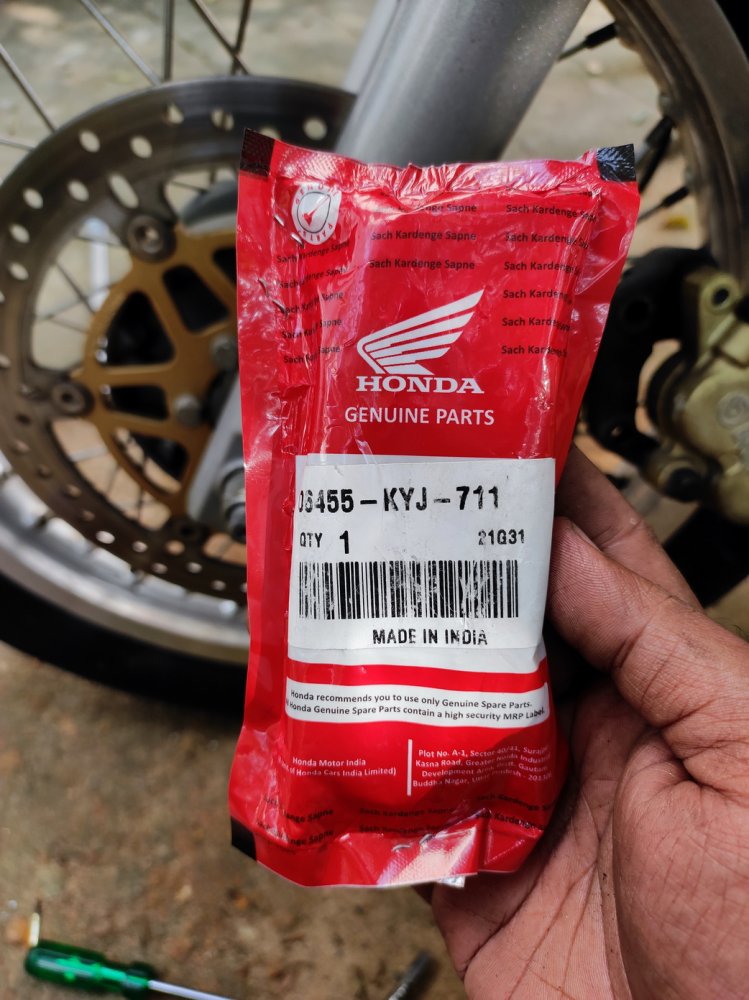
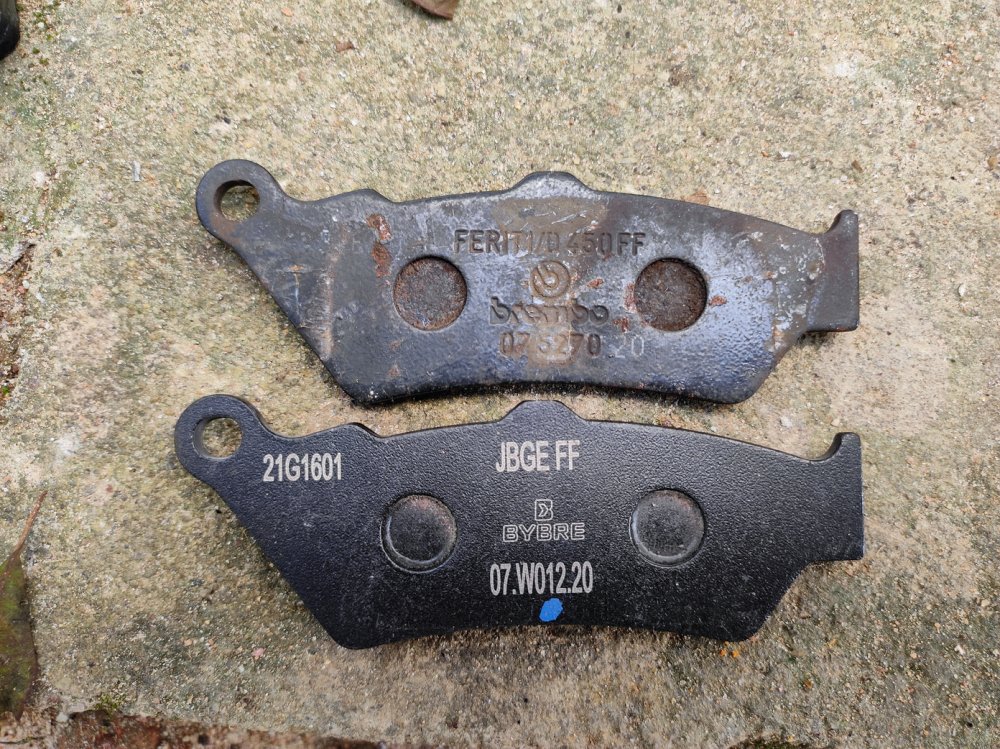
CBR 250 Non-ABS pads.

2021-12-19 15-08-50.jpg
2021-12-19 15-08-56.jpg
2021-12-19 15-09-38.jpg


Came with shim plate.
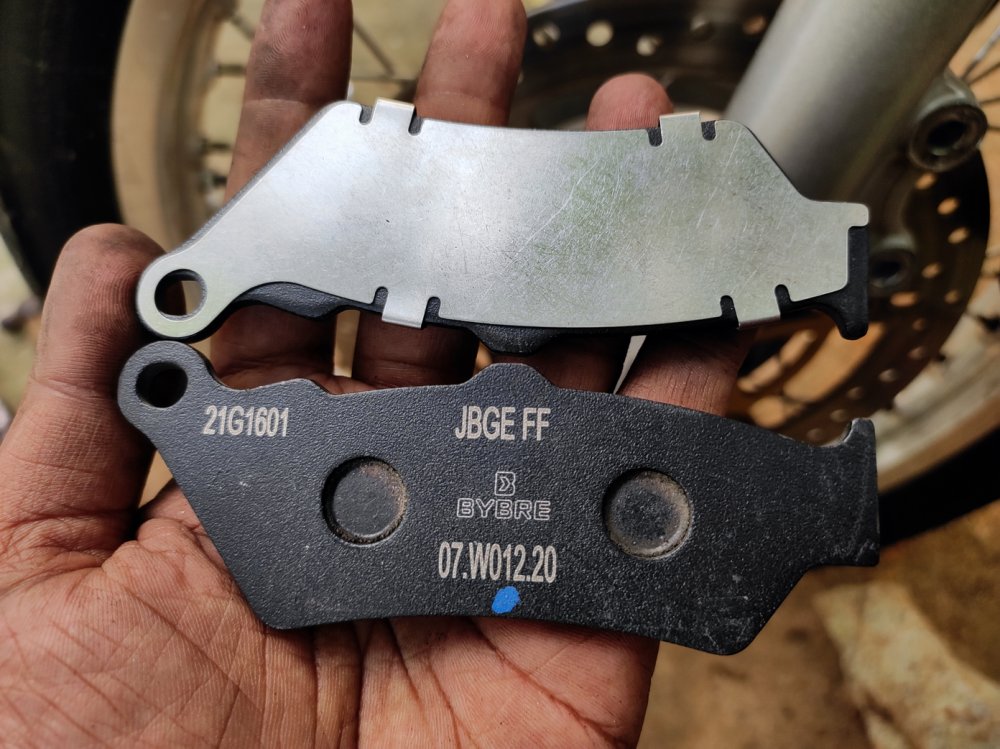
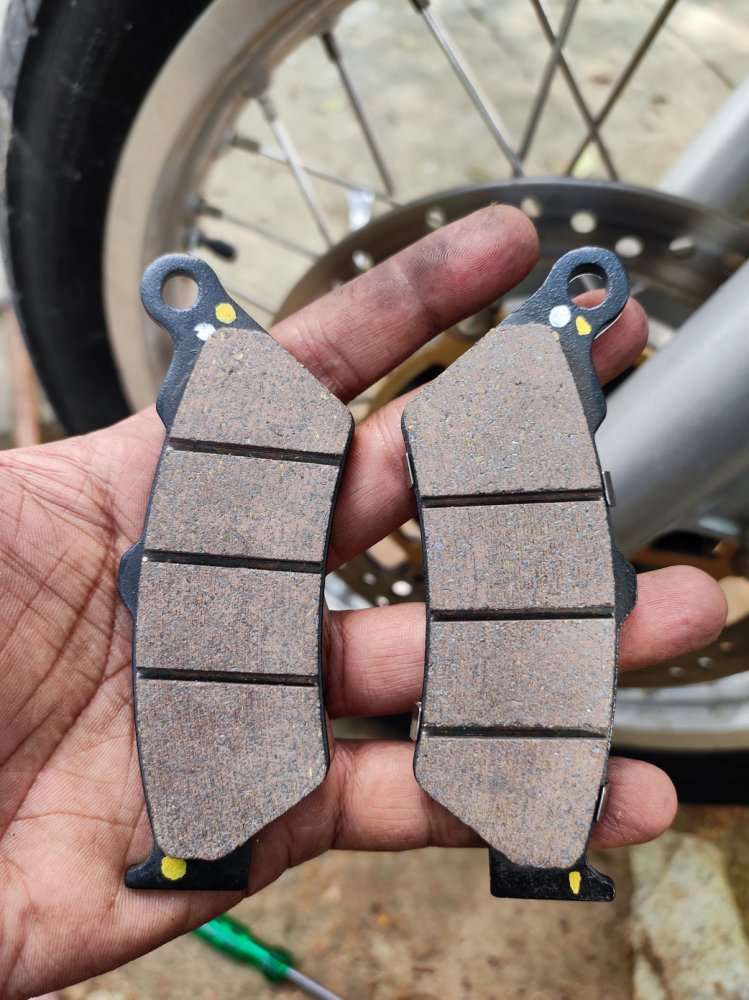
2021-12-19 15-10-04.jpg

2021-12-19 16-24-54.jpg


New vs. old.

2021-12-19 15-10-30.jpg


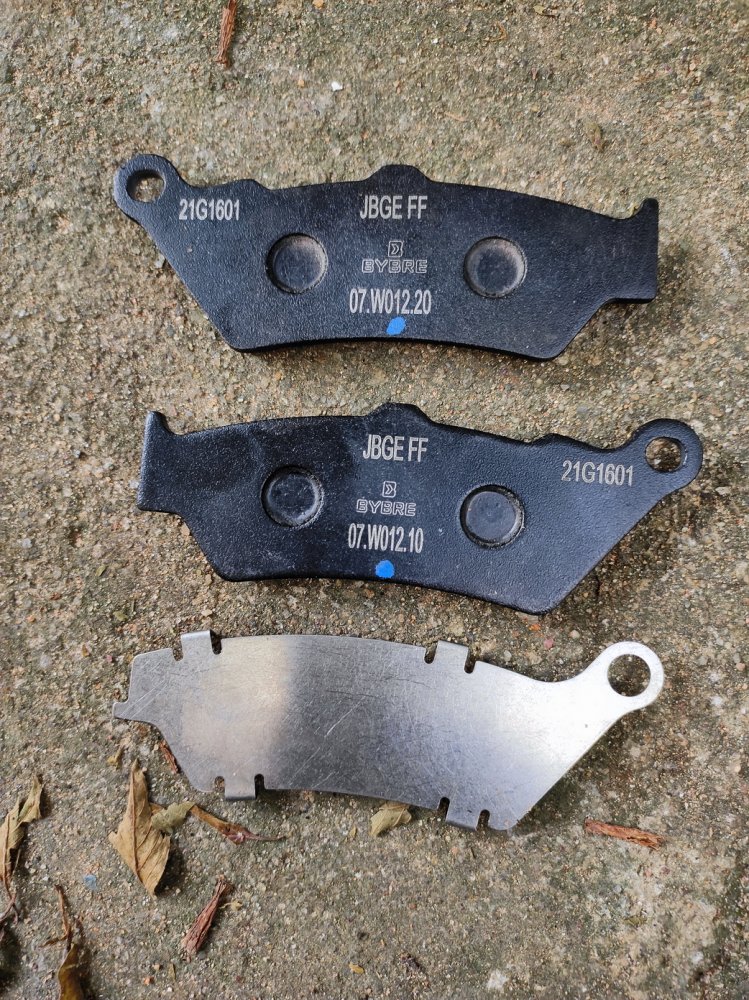
Parent vs subsidiary. Both FF braking gradient.

2021-12-19 15-10-53.jpg


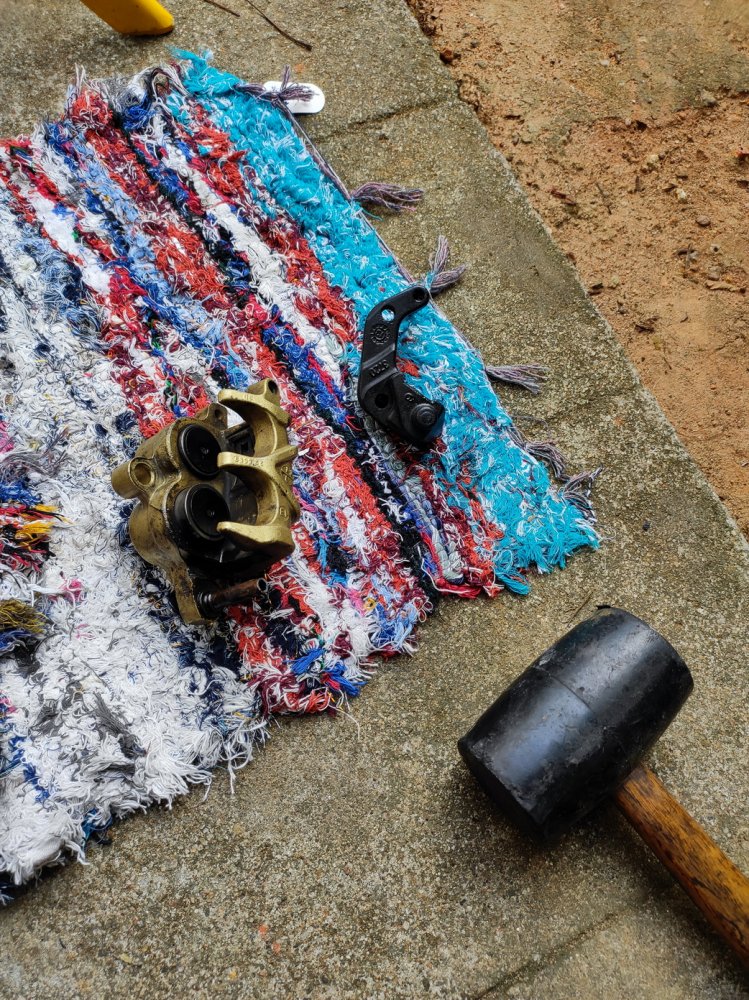
Road block. Caliper was jammed inside the rubber insulator/boots.

2021-12-19 15-22-57.jpg
2021-12-19 15-23-00.jpg


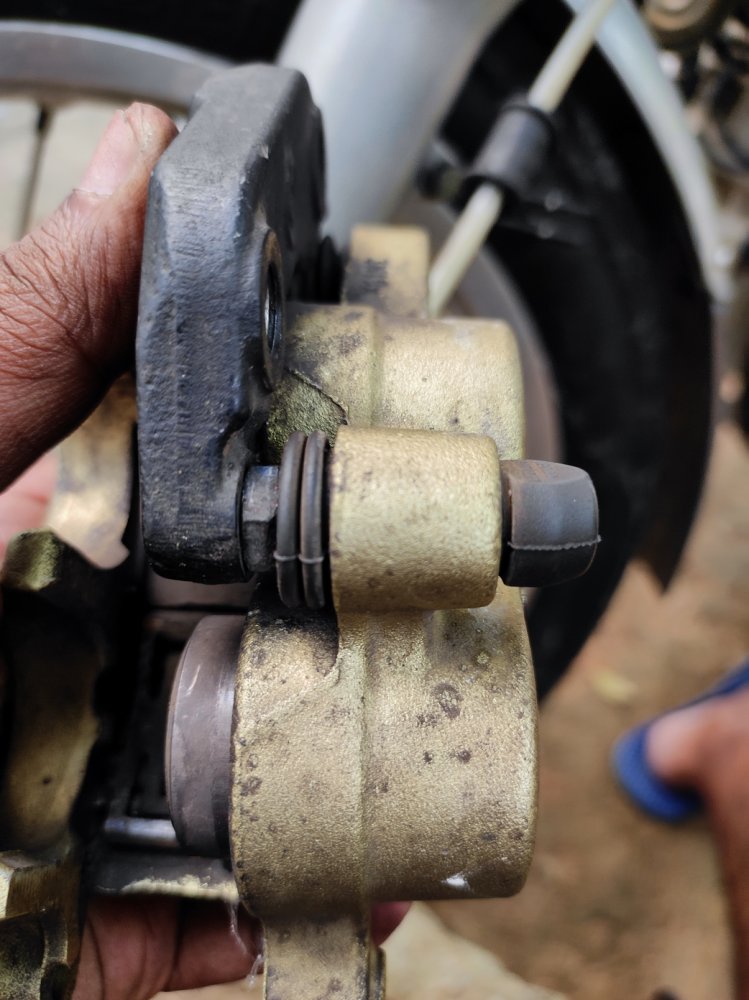
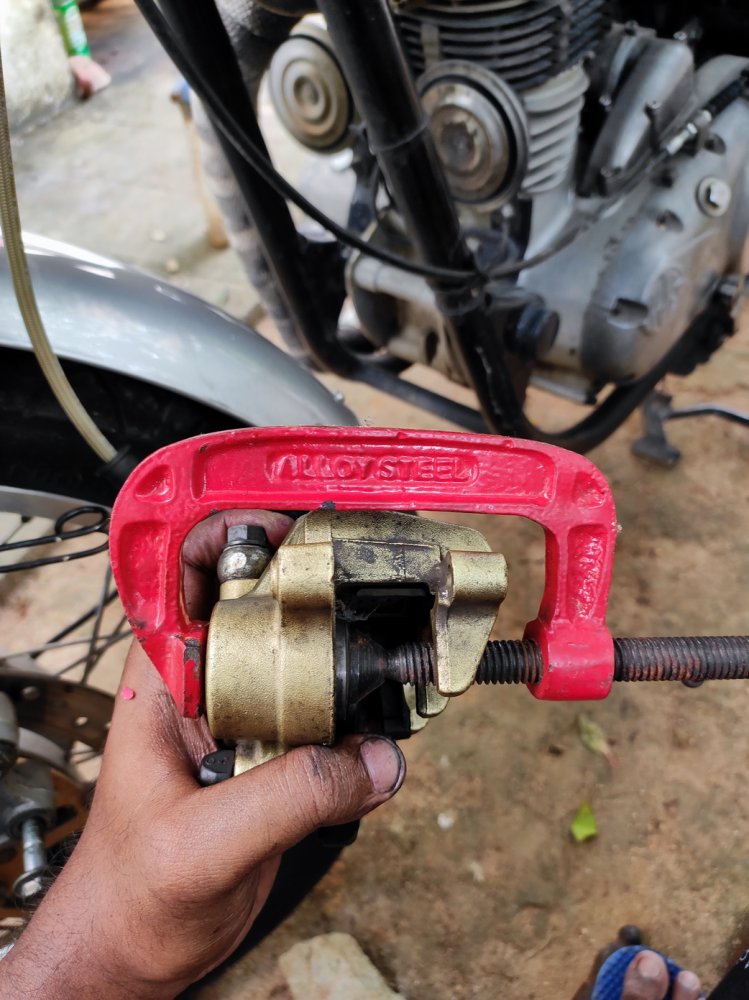
Had to remove the caliper from the bike. Handled with utmost care as Brembo parts can cost a bomb, but in the end, had to cut off the rubber parts.

2021-12-19 16-07-30.jpg
2021-12-19 16-11-51.jpg
2021-12-19 16-15-01.jpg


Red pill or blue pill?

2021-12-19 16-26-24.jpg


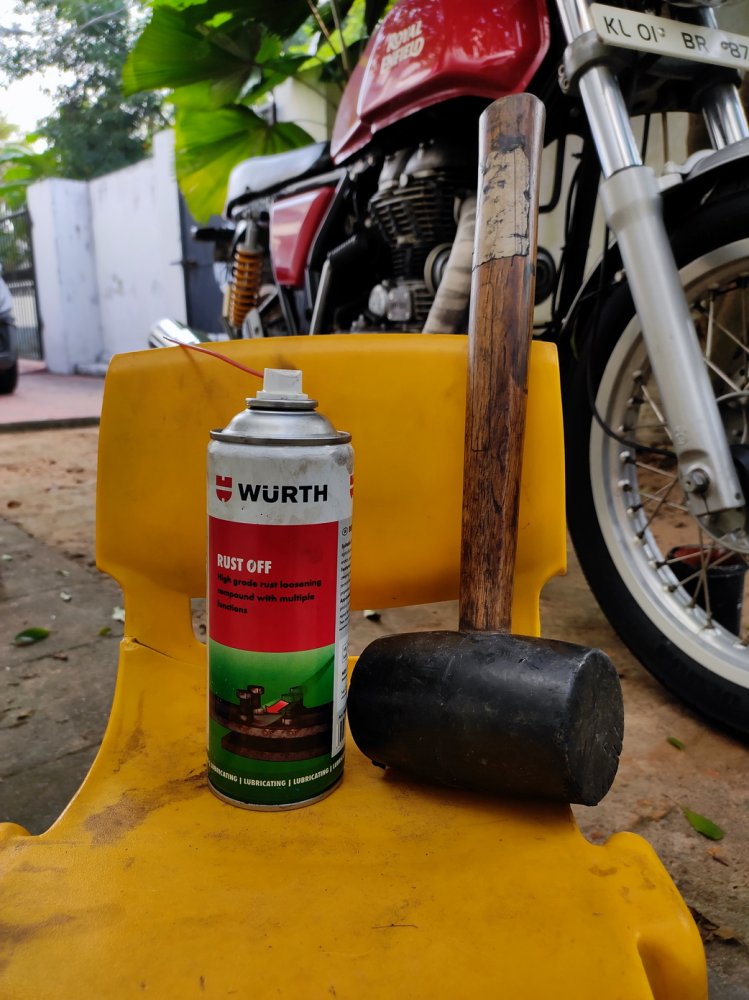
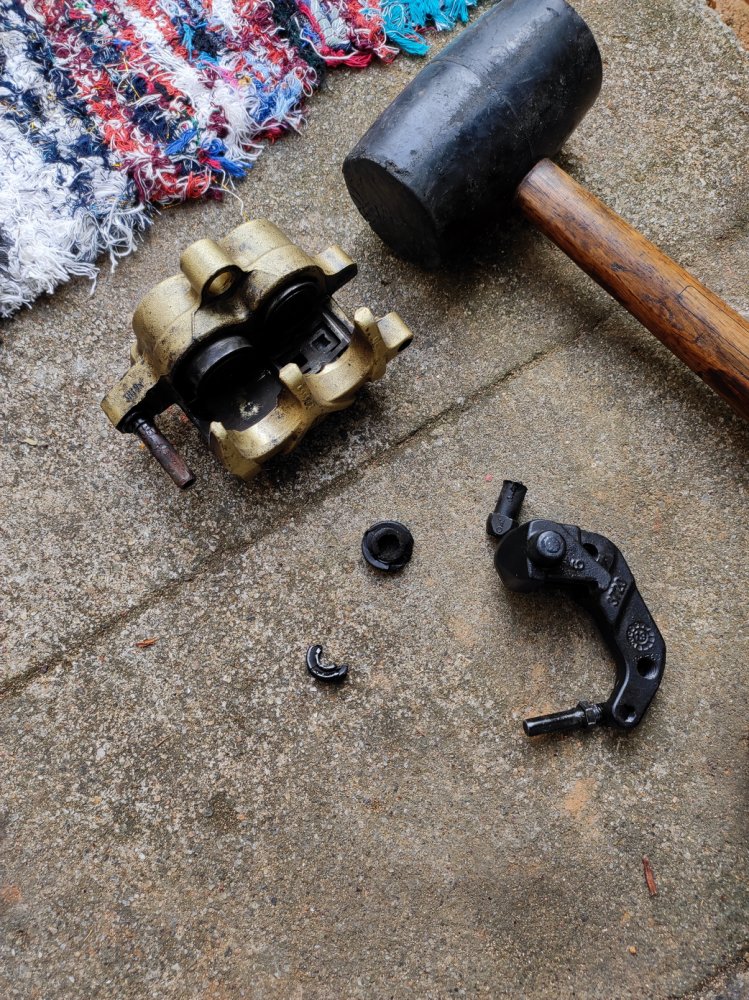
Sprayed rust off and hammered lightly and separated the bracket.

2021-12-19 16-17-45.jpg


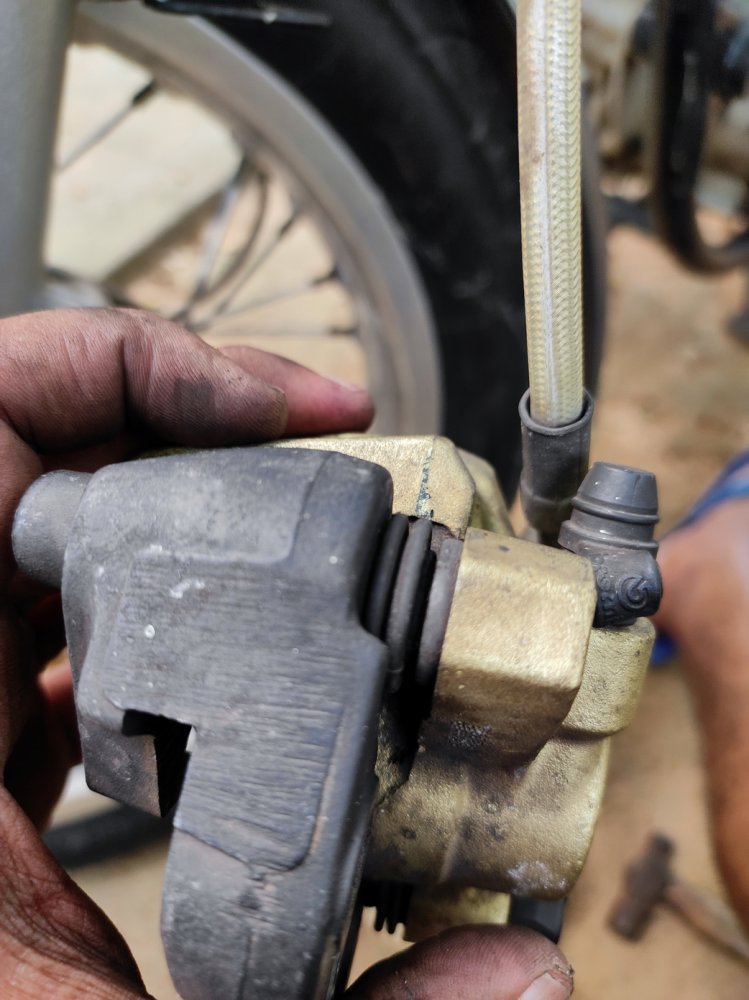
Remnants of the rubber parts, all of them carried Brembo name and part number and there was a sense of worry behind my head about the availability and (obviously/rather) price of them.

2021-12-19 16-19-24.jpg


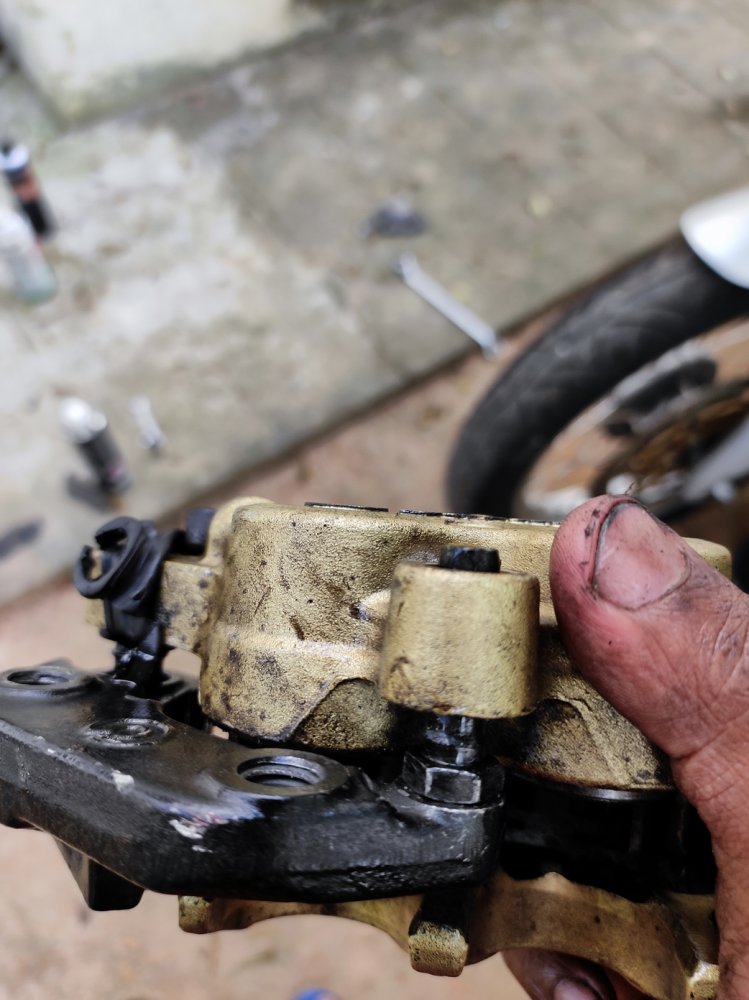
Rusted pin, root cause of the jam.

2021-12-19 16-19-59.jpg


Pushed back the pistons in anticipation of rebuilding.
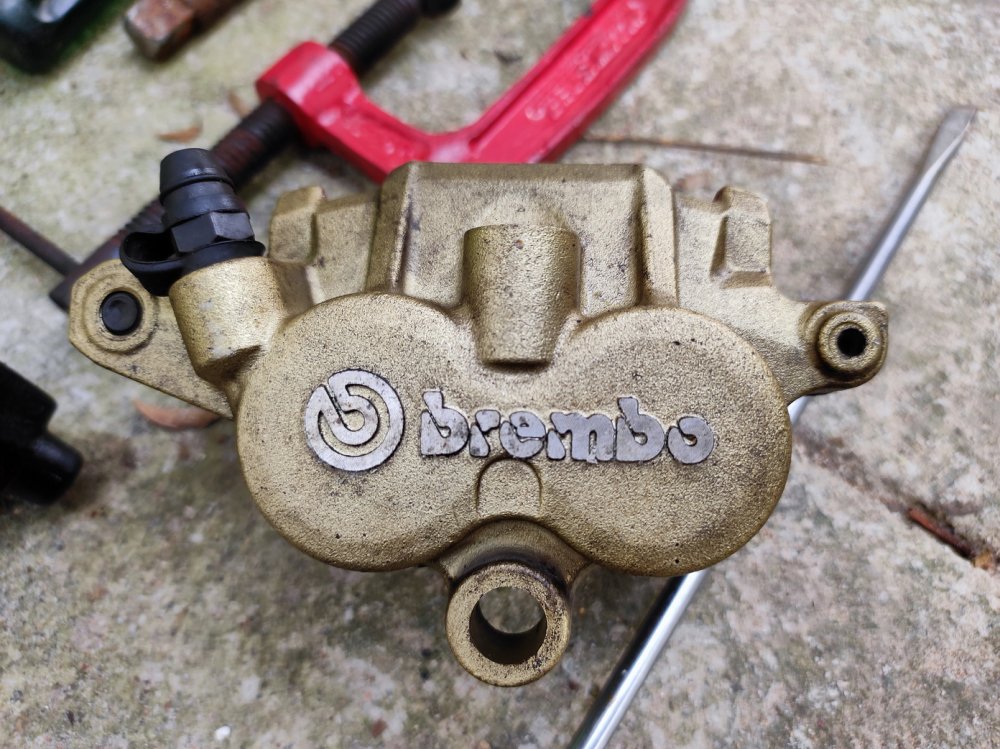
2021-12-19 15-44-13.jpg


Brembo.

2021-12-19 16-28-40.jpg
 
Thread Starter #107

deville_56

Honoured Member
Joined
Sep 11, 2009
Messages
2,974
Likes
4,815
Location
Trivandrum
December 2021 – Caliper Semi-Rebuild and Brake Pad Install

DIYs usually happens on Sundays with very limited scope of getting spares in case of urgency. I knew it's gonna be a sleepless night thinking of availability and (of course) the cost of Brembo parts. Checked with my old worn FZ parts lying around and they seemed to fit. Called up my buddy in Kochi running a weekend SBK garage, and he affirmed almost all bikes sold here shares the same kit, be it Brembo, Bybre, or Nissin, and he gets Yamaha ones due to easy availability. My usual Sunday spare store was closed and to my luck, another store was open for cleaning, Moto Tech Spares. He had Unicorn parts, which were cheaper than Yamaha ones.

Honda Boot Set (Brake Insulator + Dust Cover) - 06439MAK003 - ₹ 28.00

2021-12-19 17-46-01.jpg
2021-12-19 17-56-30.jpg


Villain of the show, the rusty guide pin.

2021-12-19 18-36-10.jpg


Took some effort to remove.

2021-12-19 18-38-33.jpg


Used 5-mm Allen key,

2021-12-19 18-53-23.jpg


and jumbo pipe wrench.

$RK55JX1.jpg


Sanded lightly. Before-after.

2021-12-19 18-39-17.jpg
2021-12-19 18-41-29.jpg


Cleaned up caliper.

2021-12-19 18-51-41.jpg


Second pin. Good shape.

2021-12-19 18-54-45.jpg


11-mm spanner kits.

2021-12-19 18-55-28.jpg

2021-12-19 18-55-02.jpg


All cleaned and ready for fit.

2021-12-19 18-56-49.jpg


Locations for new parts.

2021-12-19 18-57-37.jpg


Installed.

2021-12-19 18-58-58.jpg


Caliper clip. Cleaned and installed.

2021-12-19 19-14-30.jpg
2021-12-19 19-15-15.jpg


Brake pads ready to fit. Removed the shim as there was no room and fit was very tight.

2021-12-19 19-16-43.jpg
2021-12-19 19-16-52.jpg


Finally, the caliper pin.

2021-12-19 19-18-17.jpg


All installed,

2021-12-19 19-21-25.jpg


and ready to install.

2021-12-19 19-21-29.jpg


Used TVS caliper grease, which I was not confident with. They worked on rubber parts without damaging them, but they seized up easily.

2021-12-19 18-59-35.jpg


Copper grease was always in bucket list. My friend Krishna Prasad from Pattambi was kind enough to send the one he had, and it reached at the nick of the time. Wiped out all the TVS grease and reapplied with copper anti-seize grease. Reminds me of Nutella

2021-12-22 15-50-23.jpg
2021-12-22 15-51-00.jpg
 
Thread Starter #108

deville_56

Honoured Member
Joined
Sep 11, 2009
Messages
2,974
Likes
4,815
Location
Trivandrum
December 2021 - Brake Overhaul (Continued)

Front master cylinder removed for cleaning.

2021-12-20 15-08-44.jpg


Condition inside after 7 years of not bleeding - muck and gel.

2021-12-20 15-10-03.jpg


Did a quick coat of matt black. Ran out of primer, so didn't bother to do in detail, as I'll anyway redo it again.

2021-12-20 15-33-56.jpg


Diaphragm.

2021-12-20 15-45-05.jpg


Mounted the caliper.

2021-12-20 15-52-02.jpg


Breaking loose the bleeding nut before going further to make sure not to screw up once more. Size is 11 mm.

2021-12-20 15-54-47.jpg


KBX DOT4 brake fluid.

2021-12-20 15-55-09.jpg


Connected hose and bled. Hose above the caliper level prevents return of escaped air bubbles.

2021-12-20 16-10-00.jpg


To the level. One advantage of steel braided hose, I felt, was they were easy to bleed, will do in a single go.

2021-12-20 15-55-33.jpg


Front brake light switch.

2021-12-20 16-59-30.jpg


Checking the rear brake.

2021-12-20 16-15-39.jpg


Rear brake fluid reservoir.

2021-12-20 16-15-42.jpg


Emptied.

2021-12-20 16-17-06.jpg


Breaking open rear brake bleed nut, 8 mm here.

2021-12-20 16-17-50.jpg


Bled.

2021-12-20 16-18-54.jpg


Rear brake mount is tricky. Have to adjust the mount during tightening the nut with surgical precision to prevent rubbing with the rotor. Not sure if it is one of a case or similar across all GTs/REs.

2021-12-22 16-04-39.jpg


Pistons pushed back in.

2021-12-22 16-22-53.jpg


Condition of pads.

2021-12-22 16-26-15.jpg


Greased pins. They were dry, but not rusty like front.

2021-12-22 16-28-32.jpg


Wurth Brake Cleaner. Came very handy in cleaning the spilled brake fluid.

2021-12-20 15-47-45.jpg
 
Thread Starter #109

deville_56

Honoured Member
Joined
Sep 11, 2009
Messages
2,974
Likes
4,815
Location
Trivandrum
December 2021 - Will it Start?

Before pushing the bike all the way to the mechanic, decided to try one last time.

Removed the plug and it was in horrible shape.

2021-12-19 16-44-09.jpg


It was RE OE part installed by dealer, Bosch Platinum Plus WR8DP. Claims longer life, but just clocked 8k km.

2021-12-19 16-44-23.jpg


Made in Germany. Pin was bent by external forces.

2021-12-19 16-44-25.jpg


21 mm spark plug wrench.

2021-12-19 16-46-59.jpg


NGK G-Power, my love.

2021-12-20 13-48-05.jpg


NGK G-Power BPR5EGP. MRP ₹ 270.00, got for ₹ 250.00 from Amruth Auto Spares (NGK two-wheeler plug dealer).

2021-12-20 13-48-01.jpg


Needle tip.

2021-12-20 13-48-24.jpg


Oops the terminal was big.

2021-12-20 13-48-28.jpg


Made in Thailand. Used to be made in Japan.

2021-12-20 13-48-34.jpg


Terminal nut is removable. @mayankdixit

2021-12-20 13-48-54.jpg


Old vs new.

2021-12-20 13-51-02.jpg


PAV Hose. Another sore part of the RE. Crap quality rubber made in entire India. Somebody suggested replacing with hydraulic hose last time, but had a heart attack hearing the price and rocketed to RE spares and bought the stock hose, roughly just twice-trice times the price. They gave one for Standard 500, which was a bit longer than GT535's hose.

Air Filter PAV Hose - 573984/A - ₹ 209.00

2021-12-19 19-37-06.jpg
2021-12-19 19-37-17.jpg
2021-12-19 19-37-54.jpg


Old hose at PAV system.

2021-12-19 19-42-41.jpg
2021-12-19 19-43-09.jpg


Old hose. Brittle through its length.

2021-12-20 15-03-35.jpg


Feed into the air filter box.

2021-12-20 17-08-40.jpg


Spark comes to check the injector [lol]

2021-12-20 14-06-30.jpg


Injector is installed in a tricky way with little room to play with. First have to remove the connector and the sensor. Then remove the 10 mm nut at the end of the spacer.

2021-12-20 14-06-41.jpg


Injector comes off.

2021-12-20 14-18-53.jpg


Injector. As suspected, it was clogged and wasn't pumping fuel. Couldn't remove either. Vigorously sprayed Magsol throttle body cleaner. Drained the short length of fuel hose from pump and filled with TB cleaner.

2021-12-20 14-18-44.jpg


Primed the pump a few times to confirm it wasn't dead. Connected the fuel line back.

2021-12-20 14-28-58.jpg


Checking air filter.

2021-12-20 17-13-54.jpg


2021-12-20 17-08-52.jpg


2021-12-20 17-08-28.jpg


It wasn't bad either.

2021-12-20 17-08-35.jpg


Sprayed some TB through the hole before installing back the injector. Starts in 2-3 kicks. Started off with rough idle and smoothed out once the TB cleaner got through the injector.

Now starts with single kick and idles smoothly.

 
Thread Starter #110

deville_56

Honoured Member
Joined
Sep 11, 2009
Messages
2,974
Likes
4,815
Location
Trivandrum
December 2021 - (Finally) Grab Rails

Stock dual seat of GT is scary for pillion, very poor support. Pillion part sinks, giving a feeling of falling back. Without grab rail, the pillion had to constantly watch their back. I literally check the rear end of the seat intermittently when I am riding in the rear.

Stock grab rail on Neil's GT, an enthusiastic GT535 owner. It wasn't a looker with odd upright shape. Liked the ones from GT650 twins. They had a slant instead of right angle. Inquired via our friend working at RE Factory Shop in Kochi, got affirmation, direct fit on 535.

Neil.png


Went to Subha Auto Wares, authorized RE parts dealer and they had GT650 grab handle, but they said 100% it won't fit 535. Bought it anyway, wasn't expensive.

2021-12-22 15-20-23.jpg


GT650/Interceptor Pillion Grab Handle - 148703 - ₹ 252.00

2021-12-22 15-20-21.jpg


Hex Bolt - M8x20 - 586002/A - ₹ 15.00 x 4

2021-12-22 15-31-44.jpg
2021-12-22 15-34-09.jpg
2021-12-22 15-34-11.jpg


Spare guys were right. It didn't fit. Wider by around 2 inches, and holes won't alight. After pushing against the wall with the leg, managed to match the width.

2021-12-22 15-39-26.jpg


Aligned one hole on either side. Checked Google and Youtube and found most of the export version had similar situation with only 2 bolts possible. Dropped the plan for drilling extra holes.

2021-12-22 15-39-36.jpg


Trialling combination of holes. Maximum inward position. Looked odd with vacant space behind. Spray can killed the perception.

2021-12-22 15-45-08.jpg


Outmost position. Liked it.

2021-12-22 15-41-32.jpg


Installed.

2021-12-22 15-39-19.jpg


Final outcome.

2021-12-22 17-23-06.jpg
 
Thread Starter #112

deville_56

Honoured Member
Joined
Sep 11, 2009
Messages
2,974
Likes
4,815
Location
Trivandrum
December 2021 - New Seat and Number Plates

Crow and cat attacked seat. Still can't digest we paid ₹ 4,150.00 for this inferior quality seat.

2021-12-22 17-23-14.jpg


Got it redone by the veteran upholsterer in town, Balan. Charged ₹ 600.00 and done in 2 hours.

2021-12-25 15-34-18.jpg


Old one was too spongy for pillion and tends to fall back and was scary.

2021-12-25 15-36-56.jpg


Ordered number plates from Sagar, Chennai. ₹ 325.00 including shipping and delivered in 2 days.

2021-12-27 16-05-34.jpg


Quality was good for the price, which would have been ₹ 500-600 if done locally.

2021-12-27 16-14-22.jpg
 
Thread Starter #115

deville_56

Honoured Member
Joined
Sep 11, 2009
Messages
2,974
Likes
4,815
Location
Trivandrum
December 2021 - Insurance Renewed

Renewed insurance before handing over to some mechanic for fixing the one-way clutch. Insured with Acko. Got comprehensive coverage despite a gap of 2-3 years. IDV ₹1,04,523.

Own Damage Premium - ₹ 536.00. No NCB due to the break.
Net Liability Premium - ₹ 2323.00

Total Premium - ₹ 3373.00 including 18% GST.
 
Joined
Sep 24, 2022
Messages
21
Likes
42
Location
India
Hello! Few comments from what I've seen on this page so far:

Condition inside after 7 years of not bleeding - muck and gel.
If the insides are this...grim, the master cylinder piston will be hiding even more muck. Its better you take off the circlip and the MC piston, give everything a good clean and reassemble it back. It will keep leeching out the muck and ruining the fresh fluid you've replaced now.

Greased pins. They were dry, but not rusty like front.
Don't use copper grease on caliper pins. It's meant to be used on the shims, edges of brake pads which move and the back of the brake pads. You're supposed to use silicone grease or a proper caliper grease with the pins.

I use this : Permatex® Ceramic Extreme Brake Parts Lubricant, 8 OZ – Permatex
 
Thread Starter #117

deville_56

Honoured Member
Joined
Sep 11, 2009
Messages
2,974
Likes
4,815
Location
Trivandrum
Hello! Few comments from what I've seen on this page so far:

If the insides are this...grim, the master cylinder piston will be hiding even more muck. Its better you take off the circlip and the MC piston, give everything a good clean and reassemble it back. It will keep leeching out the muck and ruining the fresh fluid you've replaced now.
Right said, the rear MC got stuck up and had to repair it. Replaced in Duke instead of rebuilding without knowing it could have been repaired.

Don't use copper grease on caliper pins. It's meant to be used on the shims, edges of brake pads which move and the back of the brake pads. You're supposed to use silicone grease or a proper caliper grease with the pins.

I use this : Permatex® Ceramic Extreme Brake Parts Lubricant, 8 OZ – Permatex
Understood the hard way. It was all dry when I removed the caliper again to sort out the sticky caliper. Silicone grease came with the repair kit rerouted me through Google to find what the white paste really was. Saw many packets lying at Yamaha dealer for years and rushed there and all were gone. Thanks for the link. Will give a try.
 
Thread Starter #118

deville_56

Honoured Member
Joined
Sep 11, 2009
Messages
2,974
Likes
4,815
Location
Trivandrum
December 2021 - Updates

Renewed insurance with Acko. Total premium ₹ 3,373.00. IDV ₹ 1,04,523.00. Own damage premium ₹536.00, nil no-claim bonus. Third-party premium ₹ 2,323.00

Battery was discharging quickly, needs replacement soon.

2021-12-27 16-37-07.jpg


Bosch C7, borrowed from @vishnu vichu

2021-12-27 16-37-13.jpg
 
Thread Starter #119

deville_56

Honoured Member
Joined
Sep 11, 2009
Messages
2,974
Likes
4,815
Location
Trivandrum
January 2022 - One-Way Clutch Replaced

Gave the bike during Christmas weekend to fix the sprag clutch issue. Gave it to Mr. Ali, a vetaran RE mechanic who runs an RE workshop in the heart of the junction for over 35 years. He has been my dad's friend and the first mechanic I knew of. Used to visit the shop during haircut days as the salon was close by. I am 38 now, he instantly recognized me. He was the one who dealt the purchase of my dad's first Kinetic (and screwed it and made us sell it), the guy who made me hate RE bikes as we spent a great time there fixing the bike (Most of my uncles and dad's friends had Bullets and they always mocked RX and HH guys (who never broke down like this)). The tin sheet shed is the workshop and used to have the similar coconut palm leaf and reaper construction. The quality of work was hit or miss, thanks to his assistants. He himself worked on cast iron bikes, while UCE bikes were worked by his assistants. One of the assistant has been with him all these years and takes up the major works while the new assistant does the minor jobs.

2022-01-01 15-12-22.jpg


He gave me two options for the sprag clutch, the original and a non-OE make. He wasn't confident with the OE one (like most RE mechanics) and suggested the latter claiming that it was more reliable per his experience and was cheaper at ₹ 3,000.00 compared to ₹ 4,800.00 for the original one and had one-year replacement warranty. Chose the non-OE part as I too wasn't confident with original RE stuff [lol] . Took four days as the shop was busy after the New Year weekend with pending works.

Nothing wrong to complain about the work. Labour was dirt cheap compared to other RE mechanics, who charge in the SBK level and no signs of orange sealant anywhere. Had to wait for the battery, which was out for charging, and he recommended replacing it. He even offered home delivery after seeing I could barely reach down.

Bill:

Sprag Clutch Assembly - Non-OE - ₹ 3,000.00
Shell Semi-Synthetic Engine Oil 15W50 - ₹ 1,035.00
Oil Filter₹ 40.00
Labour - ₹ 375.00

Total - ₹ 4,450.00.

He took only ₹ 4,000.00 and gave bill for clutch warranty.

Unfortunately, Mr. Ali passed away about two months back.

Went straight to pollution testing centre and then to car wash, Autobox, where they would wash and detail anything. Wash was okay and as expected, it refused to start after the wash as always and drained the battery after a couple of cranks before I could stop them. Did the usual trick of blowing the plug cap and it started in a kick.

2022-01-03 18-26-05.jpg


Reached home the longer route.

2022-01-03 19-04-29.jpg
 
Thread Starter #120

deville_56

Honoured Member
Joined
Sep 11, 2009
Messages
2,974
Likes
4,815
Location
Trivandrum
January 2022 - New Battery

Finally, bought an Exide. If I remember right, first Exide purchased amongst all our vehicles in 15 years. 14 Ah batteries are harder to find with RE switching to 8 Ah. Getting maintenance free was even harder, but thankfully only MF was available. Came with usual 24+24 month pro-rata warranty.

2022-01-04 12-28-21.jpg


Exide Xplore 12XL14L-A2 - ₹ 3,500.00 (MRP ₹ 3,865.00, ₹ 365.00 for old battery)

2022-01-04 18-10-22.jpg


Pro-rata details.

2022-01-04 18-10-43.jpg
2022-01-04 18-11-07.jpg

.
The battery

2022-01-04 18-12-13.jpg
2022-01-04 18-12-18.jpg


Seems Exide is too serious about aesthetics.

2022-01-04 18-12-25.jpg


Even the terminal caps were detailed.

2022-01-04 18-12-32.jpg


New bolts.

2022-01-04 18-11-48.jpg


Ready to install.

2022-01-04 18-12-47.jpg


The drain tube goes into the bin.

2022-01-04 18-14-44.jpg


Installed

2022-01-04 18-27-48.jpg


and checked. Multimeter ran out of battery.

2022-01-04 18-23-00.jpg


Ready to roll.

2022-01-04 18-31-17.jpg
2022-01-04 18-31-28.jpg


Stance correction. Adjusted the spring tension. Rotated freely with hand. Tightened about a centimetre on both sides. Now everyone gotta tip toe. Rear won't go down on load.

2022-01-04 18-31-58.jpg
2022-01-04 18-31-38.jpg
 

Attachments


Top Bottom