
Thread Starter
#1
This is a thread especially for those who were using Chevrolet Beat Diesel. This thread includes how to properly maintain your Beat and common problems faced by beat owners and its solutions and of course DIY's ![[evil]](https://www.theautomotiveindia.com/forums/images/smilies/Evil.gif "Evil [evil]") . Hope this thread is useful for all beat diesel owners among us...
. Hope this thread is useful for all beat diesel owners among us...
A small Introduction...
Chevrolet Beat Diesel has a small version of Fiat’s Famous Multijet Engine. Multijet engine designs in a way which is affordable to make, reliable engine and decreases the cubic liters as low as possible and stress the engine with a matched turbocharger. By decreasing the cubic size the mileage will increase and by using a well matched turbo more power can be achieved without compromising fuel economy. But the engine is under a lot of stress while operating.
In case of the XSDE 1.0 Liter Smartech Engine (Which is the smaller version of MJD), Chevrolet cuts one cylinder out and decreases the cubic capacity to 936cc, which makes the engine smaller. But that makes the engine more prone to reliability issues.
Engine(cc) - 936
Engine Description - 1.0-litre 56.3bhp 12V XSDE Engine
Max Torque - 142.5Nm@1750rpm
ARAI Mileage - 25.44 kmpl
Valve Configuration - DOHC
Front Suspension - MacPherson Strut
Rear Suspension - Compound Link Crank
Tyre Size - 165/65 R14
Tyre Pressure - 34PSI ( All Four )
Diesel Capacity - 35L
Engine Oil - 5W-30 ACEA A3/B4 ( 3.5L )
Transmission oil - XGP SAE 75W85 ( 2.0L )
Engine Coolant - Ethylene Glycol(Organic acid type long life coolant) ( 4.74L )
Brake fluid - DOT4 ( 0.5L )
Things i love in this car
Things i hate in this car
Problems with SMARTECH Engine
• Engine Burning Oil
We know that MJD engines work under a lot of stress, when it comes to SMARTECH engine the condition is even worse.. The main problem with SMARTECH engine is when Chevrolet decreases the size of the engine, the heat inside the engine will increase a lot and causes the engine oil to evaporate over time. In that scenario, the engine components won’t get proper lubrication and the engine wear out quickly. After finding this issue, Chevrolet decreases the oil change interval from 10000 to 7500kms. Even Chevrolet decreases the oil change interval, it is also not good for your engine.
I strongly recommend you to change your engine oil at every 5000Km, and use only 5W-30 ACEA A3/B4 Fully Synthetic Engine Oil
• Turbocharger Failure
This is a common problem that occurred when we don’t follow the 1 Minute Idle Rule. Almost all cars in India have an oil cooled turbocharger. For Oil cooled turbo’s the bearings are lubricated by feeding engine oil to its bearing. But when we start the car in the morning, the engine oil is at the bottom of the oil drain pan and it needs some time to reach the top parts of the engine. When we don’t follow the 1 minute rule, the turbocharger spins without lubrication and it wears out fast.
It is also a must thing to follow the 1 minute idle rule after every drive. Because while driving the turbocharger spins up to 250,000 RPM and the temperature may increase up to 1000 degree Celsius. If we don’t follow the rule, the turbocharger will overheat and damages its bearings and other components
• Fuel Pump Failure
Fuel Delivery Pump (Inside the fuel tank) in beat is very sensitive, it wears out quickly if we don’t care it with that much care. To prevent the fuel pump failure the fuel pump must be submersed in fuel. That is, you must have at least ¼ amount of diesel in the fuel tank every time (First 4 Bars in the fuel gauge).
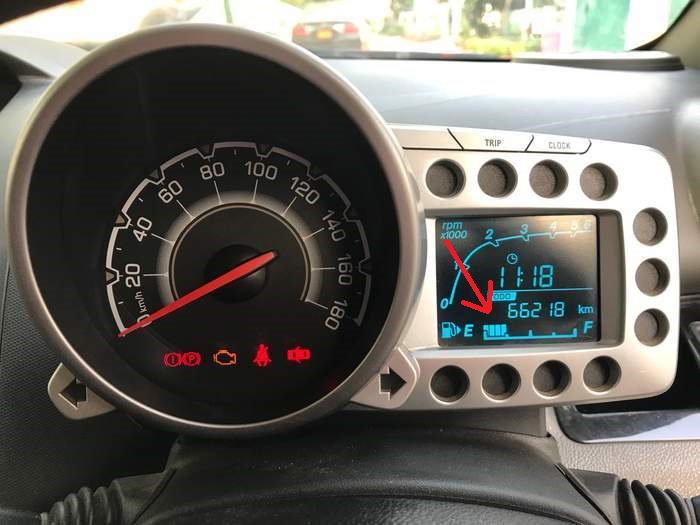
Do not drive your car below that level. If you drive your car below that level the fuel pump won’t get enough diesel to pump and when that scenario occurs, the pump will try harder to maintain the fuel pressure. It will heat up the pump quickly and lack of diesel causes the pump to run without lubrication and wears out quickly.
Another main cause of fuel pump failure is not changing the fuel filter on time. If we do not change fuel filter on time, the filter will clog and restrict fuel flow. So the pump needs to work harder to maintain fuel pressure and over time it will wear out very early.
Change your fuel filter every 5000 Kms along with the oil change
N.B: If you think it is costlier or it is too early to change fuel filter in 5000kms, use ZIP filters it costs you around 450 bucks. But the quality is low than Genuine UFI SOFIMA Filter. If you use ZIP filters you must change it at every 5000 Kms. I strongly recommend changing diesel filer in 5000 Kms.

(This is why i recommend to change fuel filter at 5K Kms,Check out the condition of the old one after 5K Kms and new one...)
• High Pressure Fuel Pump Failure
This is a common problem for BOSCH CP1 High Pressure fuel pump. When it happens, it costs you a bomb!! A new high pressure pump for beat costs approx. 25000/-.![[frustration]](https://www.theautomotiveindia.com/forums/images/smilies/Frustration.gif "Frustration [frustration]")
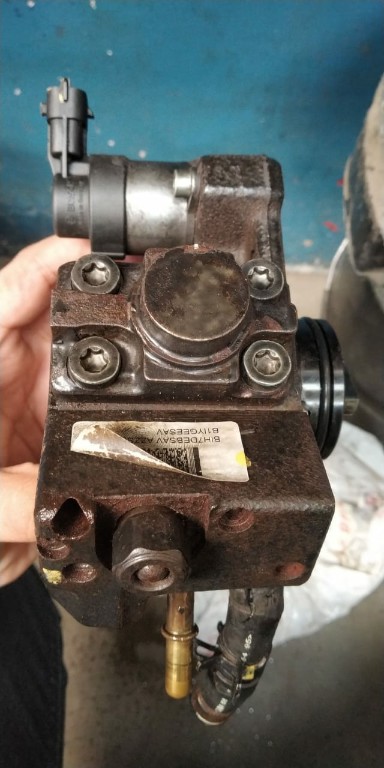
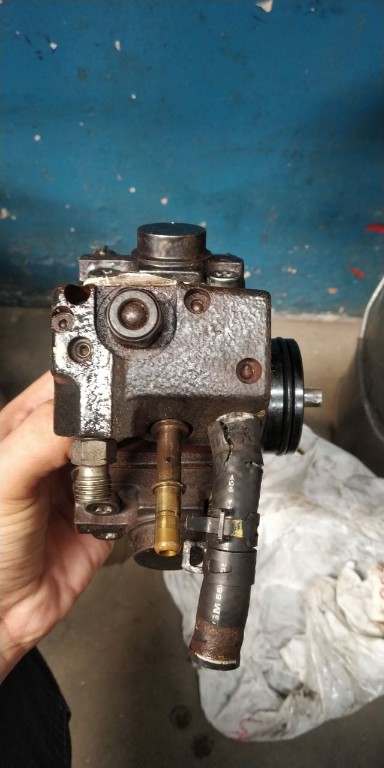
( Bosch CP1 High Pressure Pump)
The CP1 fuel pump operates at extremely high pressure. Due to this, the O Rings and Gaskets in the fuel pump assembly may damage over time and if any seals or gaskets damaged the fuel pressure in the fuel rail will decrease and the vehicle may take some more cranks to start than usual and in a worst case scenario the vehicle won’t start.
When it happens the MIL (Malfunction Indicator Lamp) comes on and error code P0087 will saved in the ECM.
WARNING: Error Code P0087 can also be triggered by-
- Clogged Fuel Filter
- Faulty Fuel Pump (Pump Inside Fuel Tank)
- Restricted Fuel Line
- Faulty Fuel Pressure Sensor
Check all the above things before touching the high pressure pump.
• Suspension Rattling Noise
This may occur in many beats when it reaches 30k kilometers. The suspension components including stabilizer links,ball joints and others will only lasts up to 30K kilometers. Is it because of the poor Indian road conditions or poor quality components from GM? Don’t know why…
I have also faced this rattling issue and when I visited the dealership the mechanic told me that changing these components cost me approx. 13000/-
So I drop that plan of buying genuine GM parts and visited my friendly local garage and he replaced all those parts with non-genuine but Good Quality parts at a cost of 6500/- and he told me that it lasts around next 30-35K Kms..
So in my experience do not but genuine suspension components for beat unless you are a person who likes to spend money on Sh***y things.
N.B: Rattling Noise can also be occurred due to bad suspension mount. Check and confirm the faulty part before replacing.
• Gear Knob Cracking
Beat's gear knob is built with very cheap type plastic and it will crack easily if we park our car in direct sunlight. The problem here is that the gear knob is note loosely available in dealerships, we need to purchase the whole gear lever assembly for this small problem; and it costs around 1600 bucks!!
So after searching for a long time i found a simple and cheap solution for this problem.
I found an aftermarket gear knob for beat on a website called Partsbigboss and it costs only 230/- Rs !!
So i ordered it online and they delivered the products on time.

( Gear knob purchased from Partsbigboss)
It fits perfectly and the quality is better than Original Chevrolet gear knob..![[clap]](https://www.theautomotiveindia.com/forums/images/smilies/Clap.gif "Clap [clap]")
Link
Gear Lever Knob Beat for Chevrolet Beat | Parts Big Boss
To be continued...
. Hope this thread is useful for all beat diesel owners among us...A small Introduction...
Chevrolet Beat Diesel has a small version of Fiat’s Famous Multijet Engine. Multijet engine designs in a way which is affordable to make, reliable engine and decreases the cubic liters as low as possible and stress the engine with a matched turbocharger. By decreasing the cubic size the mileage will increase and by using a well matched turbo more power can be achieved without compromising fuel economy. But the engine is under a lot of stress while operating.
In case of the XSDE 1.0 Liter Smartech Engine (Which is the smaller version of MJD), Chevrolet cuts one cylinder out and decreases the cubic capacity to 936cc, which makes the engine smaller. But that makes the engine more prone to reliability issues.
Engine(cc) - 936
Engine Description - 1.0-litre 56.3bhp 12V XSDE Engine
Max Torque - 142.5Nm@1750rpm
ARAI Mileage - 25.44 kmpl
Valve Configuration - DOHC
Front Suspension - MacPherson Strut
Rear Suspension - Compound Link Crank
Tyre Size - 165/65 R14
Tyre Pressure - 34PSI ( All Four )
Diesel Capacity - 35L
Engine Oil - 5W-30 ACEA A3/B4 ( 3.5L )
Transmission oil - XGP SAE 75W85 ( 2.0L )
Engine Coolant - Ethylene Glycol(Organic acid type long life coolant) ( 4.74L )
Brake fluid - DOT4 ( 0.5L )
Things i love in this car
- Easy to drive in City
- Feather lite Electronic Power Steering
- Intelligent Launch Support System makes city driving piece of cake
![[drive]](https://www.theautomotiveindia.com/forums/images/smilies/Drive.gif "Drive [drive]")
- High Fuel Economy
- Easier to travel long distances without being tired
- Looks
- Awesome Mid range torque
Things i hate in this car
- Noisy 3 cylinder engine
- Rear legroom's and headroom's are limited
- Boot Space is horrible
- Rear small window makes Claustrophobic feel
Problems with SMARTECH Engine
• Engine Burning Oil
We know that MJD engines work under a lot of stress, when it comes to SMARTECH engine the condition is even worse.. The main problem with SMARTECH engine is when Chevrolet decreases the size of the engine, the heat inside the engine will increase a lot and causes the engine oil to evaporate over time. In that scenario, the engine components won’t get proper lubrication and the engine wear out quickly. After finding this issue, Chevrolet decreases the oil change interval from 10000 to 7500kms. Even Chevrolet decreases the oil change interval, it is also not good for your engine.
I strongly recommend you to change your engine oil at every 5000Km, and use only 5W-30 ACEA A3/B4 Fully Synthetic Engine Oil
• Turbocharger Failure
This is a common problem that occurred when we don’t follow the 1 Minute Idle Rule. Almost all cars in India have an oil cooled turbocharger. For Oil cooled turbo’s the bearings are lubricated by feeding engine oil to its bearing. But when we start the car in the morning, the engine oil is at the bottom of the oil drain pan and it needs some time to reach the top parts of the engine. When we don’t follow the 1 minute rule, the turbocharger spins without lubrication and it wears out fast.
It is also a must thing to follow the 1 minute idle rule after every drive. Because while driving the turbocharger spins up to 250,000 RPM and the temperature may increase up to 1000 degree Celsius. If we don’t follow the rule, the turbocharger will overheat and damages its bearings and other components
• Fuel Pump Failure
Fuel Delivery Pump (Inside the fuel tank) in beat is very sensitive, it wears out quickly if we don’t care it with that much care. To prevent the fuel pump failure the fuel pump must be submersed in fuel. That is, you must have at least ¼ amount of diesel in the fuel tank every time (First 4 Bars in the fuel gauge).
Do not drive your car below that level. If you drive your car below that level the fuel pump won’t get enough diesel to pump and when that scenario occurs, the pump will try harder to maintain the fuel pressure. It will heat up the pump quickly and lack of diesel causes the pump to run without lubrication and wears out quickly.
Another main cause of fuel pump failure is not changing the fuel filter on time. If we do not change fuel filter on time, the filter will clog and restrict fuel flow. So the pump needs to work harder to maintain fuel pressure and over time it will wear out very early.
Change your fuel filter every 5000 Kms along with the oil change
N.B: If you think it is costlier or it is too early to change fuel filter in 5000kms, use ZIP filters it costs you around 450 bucks. But the quality is low than Genuine UFI SOFIMA Filter. If you use ZIP filters you must change it at every 5000 Kms. I strongly recommend changing diesel filer in 5000 Kms.
(This is why i recommend to change fuel filter at 5K Kms,Check out the condition of the old one after 5K Kms and new one...)
• High Pressure Fuel Pump Failure
This is a common problem for BOSCH CP1 High Pressure fuel pump. When it happens, it costs you a bomb!! A new high pressure pump for beat costs approx. 25000/-.
( Bosch CP1 High Pressure Pump)
The CP1 fuel pump operates at extremely high pressure. Due to this, the O Rings and Gaskets in the fuel pump assembly may damage over time and if any seals or gaskets damaged the fuel pressure in the fuel rail will decrease and the vehicle may take some more cranks to start than usual and in a worst case scenario the vehicle won’t start.
When it happens the MIL (Malfunction Indicator Lamp) comes on and error code P0087 will saved in the ECM.
WARNING: Error Code P0087 can also be triggered by-
- Clogged Fuel Filter
- Faulty Fuel Pump (Pump Inside Fuel Tank)
- Restricted Fuel Line
- Faulty Fuel Pressure Sensor
Check all the above things before touching the high pressure pump.
• Suspension Rattling Noise
This may occur in many beats when it reaches 30k kilometers. The suspension components including stabilizer links,ball joints and others will only lasts up to 30K kilometers. Is it because of the poor Indian road conditions or poor quality components from GM? Don’t know why…
I have also faced this rattling issue and when I visited the dealership the mechanic told me that changing these components cost me approx. 13000/-
So I drop that plan of buying genuine GM parts and visited my friendly local garage and he replaced all those parts with non-genuine but Good Quality parts at a cost of 6500/- and he told me that it lasts around next 30-35K Kms..
So in my experience do not but genuine suspension components for beat unless you are a person who likes to spend money on Sh***y things.
N.B: Rattling Noise can also be occurred due to bad suspension mount. Check and confirm the faulty part before replacing.
• Gear Knob Cracking
Beat's gear knob is built with very cheap type plastic and it will crack easily if we park our car in direct sunlight. The problem here is that the gear knob is note loosely available in dealerships, we need to purchase the whole gear lever assembly for this small problem; and it costs around 1600 bucks!!
So after searching for a long time i found a simple and cheap solution for this problem.
I found an aftermarket gear knob for beat on a website called Partsbigboss and it costs only 230/- Rs !!
So i ordered it online and they delivered the products on time.
( Gear knob purchased from Partsbigboss)
It fits perfectly and the quality is better than Original Chevrolet gear knob..
Link
Gear Lever Knob Beat for Chevrolet Beat | Parts Big Boss
To be continued...
Attachments
-
 83.8 KB Views: 463
Last edited:
![[sad]](https://www.theautomotiveindia.com/forums/images/smilies/Sad.gif "Sad [sad]")
![[cheers]](https://www.theautomotiveindia.com/forums/images/smilies/Cheers.gif "Cheers [cheers]")

![[thumbswink]](https://www.theautomotiveindia.com/forums/images/smilies/Thumbs%20&%20Wink.gif "Thumbs & Wink [thumbswink]")
![[thumbsup]](https://www.theautomotiveindia.com/forums/images/smilies/Thumbs%20Up.png "Thumbs Up [thumbsup]")
![[think]](https://www.theautomotiveindia.com/forums/images/smilies/Thinking.gif "Thinking [think]") So in my opinion,go for the OEM specified coolant..
So in my opinion,go for the OEM specified coolant..![[:D]](https://www.theautomotiveindia.com/forums/images/smilies/Big%20Smile.gif "Big Smile [:D]")
![[shock]](https://www.theautomotiveindia.com/forums/images/smilies/Shock.gif "Shock [shock]")