Mine is orangish-gold from the beginning, so is my cousin's.

Ultimate Guide For Maintaining Chevrolet Beat Diesel
- Thread Starter Auto_Psycho
- Start date
As I have said before "Because the coolant is still mixing with oil somewhere ,maybe at the head gasket ! "
![[lol]](https://www.theautomotiveindia.com/forums/images/smilies/Laugh.gif "Laugh [lol]")
Thread Starter
#18
Because the coolant is still mixing with oil somewhere ,maybe at the leaking head gasket !
Nice DIY on your Beat. And very apt explanation with lots of pics. Very good thread !
Are you doing it all yourself,or is that you're taking pics at the FNG while the mechanics are working over on the Beat?
Nice DIY on your Beat. And very apt explanation with lots of pics. Very good thread !
Are you doing it all yourself,or is that you're taking pics at the FNG while the mechanics are working over on the Beat?
And YES i am doing this all by myself!
![[:D]](https://www.theautomotiveindia.com/forums/images/smilies/Big%20Smile.gif "Big Smile [:D]")
Last edited:
YES i am doing this all by myself!
Thread Starter
#20
DIY: How to Replace Diesel Filter?
Finally, got some time to replace the diesel filter. As i was busy with some other works, i didn't had time to get this done.While replacing the diesel filter,keep in mind that you must do the 'Air Bleeding' process properly. Because improper bleeding may screw your high pressure pump.
Okay so enough talking, let's jump into the process...![[evil]](https://www.theautomotiveindia.com/forums/images/smilies/Evil.gif "Evil [evil]")
THINGS NEEDED
13 mm ring spanner
36 mm socket, handle and extension
Diesel Filter
Flat Head Screw Driver
Drain pan
Jack and Jack Stands
PROCEDURE
Step 1: Jackup the rear right passenger side of the car. (The filter housing is located under this side)

Step 2: Keep a Catch Pan under the filter housing to catch diesel

Step 3 (Optional): Remove the clamp.( This will gave more room to remove the filter)
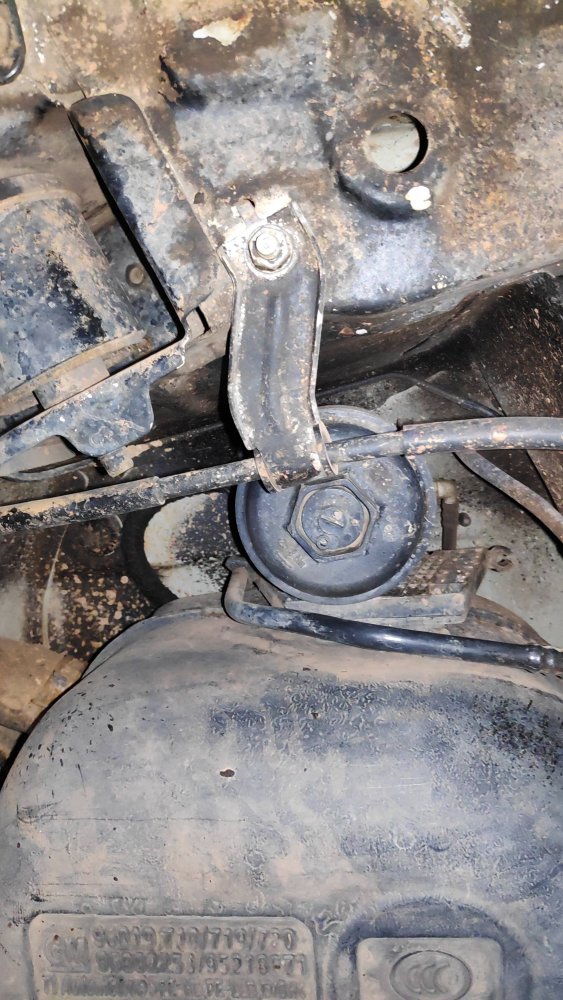
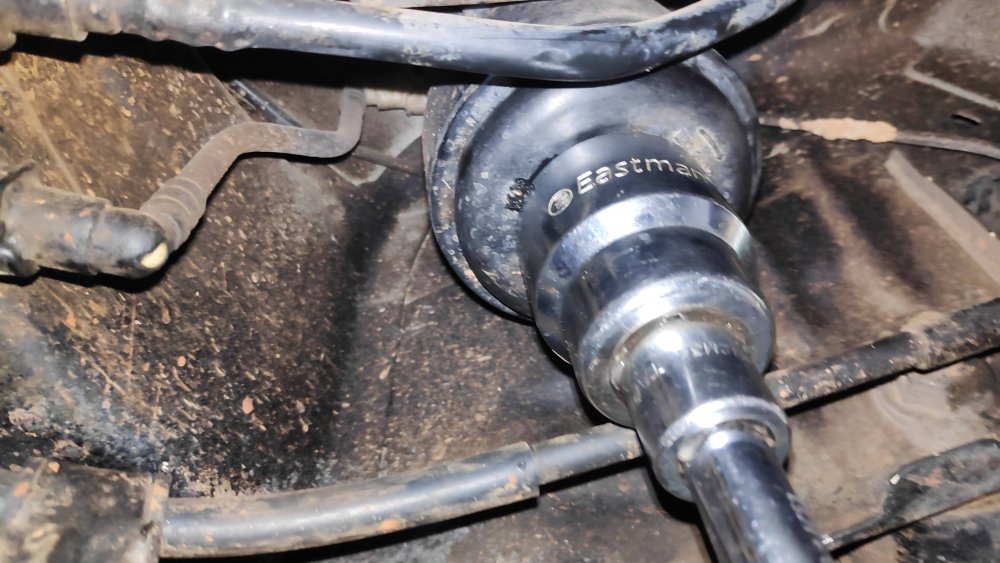
The filter housing.

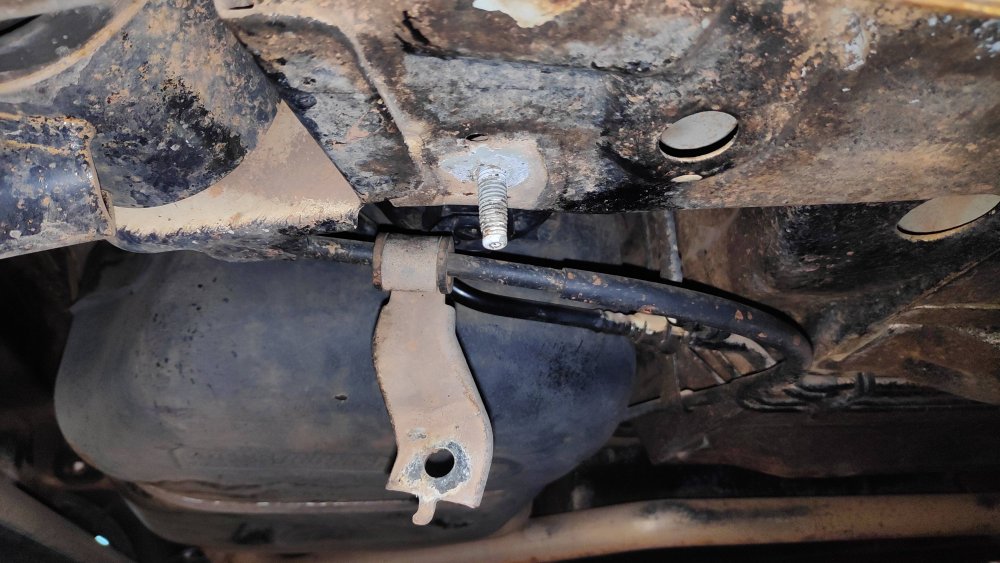
Step 4: Remove the drain bolt with a flat head screw driver. (This step is optional, but it will helps to reduce the mess while removing the filter)

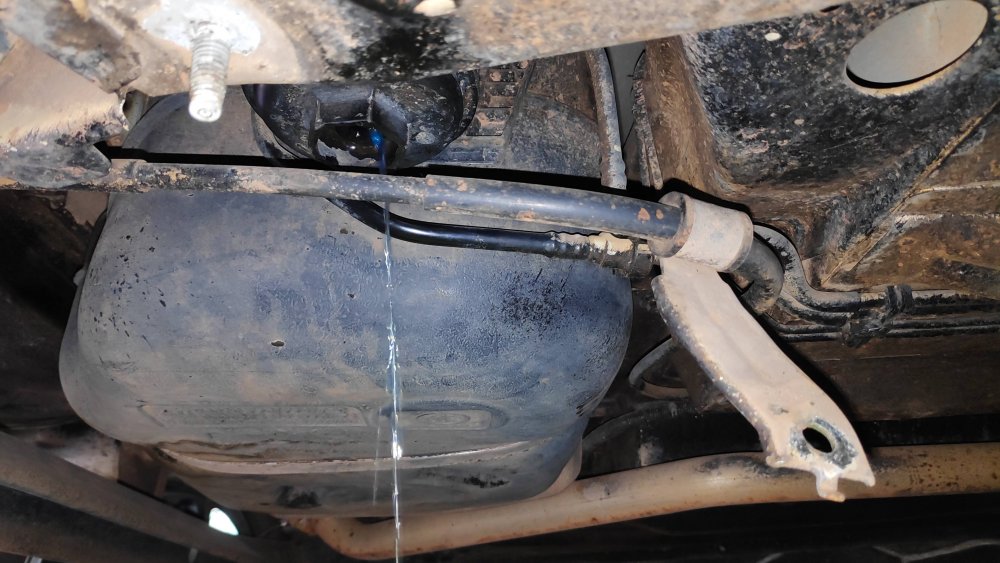
 Drain Plug (This is the plug we need to use if the water in fuel lamp glows)
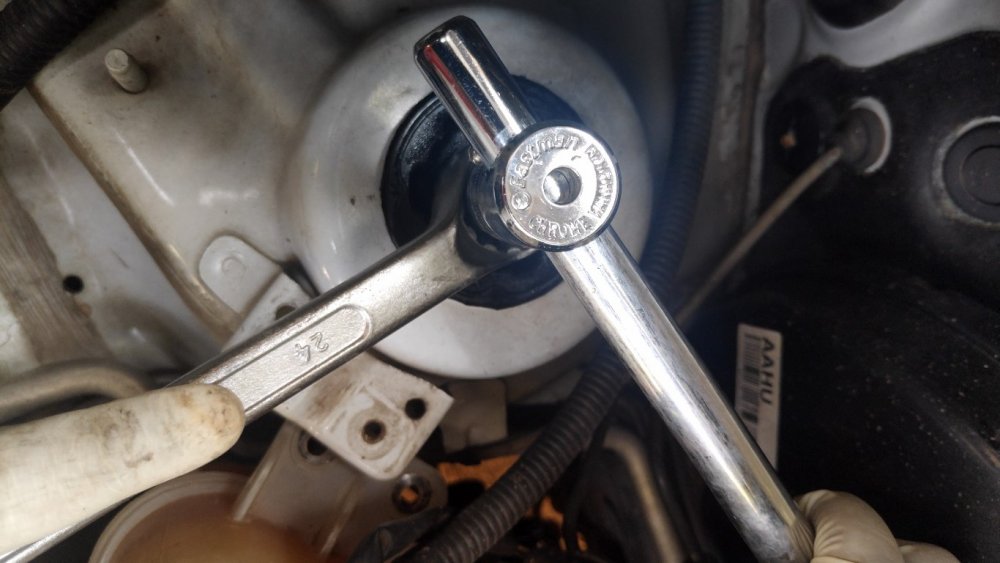
Step 5: Now use a 36 mm socket to remove the filter housing cap
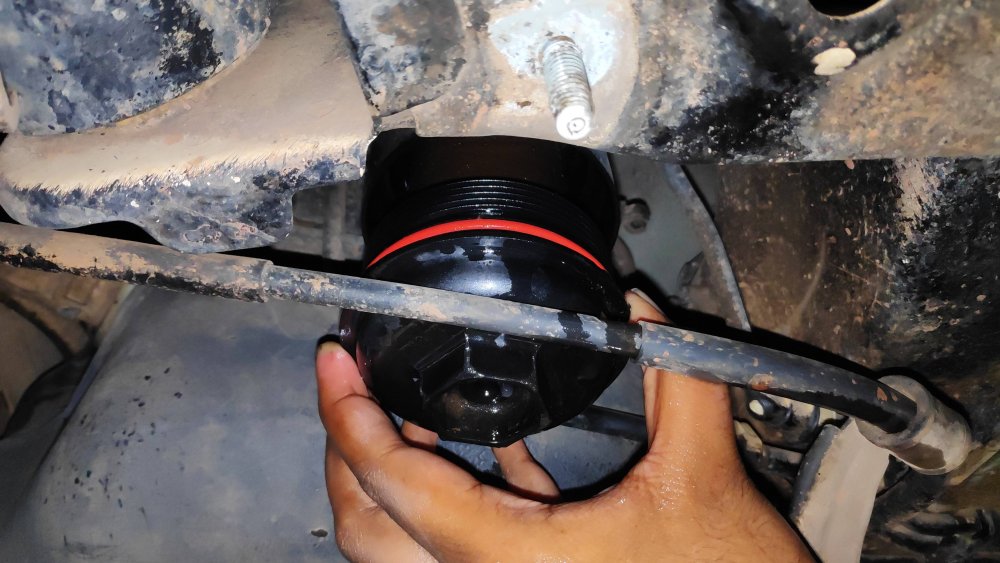
 Old Filter and Filter Housing Cap
 The Filter Housing
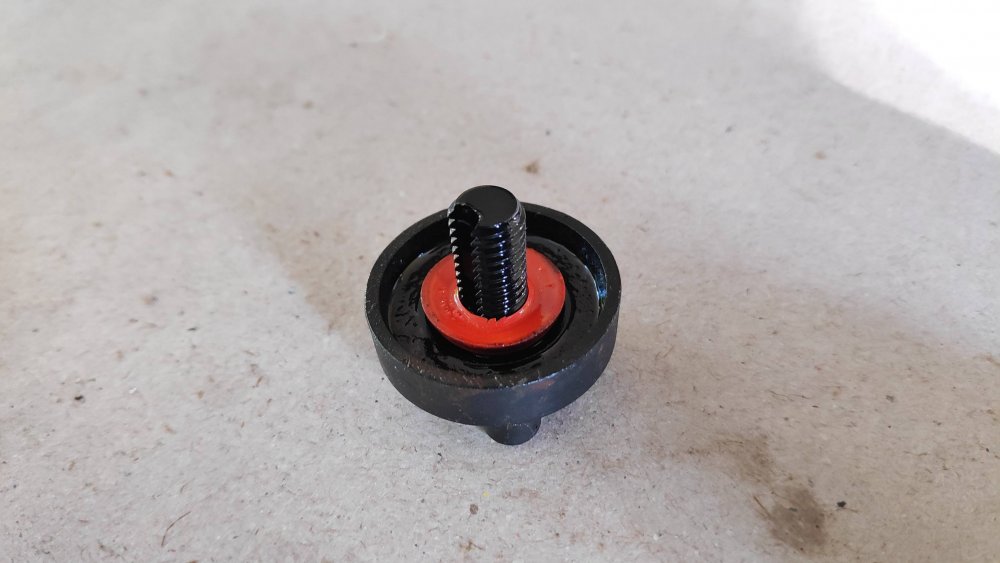
Step 6: Replace the O Ring
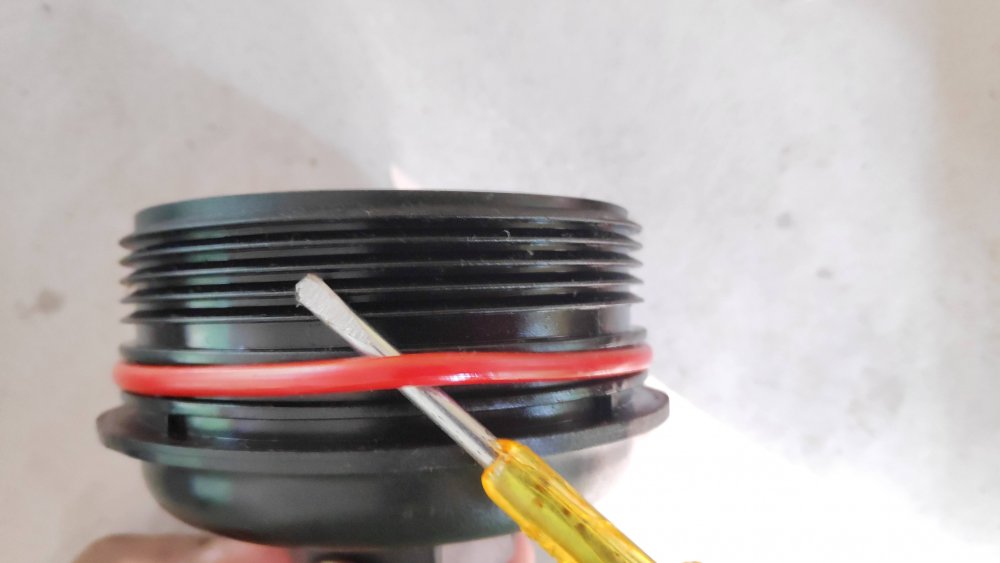 Remove the old O ring by using a flat head screw driver
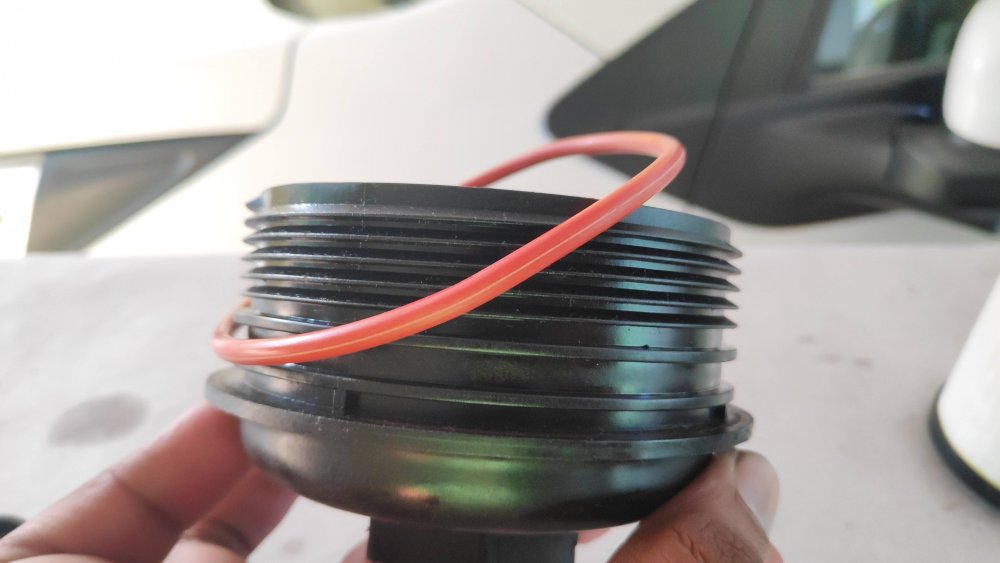
Then install the new one
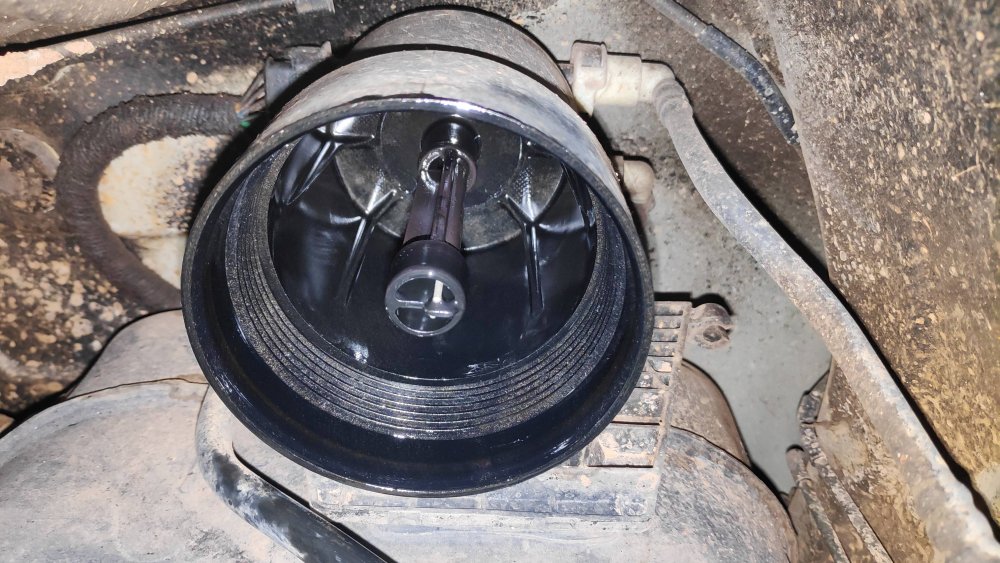
Step 7: Install the new filter into the filter cap assembly


The filter fits only in one direction, so no need to worry about messing up![[:)]](https://www.theautomotiveindia.com/forums/images/smilies/Smile.gif "Smile [:)]")
Step 8: Install the filter back into the assembly
Now install the drain bolt back and apply a little bit of diesel in the o ring before installing the filter cover assembly to make sure it seats properly while tightening.


Be gentle while tightening the filter assembly, it may break easily if you use too much force to tighten it. Just make sure the cap is closed properly like in this picture.
Do not forget to install the clamp back.
Step 9: Bleeding the Air
Many ASC and Local Garages do this process by simply turn the ignition on and off several times to build pressure in the fuel lines. But i don't think this is a proper method, because while doing this the air in the line is not bleeding out. It is just compressing the air by the diesel. As the beat's high pressure pump is very sensitive, this small mistake may affect the life of the pump drastically and i don't like to take that risk. So i use the following step to bleed the air in the fuel line..

Remove the fuel pipe connection from the filter to the high pressure pump.(Just press the button in the adapter and pull the adapter upwards to remove the adapter)

Fuel line removed
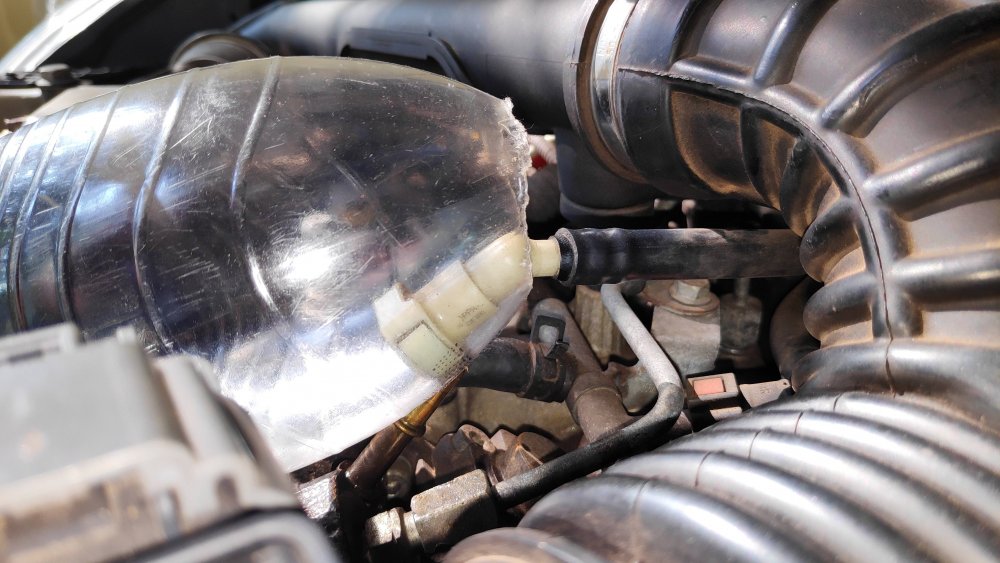
Now put the fuel line inside a bottle and turn the igniton on and off for 8-10 times.

While doing this you can hear the air escaping from the line like our water tap. After some on and off's, you can see the fuel flowing continuesly from the pipe without any air. This means that you are successfully bleed the air in the system.
Now, install the fuel line back by simply pressing it in (Make sure you hear a click sound while doing this).
Voila!! Task Completed!![[clap]](https://www.theautomotiveindia.com/forums/images/smilies/Clap.gif "Clap [clap]")
Finally, got some time to replace the diesel filter. As i was busy with some other works, i didn't had time to get this done.While replacing the diesel filter,keep in mind that you must do the 'Air Bleeding' process properly. Because improper bleeding may screw your high pressure pump.
Okay so enough talking, let's jump into the process...
THINGS NEEDED
13 mm ring spanner
36 mm socket, handle and extension
Diesel Filter
Flat Head Screw Driver
Drain pan
Jack and Jack Stands
PROCEDURE
Step 1: Jackup the rear right passenger side of the car. (The filter housing is located under this side)
Step 2: Keep a Catch Pan under the filter housing to catch diesel
Step 3 (Optional): Remove the clamp.( This will gave more room to remove the filter)
The filter housing.
Step 4: Remove the drain bolt with a flat head screw driver. (This step is optional, but it will helps to reduce the mess while removing the filter)
Step 5: Now use a 36 mm socket to remove the filter housing cap
Step 6: Replace the O Ring
Then install the new one
Step 7: Install the new filter into the filter cap assembly
The filter fits only in one direction, so no need to worry about messing up
Step 8: Install the filter back into the assembly
Now install the drain bolt back and apply a little bit of diesel in the o ring before installing the filter cover assembly to make sure it seats properly while tightening.
Be gentle while tightening the filter assembly, it may break easily if you use too much force to tighten it. Just make sure the cap is closed properly like in this picture.
Do not forget to install the clamp back.
Step 9: Bleeding the Air
Many ASC and Local Garages do this process by simply turn the ignition on and off several times to build pressure in the fuel lines. But i don't think this is a proper method, because while doing this the air in the line is not bleeding out. It is just compressing the air by the diesel. As the beat's high pressure pump is very sensitive, this small mistake may affect the life of the pump drastically and i don't like to take that risk. So i use the following step to bleed the air in the fuel line..
Remove the fuel pipe connection from the filter to the high pressure pump.(Just press the button in the adapter and pull the adapter upwards to remove the adapter)
Fuel line removed
Now put the fuel line inside a bottle and turn the igniton on and off for 8-10 times.
While doing this you can hear the air escaping from the line like our water tap
. After some on and off's, you can see the fuel flowing continuesly from the pipe without any air. This means that you are successfully bleed the air in the system.Now, install the fuel line back by simply pressing it in (Make sure you hear a click sound while doing this).
Voila!! Task Completed!
Very good DIY. Neatly completed too. I appreciate and like your diesel saving trick with the bottle. Well done.
At what intervals do you change your diesel filter?
How difficult is it to procure spares for your car, considering the present GM scenario?
At what intervals do you change your diesel filter?
How difficult is it to procure spares for your car, considering the present GM scenario?
Last edited:
Thread Starter
#22
Very good DIY. Neatly completed too. I appreciate and like your diesel saving trick with the bottle. Well done.
At what intervals do you change your diesel filter?
How difficult is it to procure spares for your car, considering the present GM scenario?
At what intervals do you change your diesel filter?
How difficult is it to procure spares for your car, considering the present GM scenario?
I change the diesel filter every 5k Kms..Because,as per the condition of the fuel available in our fuel stations, the filter may clog easily and a clogged filter kills the fuel pumps and injectors pretty soon. So its better to change it every 5K.
Right now, there is no issue with the availability of spare parts.
Every part is available and service centers are still functional. If any part is out of stock in the service center, we need to wait for 3/4 days.
Last edited:
DIY: How to Replace Diesel Filter?
Finally, got some time to replace the diesel filter. As i was busy with some other works, i didn't had time to get this done.While replacing the diesel filter,keep in mind that you must do the 'Air Bleeding' process properly. Because improper bleeding may screw your high pressure pump.
Okay so enough talking, let's jump into the process...
THINGS NEEDED
13 mm ring spanner
36 mm socket, handle and extension
Diesel Filter
Flat Head Screw Driver
Drain pan
Jack and Jack Stands
PROCEDURE
Step 1: Jackup the rear right passenger side of the car. (The filter housing is located under this side)
View attachment 269870
Step 2: Keep a Catch Pan under the filter housing to catch diesel
View attachment 269874
Step 3 (Optional): Remove the clamp.( This will gave more room to remove the filter) View attachment 269876
The filter housing.
View attachment 269877
View attachment 269879
Step 4: Remove the drain bolt with a flat head screw driver. (This step is optional, but it will helps to reduce the mess while removing the filter)
View attachment 269883
View attachment 269886
View attachment 269887 View attachment 269888 Drain Plug (This is the plug we need to use if the water in fuel lamp glows)
Step 5: Now use a 36 mm socket to remove the filter housing cap
View attachment 269889
View attachment 269891
View attachment 269892 Old Filter and Filter Housing Cap
View attachment 269893 The Filter Housing
Step 6: Replace the O Ring
View attachment 269894 Remove the old O ring by using a flat head screw driver
View attachment 269895
Then install the new one
Step 7: Install the new filter into the filter cap assembly
View attachment 269896
View attachment 269897
The filter fits only in one direction, so no need to worry about messing up
Step 8: Install the filter back into the assembly
Now install the drain bolt back and apply a little bit of diesel in the o ring before installing the filter cover assembly to make sure it seats properly while tightening.
View attachment 269898
View attachment 269900
Be gentle while tightening the filter assembly, it may break easily if you use too much force to tighten it. Just make sure the cap is closed properly like in this picture.
Do not forget to install the clamp back.
Step 9: Bleeding the Air
Many ASC and Local Garages do this process by simply turn the ignition on and off several times to build pressure in the fuel lines. But i don't think this is a proper method, because while doing this the air in the line is not bleeding out. It is just compressing the air by the diesel. As the beat's high pressure pump is very sensitive, this small mistake may affect the life of the pump drastically and i don't like to take that risk. So i use the following step to bleed the air in the fuel line..
View attachment 269906
Remove the fuel pipe connection from the filter to the high pressure pump.(Just press the button in the adapter and pull the adapter upwards to remove the adapter)
View attachment 269907
Fuel line removed
View attachment 269908
Now put the fuel line inside a bottle and turn the igniton on and off for 8-10 times.
View attachment 269910
While doing this you can hear the air escaping from the line like our water tap. After some on and off's, you can see the fuel flowing continuesly from the pipe without any air. This means that you are successfully bleed the air in the system.
Now, install the fuel line back by simply pressing it in (Make sure you hear a click sound while doing this).
Voila!! Task Completed!
Finally, got some time to replace the diesel filter. As i was busy with some other works, i didn't had time to get this done.While replacing the diesel filter,keep in mind that you must do the 'Air Bleeding' process properly. Because improper bleeding may screw your high pressure pump.
Okay so enough talking, let's jump into the process...
THINGS NEEDED
13 mm ring spanner
36 mm socket, handle and extension
Diesel Filter
Flat Head Screw Driver
Drain pan
Jack and Jack Stands
PROCEDURE
Step 1: Jackup the rear right passenger side of the car. (The filter housing is located under this side)
View attachment 269870
Step 2: Keep a Catch Pan under the filter housing to catch diesel
View attachment 269874
Step 3 (Optional): Remove the clamp.( This will gave more room to remove the filter) View attachment 269876
The filter housing.
View attachment 269877
View attachment 269879
Step 4: Remove the drain bolt with a flat head screw driver. (This step is optional, but it will helps to reduce the mess while removing the filter)
View attachment 269883
View attachment 269886
View attachment 269887 View attachment 269888 Drain Plug (This is the plug we need to use if the water in fuel lamp glows)
Step 5: Now use a 36 mm socket to remove the filter housing cap
View attachment 269889
View attachment 269891
View attachment 269892 Old Filter and Filter Housing Cap
View attachment 269893 The Filter Housing
Step 6: Replace the O Ring
View attachment 269894 Remove the old O ring by using a flat head screw driver
View attachment 269895
Then install the new one
Step 7: Install the new filter into the filter cap assembly
View attachment 269896
View attachment 269897
The filter fits only in one direction, so no need to worry about messing up
Step 8: Install the filter back into the assembly
Now install the drain bolt back and apply a little bit of diesel in the o ring before installing the filter cover assembly to make sure it seats properly while tightening.
View attachment 269898
View attachment 269900
Be gentle while tightening the filter assembly, it may break easily if you use too much force to tighten it. Just make sure the cap is closed properly like in this picture.
Do not forget to install the clamp back.
Step 9: Bleeding the Air
Many ASC and Local Garages do this process by simply turn the ignition on and off several times to build pressure in the fuel lines. But i don't think this is a proper method, because while doing this the air in the line is not bleeding out. It is just compressing the air by the diesel. As the beat's high pressure pump is very sensitive, this small mistake may affect the life of the pump drastically and i don't like to take that risk. So i use the following step to bleed the air in the fuel line..
View attachment 269906
Remove the fuel pipe connection from the filter to the high pressure pump.(Just press the button in the adapter and pull the adapter upwards to remove the adapter)
View attachment 269907
Fuel line removed
View attachment 269908
Now put the fuel line inside a bottle and turn the igniton on and off for 8-10 times.
View attachment 269910
While doing this you can hear the air escaping from the line like our water tap
. After some on and off's, you can see the fuel flowing continuesly from the pipe without any air. This means that you are successfully bleed the air in the system.Now, install the fuel line back by simply pressing it in (Make sure you hear a click sound while doing this).
Voila!! Task Completed!
Very good DIY. Neatly completed too. I appreciate and like your diesel saving trick with the bottle. Well done.
At what intervals do you change your diesel filter?
How difficult is it to procure spares for your car, considering the present GM scenario?
At what intervals do you change your diesel filter?
How difficult is it to procure spares for your car, considering the present GM scenario?
Thread Starter
#24
Could have posted a month back saving me from the gush of diesel onto my mouth lying under the car
@Auto_Psycho Is there any way to procure the service manual? Or is it possible to activate the stock fog lamp wiring just by adding the combination switch with fog lamp function and the missing relay and fuse? I traced the whole wiring from fog lamp to fuse box to combination switch, but somehow it is not working with various combinations of extra 2 wires in the combination switch assembly.
Thread Starter
#26
DIY: How to replace Strut Mounts (With Bearing)?
Recently my Beat was making a 'Thud' sound when driving though potholes in the highways. As i replaced my lower ball joints,tie rod ends and stabilizer links earlier (at around 30K kms), i am pretty damn sure that the sound was not coming from those parts. The only thing i didn't replaced at that time was the mount bush. So i am sure that the culprit is the Strut Mount Bush. But for a confirmation, i checked it and found that my assumption was correct!
What is a Strut Mount?
Strut Mount a component that attaches the suspension strut to the vehicle.It insulates the tire noise & vibrations from the vehicle. Many (front) strut mounts also contain a bearing or bearing plate that serves as the steering pivot.A strut mount is like a sandwich. One side bolts to the vehicle, the other side to the strut. In the middle is a rubber-like insulating material. So as the vehicle moves and goes over bumps, the up & down impact pushes and pulls at the mount. The mount’s job is to cushion the impacts to reduce the jarring effect, noise and vibration that could transmit into the vehicle.On many front struts, the mount also includes a bearing that the strut attaches to. With one on each side of the vehicle, these bearings act as the steering pivots. The bearing is a critical component that affects steering movement smoothness and response.
Symptoms of a Bad Strut Mount
- Clunking noises
- Vibration
- Loose, stiff or noisy steering
- Tire alignment
- Tire wear
Okay, so that's enough talking; Lets jump into the DIY!
THINGS NEEDED:
Mount Bush Kit
Flat Head Screw Driver
1/2 inch Socket set and its handles (L & T) and extensions
T50 Torx
T40 Torx
Hex Bits set/Allen Key Set
Ring Spanners
Jack
Jack Stands
Thread Locker
Multipurpose Grease
Spring Compressors
WARNING: Before we get started, i need to mention that the coil spring compressor used in this diy is a very dangerous tool. Improper usage of these coil spring compressors may cause serious injury or death. If you don't know how to use a coil spring compressor properly, do not try to do this diy. I am not encouraging newbies to use this dangerous tool. I am just explaining the procedures of how to replace a Strut Mount to prove that these jobs can also be done at home by ourselves. If you are planing to use this coil spring compressor, use it carefully AT YOUR OWN RISK. I am not responsible for any damage that happens due to the mishandling of this tool. If you don't know how to safely use these compressors, you can take the struts to your FNG and replace the mount bushes from there.
PROCEDURE:
Step 1: Jack up the front of the car and support it on Jack Stands
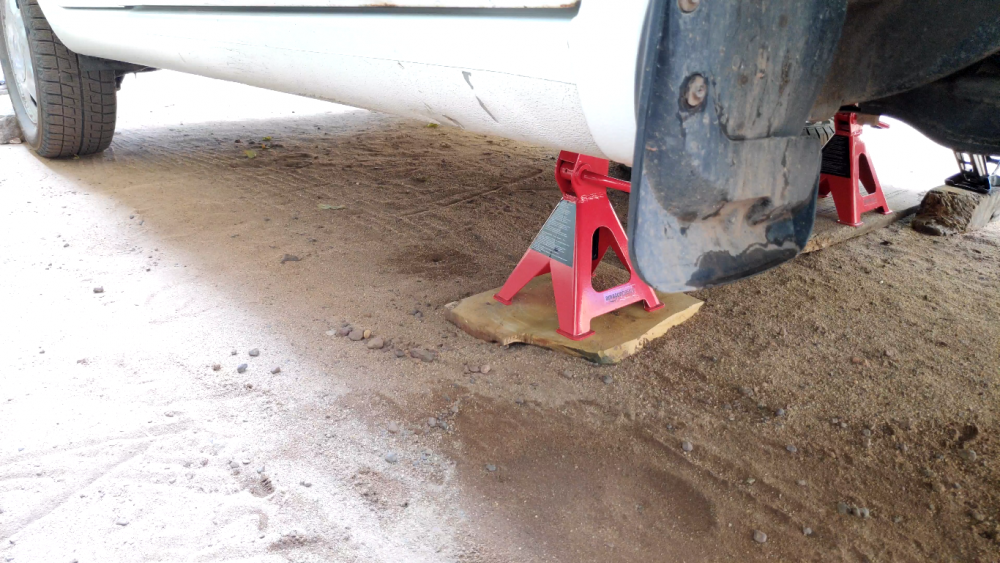
While jacking up, make sure the floor is strong enough to hold the weight of the car. ( Do not try to jack up the car in a sandy floor)
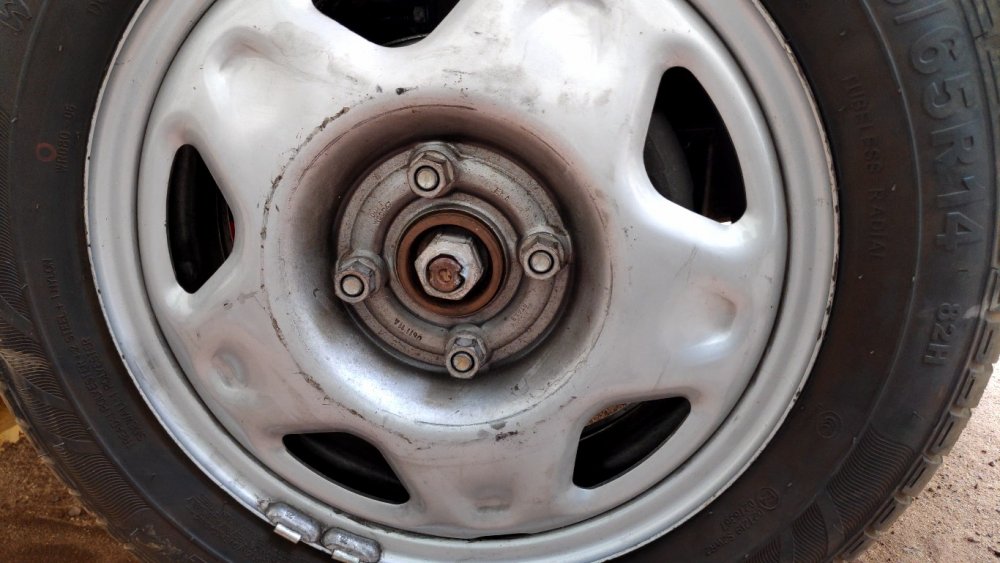
Step 2: Remove the Wheels


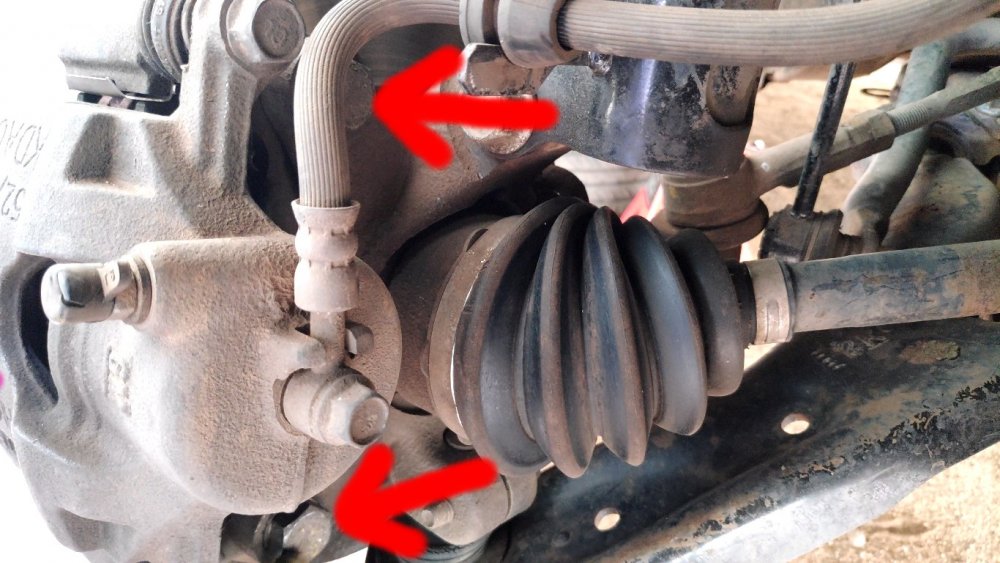
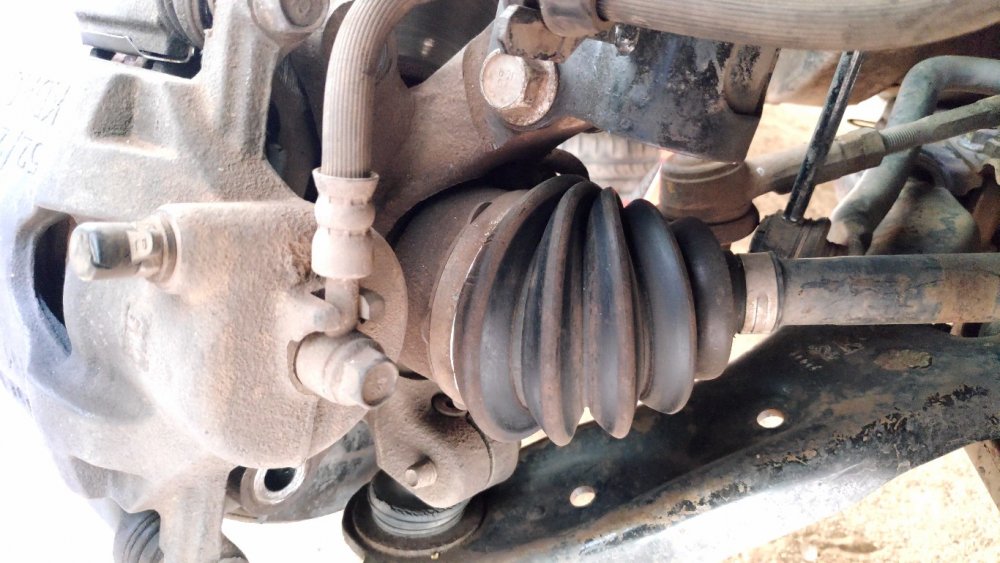
Step 3: Remove the a Caliper mounting bracket bolts and remove the whole caliper assembly
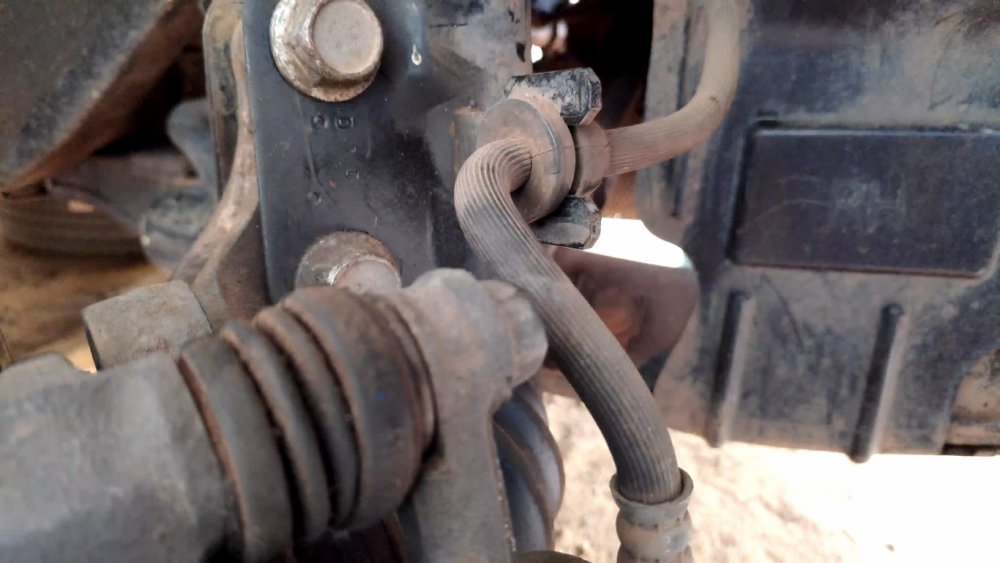
Before removing the bracket bolts,remove the brake hose from its guide by simply pulling it outwards
Remove these two bracket bolts
Bolts removed

Keep the caliper assembly aside without giving stress to the brake hose.
Step 4:Remove the stabilizer link
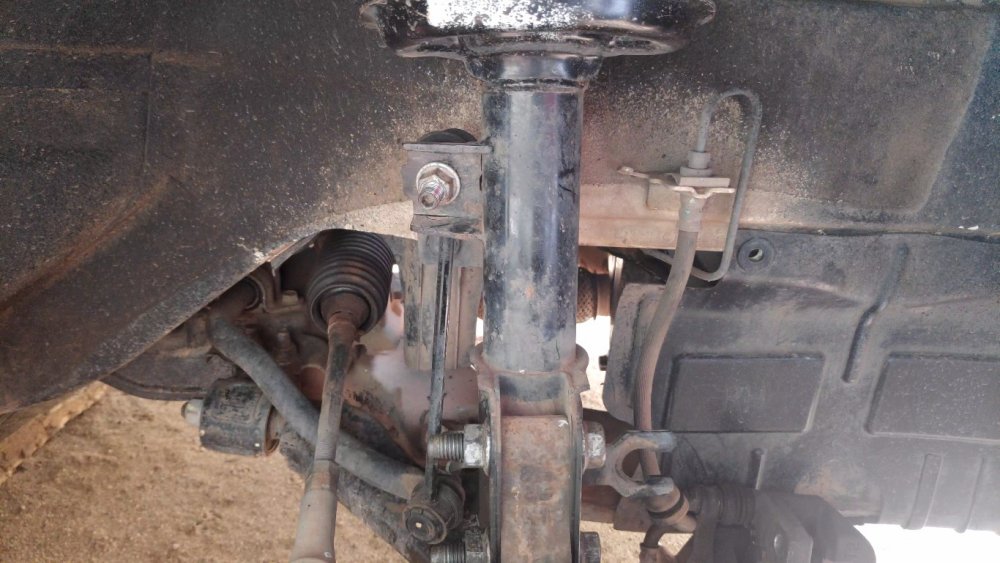

Use an appropriate hex bit/allen key to hold the ball joint and use a ring spanner to remove the nut
Stabilizer link removed!
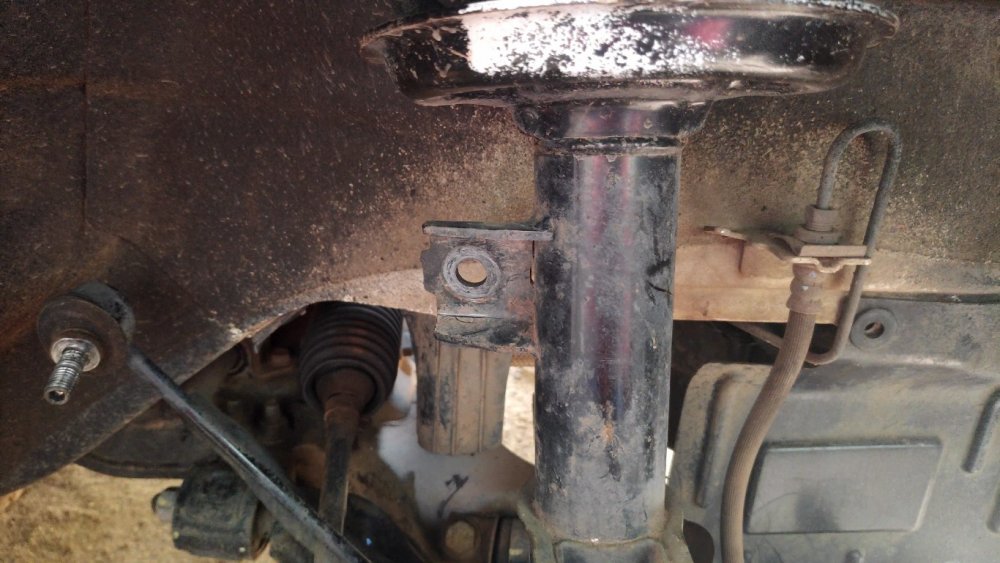
Step 5: Remove the bolts holding the strut and knuckle and separate it
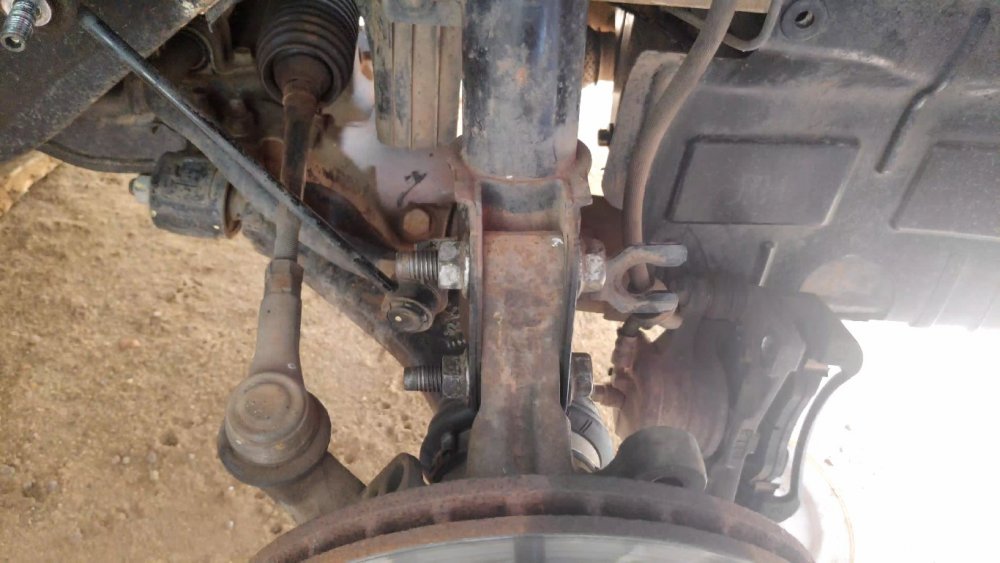
Remove the two bolts holding the strut and knuckle


Step 6: Remove Wiper and its complete panel assembly
I am sorry that i forget to take the picture of this process.![[frustration]](https://www.theautomotiveindia.com/forums/images/smilies/Frustration.gif "Frustration [frustration]") The process is quite simple, just remove some nuts,clips and wiper motor wiring harness and you can easily remove wiper and its related panels. By removing this, we get a lot of room to use the tools.
The process is quite simple, just remove some nuts,clips and wiper motor wiring harness and you can easily remove wiper and its related panels. By removing this, we get a lot of room to use the tools.

Step 7: Remove the nut holding the strut assembly and remove the complete strut assembly
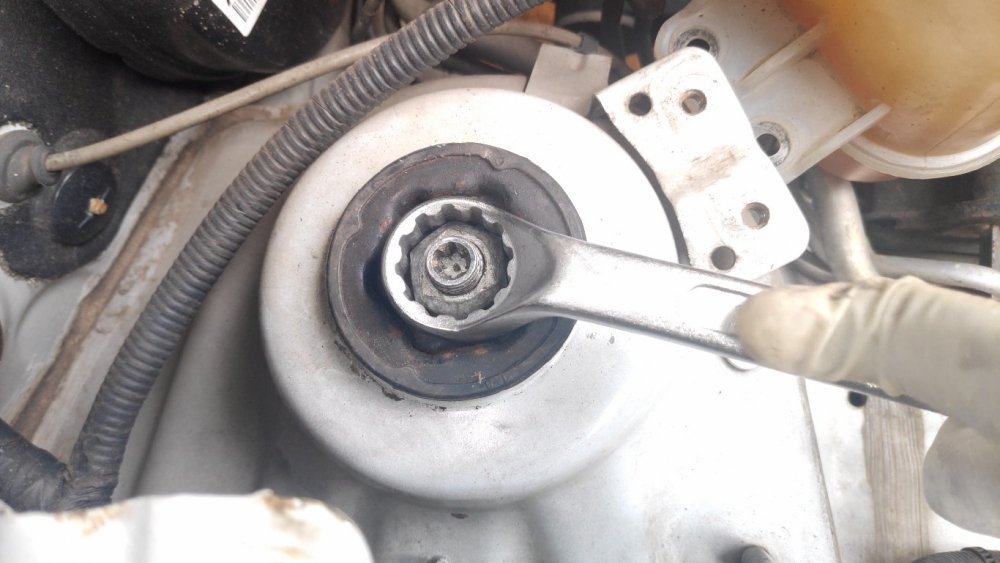

Use T50 torx bit to hold the strut and use ring spanner to remove the bolt
Bolt removed!
Remove the strut assembly

After Strut removed!
Step 8: Compress the Spring
Strut Assembly!

Insert the jaws of the spring compressor into the springs and tighten the compressor.


Keep in mind that if the jaws of the compressor slips while tightening (Check the above pic), the spring may shoot at you at an EXTREEEME force and that is enough to kill you. So be very careful while doing this. While tightening the compressor tighten both compressors evenly. If you try to compress from one side completely the spring may bend to one side and slip from the jaws of the compressor and thus creating a dangerous scenario. So compress it evenly.
Spring compressed!
Step 9:Replace the mount bush

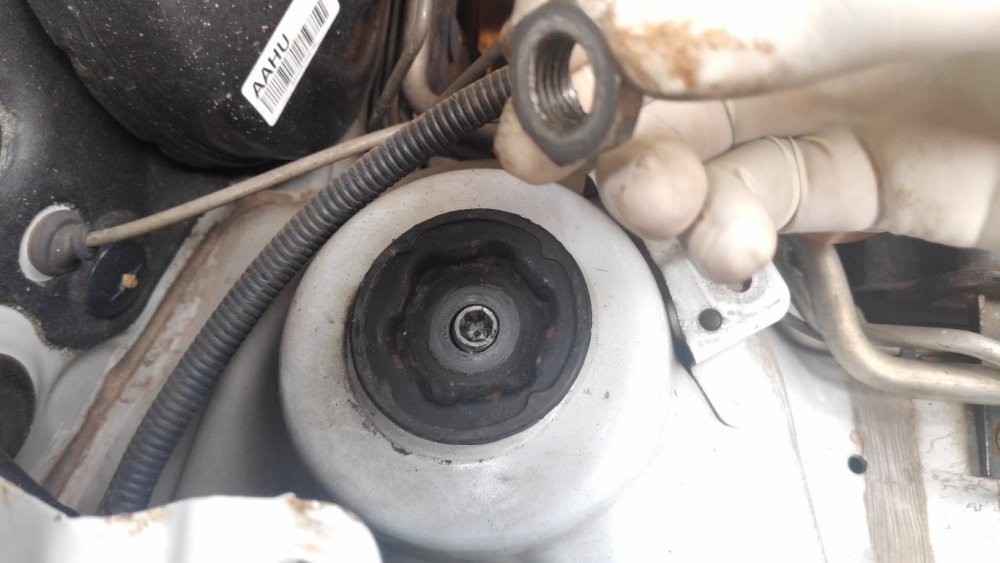
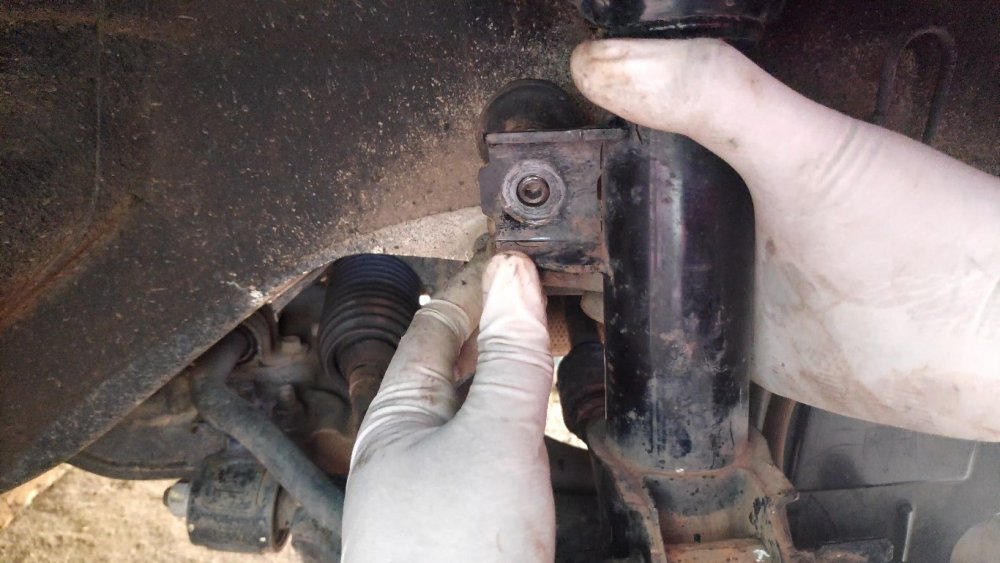
Remove the nut holding the strut mount. (Do not try to remove the nut without compressing the spring)
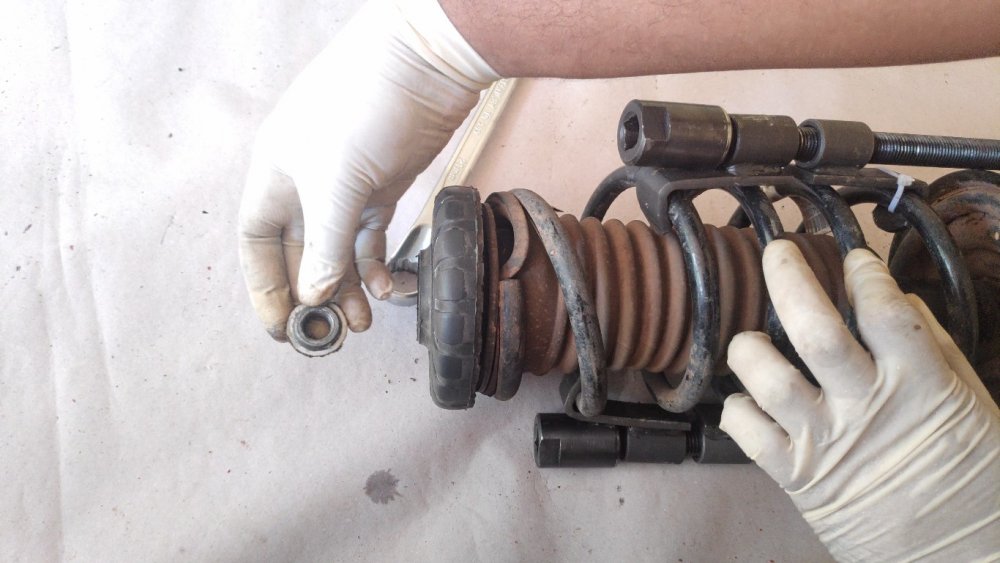
Nut removed

Old damaged strut mount

New One!

Old vs New

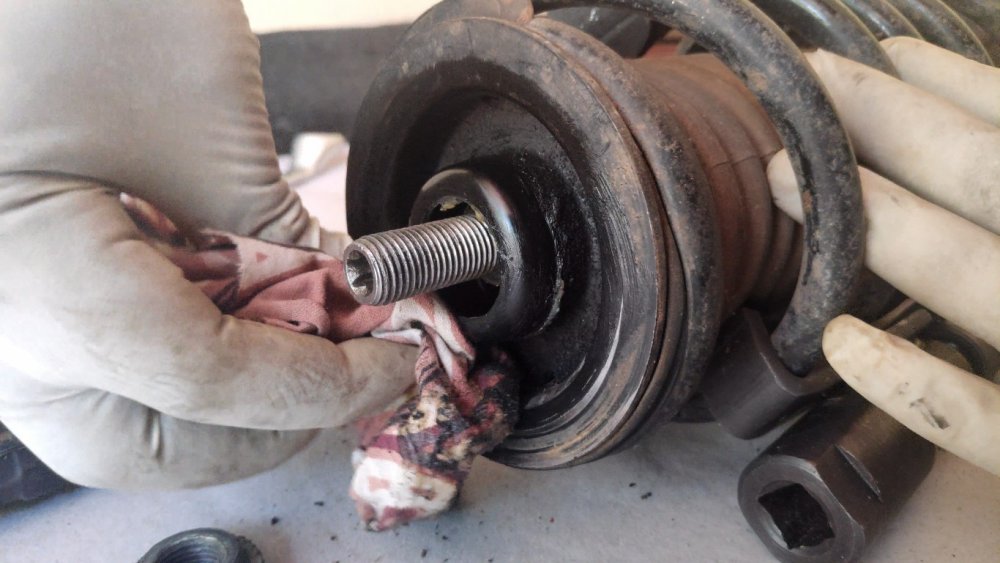
Check out the height of the bushing material,this gap is creating the 'thud' sound while hitting potholes.

Clean the old grease and dirt and apply fresh new grease


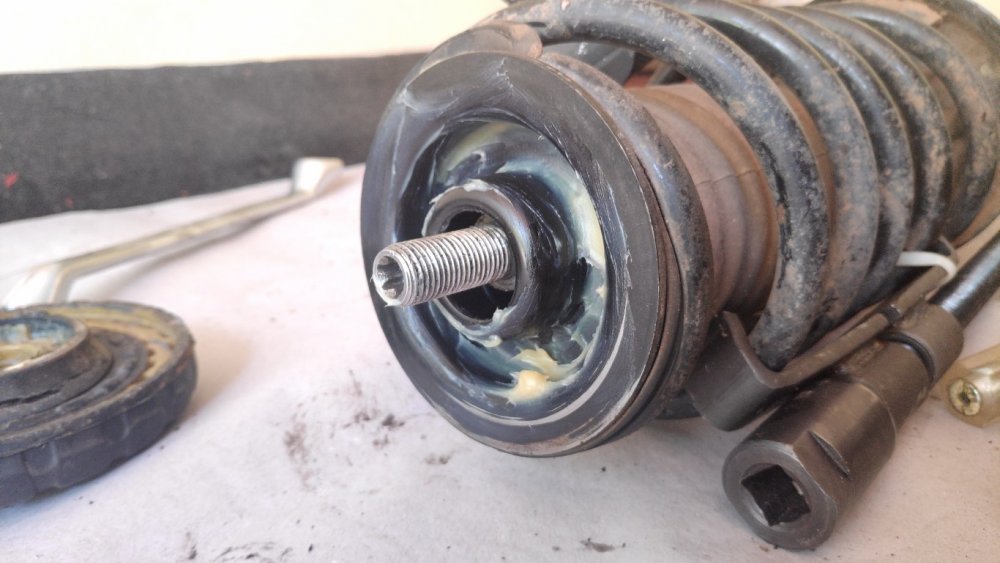
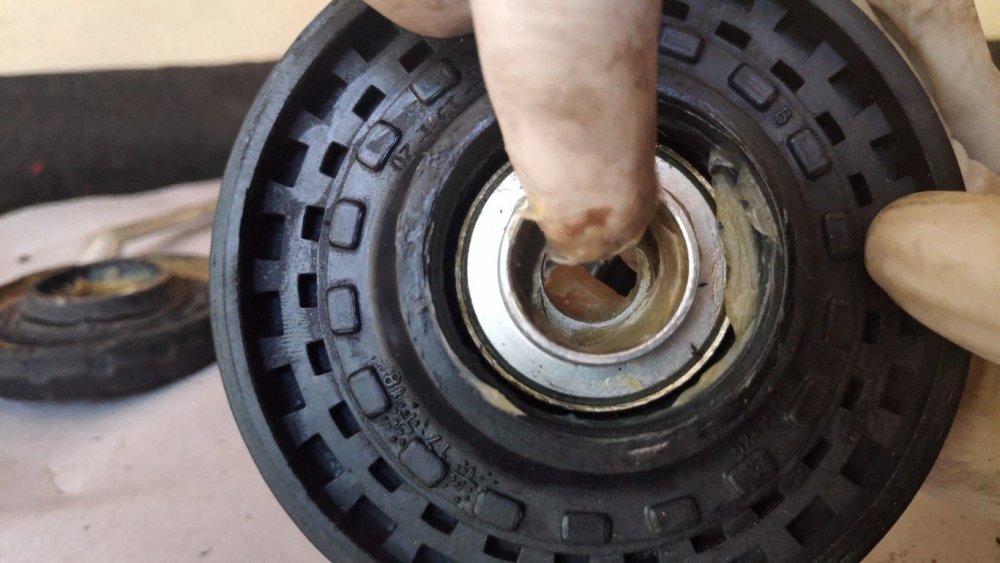
Do not forget to apply grease to the bearing too..

Install the strut mount back and tighten the nut.

Loosen the spring compressor carefully and evenly to avoid casuality.
Step 10: Install the strut back


New strut mount kit comes with new mount plate also
New mount plate.

Tighten the nut.
Step 11: Align the knuckle properly into the strut and tighten the bolts


Before Installing the bolts,clean the threads using a metal wire brush.

Apply a little bit of thread locker to the threads of the bolts to prevent it from loosening up due to vibration

Tighten the bolts.

Step 12: Install the Stabilizer Link
Insert the stabilizer link into the strut and tighten the nut.


Step 13: Install the Wheels
Step 14: Do the same steps to other side also
While replacing strut mounts, always replace them in pairs.
Kudos Job Completed! No more annoying 'Thud Thud'![[cheers]](https://www.theautomotiveindia.com/forums/images/smilies/Cheers.gif "Cheers [cheers]")

Recently my Beat was making a 'Thud' sound when driving though potholes in the highways. As i replaced my lower ball joints,tie rod ends and stabilizer links earlier (at around 30K kms), i am pretty damn sure that the sound was not coming from those parts. The only thing i didn't replaced at that time was the mount bush. So i am sure that the culprit is the Strut Mount Bush. But for a confirmation, i checked it and found that my assumption was correct!
What is a Strut Mount?
Strut Mount a component that attaches the suspension strut to the vehicle.It insulates the tire noise & vibrations from the vehicle. Many (front) strut mounts also contain a bearing or bearing plate that serves as the steering pivot.A strut mount is like a sandwich. One side bolts to the vehicle, the other side to the strut. In the middle is a rubber-like insulating material. So as the vehicle moves and goes over bumps, the up & down impact pushes and pulls at the mount. The mount’s job is to cushion the impacts to reduce the jarring effect, noise and vibration that could transmit into the vehicle.On many front struts, the mount also includes a bearing that the strut attaches to. With one on each side of the vehicle, these bearings act as the steering pivots. The bearing is a critical component that affects steering movement smoothness and response.
Symptoms of a Bad Strut Mount
- Clunking noises
- Vibration
- Loose, stiff or noisy steering
- Tire alignment
- Tire wear
Okay, so that's enough talking; Lets jump into the DIY!
THINGS NEEDED:
Mount Bush Kit
Flat Head Screw Driver
1/2 inch Socket set and its handles (L & T) and extensions
T50 Torx
T40 Torx
Hex Bits set/Allen Key Set
Ring Spanners
Jack
Jack Stands
Thread Locker
Multipurpose Grease
Spring Compressors
WARNING: Before we get started, i need to mention that the coil spring compressor used in this diy is a very dangerous tool. Improper usage of these coil spring compressors may cause serious injury or death. If you don't know how to use a coil spring compressor properly, do not try to do this diy. I am not encouraging newbies to use this dangerous tool. I am just explaining the procedures of how to replace a Strut Mount to prove that these jobs can also be done at home by ourselves
. If you are planing to use this coil spring compressor, use it carefully AT YOUR OWN RISK. I am not responsible for any damage that happens due to the mishandling of this tool. If you don't know how to safely use these compressors, you can take the struts to your FNG and replace the mount bushes from there.PROCEDURE:
Step 1: Jack up the front of the car and support it on Jack Stands
While jacking up, make sure the floor is strong enough to hold the weight of the car. ( Do not try to jack up the car in a sandy floor)
Step 2: Remove the Wheels
Step 3: Remove the a Caliper mounting bracket bolts and remove the whole caliper assembly
Before removing the bracket bolts,remove the brake hose from its guide by simply pulling it outwards
Remove these two bracket bolts
Bolts removed
Keep the caliper assembly aside without giving stress to the brake hose.
Step 4:Remove the stabilizer link
Use an appropriate hex bit/allen key to hold the ball joint and use a ring spanner to remove the nut
Stabilizer link removed!
Step 5: Remove the bolts holding the strut and knuckle and separate it
Remove the two bolts holding the strut and knuckle
Step 6: Remove Wiper and its complete panel assembly
I am sorry that i forget to take the picture of this process.
The process is quite simple, just remove some nuts,clips and wiper motor wiring harness and you can easily remove wiper and its related panels. By removing this, we get a lot of room to use the tools.Step 7: Remove the nut holding the strut assembly and remove the complete strut assembly
Use T50 torx bit to hold the strut and use ring spanner to remove the bolt
Bolt removed!
Remove the strut assembly
After Strut removed!
Step 8: Compress the Spring
Strut Assembly!
Insert the jaws of the spring compressor into the springs and tighten the compressor.
Keep in mind that if the jaws of the compressor slips while tightening (Check the above pic), the spring may shoot at you at an EXTREEEME force and that is enough to kill you. So be very careful while doing this. While tightening the compressor tighten both compressors evenly. If you try to compress from one side completely the spring may bend to one side and slip from the jaws of the compressor and thus creating a dangerous scenario. So compress it evenly.
Spring compressed!
Step 9:Replace the mount bush
Remove the nut holding the strut mount. (Do not try to remove the nut without compressing the spring)
Nut removed
Old damaged strut mount
New One!
Old vs New
Check out the height of the bushing material,this gap is creating the 'thud' sound while hitting potholes.
Clean the old grease and dirt and apply fresh new grease
Do not forget to apply grease to the bearing too..
Install the strut mount back and tighten the nut.
Loosen the spring compressor carefully and evenly to avoid casuality.
Step 10: Install the strut back
New strut mount kit comes with new mount plate also
New mount plate.
Tighten the nut.
Step 11: Align the knuckle properly into the strut and tighten the bolts
Before Installing the bolts,clean the threads using a metal wire brush.
Apply a little bit of thread locker to the threads of the bolts to prevent it from loosening up due to vibration
Tighten the bolts.
Step 12: Install the Stabilizer Link
Insert the stabilizer link into the strut and tighten the nut.
Step 13: Install the Wheels
Step 14: Do the same steps to other side also
While replacing strut mounts, always replace them in pairs.
Kudos Job Completed! No more annoying 'Thud Thud'
Last edited:
Thread Starter
#27
@Auto_Psycho Is there any way to procure the service manual? Or is it possible to activate the stock fog lamp wiring just by adding the combination switch with fog lamp function and the missing relay and fuse? I traced the whole wiring from fog lamp to fuse box to combination switch, but somehow it is not working with various combinations of extra 2 wires in the combination switch assembly.
That's the motivation for starting up this thread! I am not sure about activating the fog lamp wiring,because mine is LT variant and it already has fog lamp.So i didn't get a chance to experiment in those areas.
If there is a wiring harness for fog lamps, there is a good chance that it can be activated.
DIY: How to replace Strut Mounts (With Bearing)?
Recently my Beat was making a 'Thud' sound when driving though potholes in the highways. As i replaced my lower ball joints,tie rod ends and stabilizer links earlier (at around 30K kms), i am pretty damn sure that the sound was not coming from those parts. The only thing i didn't replaced at that time was the mount bush. So i am sure that the culprit is the Strut Mount Bush. But for a confirmation, i checked it and found that my assumption was correct!
What is a Strut Mount?
Strut Mount a component that attaches the suspension strut to the vehicle.It insulates the tire noise & vibrations from the vehicle. Many (front) strut mounts also contain a bearing or bearing plate that serves as the steering pivot.A strut mount is like a sandwich. One side bolts to the vehicle, the other side to the strut. In the middle is a rubber-like insulating material. So as the vehicle moves and goes over bumps, the up & down impact pushes and pulls at the mount. The mount’s job is to cushion the impacts to reduce the jarring effect, noise and vibration that could transmit into the vehicle.On many front struts, the mount also includes a bearing that the strut attaches to. With one on each side of the vehicle, these bearings act as the steering pivots. The bearing is a critical component that affects steering movement smoothness and response.
Symptoms of a Bad Strut Mount
- Clunking noises
- Vibration
- Loose, stiff or noisy steering
- Tire alignment
- Tire wear
Okay, so that's enough talking; Lets jump into the DIY!
THINGS NEEDED:
Mount Bush Kit
Flat Head Screw Driver
1/2 inch Socket set and its handles (L & T) and extensions
T50 Torx
T40 Torx
Hex Bits set/Allen Key Set
Ring Spanners
Jack
Jack Stands
Thread Locker
Multipurpose Grease
Spring Compressors
WARNING: Before we get started, i need to mention that the coil spring compressor used in this diy is a very dangerous tool. Improper usage of these coil spring compressors may cause serious injury or death. If you don't know how to use a coil spring compressor properly, do not try to do this diy. I am not encouraging newbies to use this dangerous tool. I am just explaining the procedures of how to replace a Strut Mount to prove that these jobs can also be done at home by ourselves. If you are planing to use this coil spring compressor, use it carefully AT YOUR OWN RISK. I am not responsible for any damage that happens due to the mishandling of this tool. If you don't know how to safely use these compressors, you can take the struts to your FNG and replace the mount bushes from there.
PROCEDURE:
Step 1: Jack up the front of the car and support it on Jack Stands
View attachment 272110
While jacking up, make sure the floor is strong enough to hold the weight of the car. ( Do not try to jack up the car in a sandy floor)
Step 2: Remove the Wheels
View attachment 272048
View attachment 272049
View attachment 272126
Step 3: Remove the a Caliper mounting bracket bolts and remove the whole caliper assembly
View attachment 272113
Before removing the bracket bolts,remove the brake hose from its guide by simply pulling it outwards
View attachment 272112
Remove these two bracket bolts
View attachment 272052
Bolts removed
View attachment 272054
Keep the caliper assembly aside without giving stress to the brake hose.
Step 4:Remove the stabilizer link
View attachment 272055
View attachment 272056
Use an appropriate hex bit/allen key to hold the ball joint and use a ring spanner to remove the nut
View attachment 272057
Stabilizer link removed!
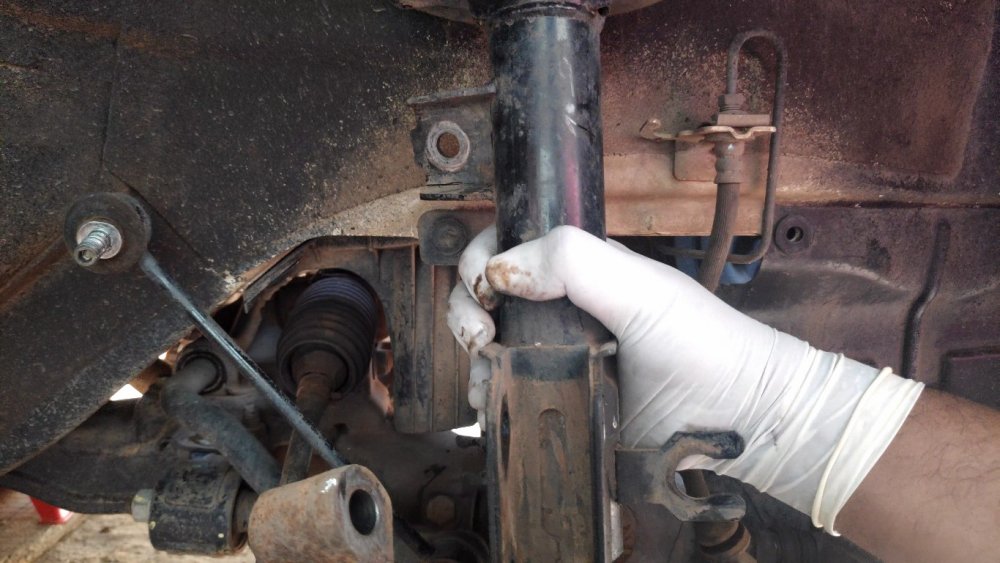
Step 5: Remove the bolts holding the strut and knuckle and separate it
View attachment 272058
Remove the two bolts holding the strut and knuckle
View attachment 272059
View attachment 272061
Step 6: Remove Wiper and its complete panel assembly
I am sorry that i forget to take the picture of this process.The process is quite simple, just remove some nuts,clips and wiper motor wiring harness and you can easily remove wiper and its related panels. By removing this, we get a lot of room to use the tools.
View attachment 272062
Step 7: Remove the nut holding the strut assembly and remove the complete strut assembly
View attachment 272063
View attachment 272065
Use T50 torx bit to hold the strut and use ring spanner to remove the bolt
View attachment 272066
Bolt removed!
View attachment 272067
Remove the strut assembly
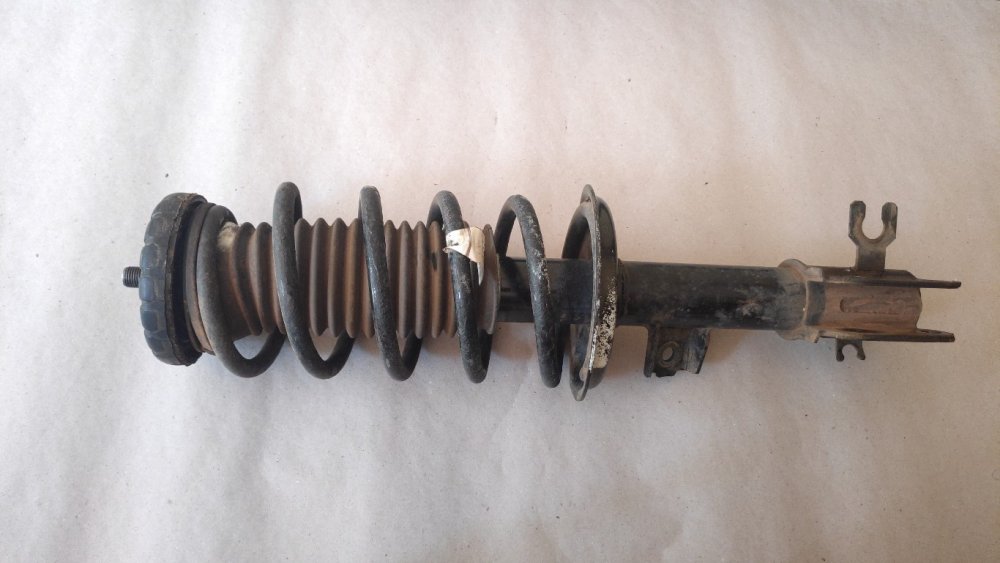
View attachment 272068
After Strut removed!
Step 8: Compress the Spring
View attachment 272069
Strut Assembly!
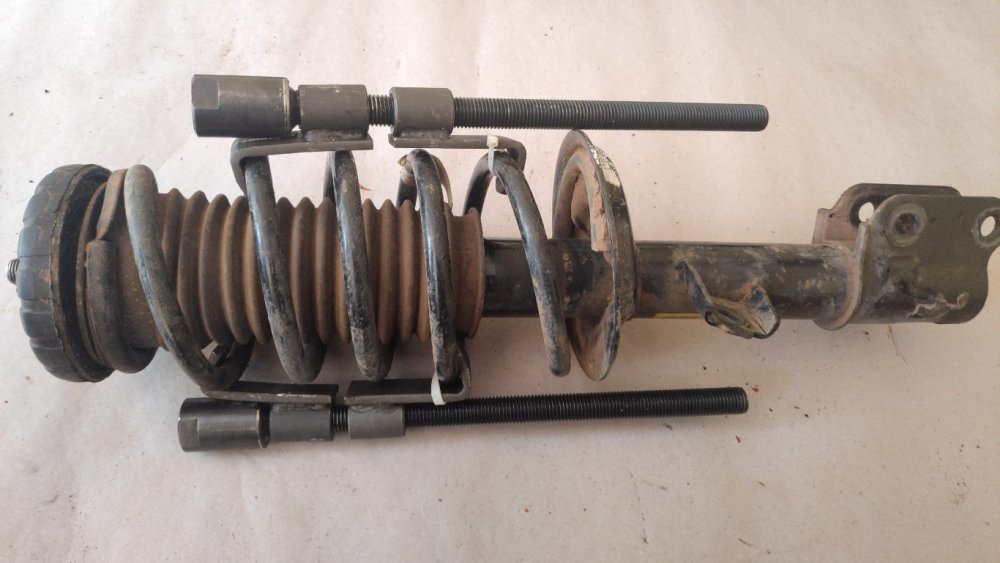
View attachment 272072
Insert the jaws of the spring compressor into the springs and tighten the compressor.
View attachment 272073
View attachment 272074
Keep in mind that if the jaws of the compressor slips while tightening (Check the above pic), the spring may shoot at you at an EXTREEEME force and that is enough to kill you. So be very careful while doing this. While tightening the compressor tighten both compressors evenly. If you try to compress from one side completely the spring may bend to one side and slip from the jaws of the compressor and thus creating a dangerous scenario. So compress it evenly.
View attachment 272075
Spring compressed!
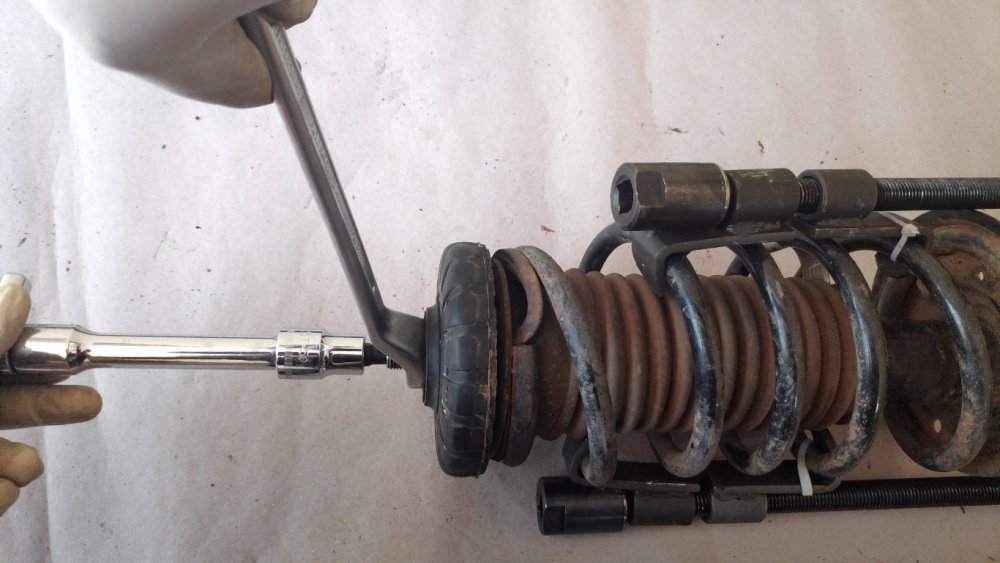
Step 9:Replace the mount bush
View attachment 272076
Remove the nut holding the strut mount. (Do not try to remove the nut without compressing the spring)
View attachment 272077
View attachment 272078
Nut removed
View attachment 272093
Old damaged strut mount
View attachment 272080
New One!
View attachment 272081
Old vs New
View attachment 272082
Check out the height of the bushing material,this gap is creating the 'thud' sound while hitting potholes.
View attachment 272083
Clean the old grease and dirt and apply fresh new grease
View attachment 272084 View attachment 272085
View attachment 272086
View attachment 272087
View attachment 272088
Do not forget to apply grease to the bearing too..
View attachment 272089
Install the strut mount back and tighten the nut.
View attachment 272090
View attachment 272091
View attachment 272092
Loosen the spring compressor carefully and evenly to avoid casuality.
Step 10: Install the strut back
View attachment 272094
View attachment 272095
View attachment 272096
View attachment 272097
New strut mount kit comes with new mount plate also
View attachment 272098
New mount plate.
View attachment 272099
View attachment 272100
Tighten the nut.
Step 11: Align the knuckle properly into the strut and tighten the bolts
View attachment 272101
View attachment 272102
Before Installing the bolts,clean the threads using a metal wire brush.
View attachment 272103
Apply a little bit of thread locker to the threads of the bolts to prevent it from loosening up due to vibration
View attachment 272104
Tighten the bolts.
View attachment 272105
Step 12: Install the Stabilizer Link
View attachment 272106
Insert the stabilizer link into the strut and tighten the nut.
View attachment 272107
View attachment 272108
Step 13: Install the Wheels
View attachment 272109
Step 14: Do the same steps to other side also
While replacing strut mounts, always replace them in pairs.
Kudos Job Completed! No more annoying 'Thud Thud'
View attachment 272123
Recently my Beat was making a 'Thud' sound when driving though potholes in the highways. As i replaced my lower ball joints,tie rod ends and stabilizer links earlier (at around 30K kms), i am pretty damn sure that the sound was not coming from those parts. The only thing i didn't replaced at that time was the mount bush. So i am sure that the culprit is the Strut Mount Bush. But for a confirmation, i checked it and found that my assumption was correct!
What is a Strut Mount?
Strut Mount a component that attaches the suspension strut to the vehicle.It insulates the tire noise & vibrations from the vehicle. Many (front) strut mounts also contain a bearing or bearing plate that serves as the steering pivot.A strut mount is like a sandwich. One side bolts to the vehicle, the other side to the strut. In the middle is a rubber-like insulating material. So as the vehicle moves and goes over bumps, the up & down impact pushes and pulls at the mount. The mount’s job is to cushion the impacts to reduce the jarring effect, noise and vibration that could transmit into the vehicle.On many front struts, the mount also includes a bearing that the strut attaches to. With one on each side of the vehicle, these bearings act as the steering pivots. The bearing is a critical component that affects steering movement smoothness and response.
Symptoms of a Bad Strut Mount
- Clunking noises
- Vibration
- Loose, stiff or noisy steering
- Tire alignment
- Tire wear
Okay, so that's enough talking; Lets jump into the DIY!
THINGS NEEDED:
Mount Bush Kit
Flat Head Screw Driver
1/2 inch Socket set and its handles (L & T) and extensions
T50 Torx
T40 Torx
Hex Bits set/Allen Key Set
Ring Spanners
Jack
Jack Stands
Thread Locker
Multipurpose Grease
Spring Compressors
WARNING: Before we get started, i need to mention that the coil spring compressor used in this diy is a very dangerous tool. Improper usage of these coil spring compressors may cause serious injury or death. If you don't know how to use a coil spring compressor properly, do not try to do this diy. I am not encouraging newbies to use this dangerous tool. I am just explaining the procedures of how to replace a Strut Mount to prove that these jobs can also be done at home by ourselves
. If you are planing to use this coil spring compressor, use it carefully AT YOUR OWN RISK. I am not responsible for any damage that happens due to the mishandling of this tool. If you don't know how to safely use these compressors, you can take the struts to your FNG and replace the mount bushes from there.PROCEDURE:
Step 1: Jack up the front of the car and support it on Jack Stands
View attachment 272110
While jacking up, make sure the floor is strong enough to hold the weight of the car. ( Do not try to jack up the car in a sandy floor)
Step 2: Remove the Wheels
View attachment 272048
View attachment 272049
View attachment 272126
Step 3: Remove the a Caliper mounting bracket bolts and remove the whole caliper assembly
View attachment 272113
Before removing the bracket bolts,remove the brake hose from its guide by simply pulling it outwards
View attachment 272112
Remove these two bracket bolts
View attachment 272052
Bolts removed
View attachment 272054
Keep the caliper assembly aside without giving stress to the brake hose.
Step 4:Remove the stabilizer link
View attachment 272055
View attachment 272056
Use an appropriate hex bit/allen key to hold the ball joint and use a ring spanner to remove the nut
View attachment 272057
Stabilizer link removed!
Step 5: Remove the bolts holding the strut and knuckle and separate it
View attachment 272058
Remove the two bolts holding the strut and knuckle
View attachment 272059
View attachment 272061
Step 6: Remove Wiper and its complete panel assembly
I am sorry that i forget to take the picture of this process.
The process is quite simple, just remove some nuts,clips and wiper motor wiring harness and you can easily remove wiper and its related panels. By removing this, we get a lot of room to use the tools.View attachment 272062
Step 7: Remove the nut holding the strut assembly and remove the complete strut assembly
View attachment 272063
View attachment 272065
Use T50 torx bit to hold the strut and use ring spanner to remove the bolt
View attachment 272066
Bolt removed!
View attachment 272067
Remove the strut assembly
View attachment 272068
After Strut removed!
Step 8: Compress the Spring
View attachment 272069
Strut Assembly!
View attachment 272072
Insert the jaws of the spring compressor into the springs and tighten the compressor.
View attachment 272073
View attachment 272074
Keep in mind that if the jaws of the compressor slips while tightening (Check the above pic), the spring may shoot at you at an EXTREEEME force and that is enough to kill you. So be very careful while doing this. While tightening the compressor tighten both compressors evenly. If you try to compress from one side completely the spring may bend to one side and slip from the jaws of the compressor and thus creating a dangerous scenario. So compress it evenly.
View attachment 272075
Spring compressed!
Step 9:Replace the mount bush
View attachment 272076
Remove the nut holding the strut mount. (Do not try to remove the nut without compressing the spring)
View attachment 272077
View attachment 272078
Nut removed
View attachment 272093
Old damaged strut mount
View attachment 272080
New One!
View attachment 272081
Old vs New
View attachment 272082
Check out the height of the bushing material,this gap is creating the 'thud' sound while hitting potholes.
View attachment 272083
Clean the old grease and dirt and apply fresh new grease
View attachment 272084 View attachment 272085
View attachment 272086
View attachment 272087
View attachment 272088
Do not forget to apply grease to the bearing too..
View attachment 272089
Install the strut mount back and tighten the nut.
View attachment 272090
View attachment 272091
View attachment 272092
Loosen the spring compressor carefully and evenly to avoid casuality.
Step 10: Install the strut back
View attachment 272094
View attachment 272095
View attachment 272096
View attachment 272097
New strut mount kit comes with new mount plate also
View attachment 272098
New mount plate.
View attachment 272099
View attachment 272100
Tighten the nut.
Step 11: Align the knuckle properly into the strut and tighten the bolts
View attachment 272101
View attachment 272102
Before Installing the bolts,clean the threads using a metal wire brush.
View attachment 272103
Apply a little bit of thread locker to the threads of the bolts to prevent it from loosening up due to vibration
View attachment 272104
Tighten the bolts.
View attachment 272105
Step 12: Install the Stabilizer Link
View attachment 272106
Insert the stabilizer link into the strut and tighten the nut.
View attachment 272107
View attachment 272108
Step 13: Install the Wheels
View attachment 272109
Step 14: Do the same steps to other side also
While replacing strut mounts, always replace them in pairs.
Kudos Job Completed! No more annoying 'Thud Thud'
View attachment 272123
@deville_56 No, the service manual is not available anywhere. I searched a lot for getting one. But can't find one! That's the motivation for starting up this thread!
I am not sure about activating the fog lamp wiring,because mine is LT variant and it already has fog lamp.So i didn't get a chance to experiment in those areas.
If there is a wiring harness for fog lamps, there is a good chance that it can be activated.
I am not sure about activating the fog lamp wiring,because mine is LT variant and it already has fog lamp.So i didn't get a chance to experiment in those areas.
If there is a wiring harness for fog lamps, there is a good chance that it can be activated.
Also got the sad fact that Chevy never released the repair manual for Beat, but announced pre-publication at $300.00, which never materialized. Such an irresponsible brand. Maybe there would be a dealer version with separate revision add-ons. Last hope is getting hold of that.
Thread Starter
#29
Dug through the international Chevy forum. Got a lead that it would work with the addition of missing elements and the switch, but I doubt something is missing. Combination switch costs around 1k, so wanted to clarify before getting one.
Also got the sad fact that Chevy never released the repair manual for Beat, but announced pre-publication at $300.00, which never materialized. Such an irresponsible brand. Maybe there would be a dealer version with separate revision add-ons. Last hope is getting hold of that.
Also got the sad fact that Chevy never released the repair manual for Beat, but announced pre-publication at $300.00, which never materialized. Such an irresponsible brand. Maybe there would be a dealer version with separate revision add-ons. Last hope is getting hold of that.
![[think]](https://www.theautomotiveindia.com/forums/images/smilies/Thinking.gif "Thinking [think]")
DIY: How to replace Strut Mounts (With Bearing)?
Recently my Beat was making a 'Thud' sound when driving though potholes in the highways. As i replaced my lower ball joints,tie rod ends and stabilizer links earlier (at around 30K kms), i am pretty damn sure that the sound was not coming from those parts. The only thing i didn't replaced at that time was the mount bush. So i am sure that the culprit is the Strut Mount Bush. But for a confirmation, i checked it and found that my assumption was correct!
What is a Strut Mount?
Strut Mount a component that attaches the suspension strut to the vehicle.It insulates the tire noise & vibrations from the vehicle. Many (front) strut mounts also contain a bearing or bearing plate that serves as the steering pivot.A strut mount is like a sandwich. One side bolts to the vehicle, the other side to the strut. In the middle is a rubber-like insulating material. So as the vehicle moves and goes over bumps, the up & down impact pushes and pulls at the mount. The mount’s job is to cushion the impacts to reduce the jarring effect, noise and vibration that could transmit into the vehicle.On many front struts, the mount also includes a bearing that the strut attaches to. With one on each side of the vehicle, these bearings act as the steering pivots. The bearing is a critical component that affects steering movement smoothness and response.
Symptoms of a Bad Strut Mount
- Clunking noises
- Vibration
- Loose, stiff or noisy steering
- Tire alignment
- Tire wear
Okay, so that's enough talking; Lets jump into the DIY!
THINGS NEEDED:
Mount Bush Kit
Flat Head Screw Driver
1/2 inch Socket set and its handles (L & T) and extensions
T50 Torx
T40 Torx
Hex Bits set/Allen Key Set
Ring Spanners
Jack
Jack Stands
Thread Locker
Multipurpose Grease
Spring Compressors
WARNING: Before we get started, i need to mention that the coil spring compressor used in this diy is a very dangerous tool. Improper usage of these coil spring compressors may cause serious injury or death. If you don't know how to use a coil spring compressor properly, do not try to do this diy. I am not encouraging newbies to use this dangerous tool. I am just explaining the procedures of how to replace a Strut Mount to prove that these jobs can also be done at home by ourselves. If you are planing to use this coil spring compressor, use it carefully AT YOUR OWN RISK. I am not responsible for any damage that happens due to the mishandling of this tool. If you don't know how to safely use these compressors, you can take the struts to your FNG and replace the mount bushes from there.
PROCEDURE:
Step 1: Jack up the front of the car and support it on Jack Stands
View attachment 272110
While jacking up, make sure the floor is strong enough to hold the weight of the car. ( Do not try to jack up the car in a sandy floor)
Step 2: Remove the Wheels
View attachment 272048
View attachment 272049
View attachment 272126
Step 3: Remove the a Caliper mounting bracket bolts and remove the whole caliper assembly
View attachment 272113
Before removing the bracket bolts,remove the brake hose from its guide by simply pulling it outwards
View attachment 272112
Remove these two bracket bolts
View attachment 272052
Bolts removed
View attachment 272054
Keep the caliper assembly aside without giving stress to the brake hose.
Step 4:Remove the stabilizer link
View attachment 272055
View attachment 272056
Use an appropriate hex bit/allen key to hold the ball joint and use a ring spanner to remove the nut
View attachment 272057
Stabilizer link removed!
Step 5: Remove the bolts holding the strut and knuckle and separate it
View attachment 272058
Remove the two bolts holding the strut and knuckle
View attachment 272059
View attachment 272061
Step 6: Remove Wiper and its complete panel assembly
I am sorry that i forget to take the picture of this process.The process is quite simple, just remove some nuts,clips and wiper motor wiring harness and you can easily remove wiper and its related panels. By removing this, we get a lot of room to use the tools.
View attachment 272062
Step 7: Remove the nut holding the strut assembly and remove the complete strut assembly
View attachment 272063
View attachment 272065
Use T50 torx bit to hold the strut and use ring spanner to remove the bolt
View attachment 272066
Bolt removed!
View attachment 272067
Remove the strut assembly
View attachment 272068
After Strut removed!
Step 8: Compress the Spring
View attachment 272069
Strut Assembly!
View attachment 272072
Insert the jaws of the spring compressor into the springs and tighten the compressor.
View attachment 272073
View attachment 272074
Keep in mind that if the jaws of the compressor slips while tightening (Check the above pic), the spring may shoot at you at an EXTREEEME force and that is enough to kill you. So be very careful while doing this. While tightening the compressor tighten both compressors evenly. If you try to compress from one side completely the spring may bend to one side and slip from the jaws of the compressor and thus creating a dangerous scenario. So compress it evenly.
View attachment 272075
Spring compressed!
Step 9:Replace the mount bush
View attachment 272076
Remove the nut holding the strut mount. (Do not try to remove the nut without compressing the spring)
View attachment 272077
View attachment 272078
Nut removed
View attachment 272093
Old damaged strut mount
View attachment 272080
New One!
View attachment 272081
Old vs New
View attachment 272082
Check out the height of the bushing material,this gap is creating the 'thud' sound while hitting potholes.
View attachment 272083
Clean the old grease and dirt and apply fresh new grease
View attachment 272084 View attachment 272085
View attachment 272086
View attachment 272087
View attachment 272088
Do not forget to apply grease to the bearing too..
View attachment 272089
Install the strut mount back and tighten the nut.
View attachment 272090
View attachment 272091
View attachment 272092
Loosen the spring compressor carefully and evenly to avoid casuality.
Step 10: Install the strut back
View attachment 272094
View attachment 272095
View attachment 272096
View attachment 272097
New strut mount kit comes with new mount plate also
View attachment 272098
New mount plate.
View attachment 272099
View attachment 272100
Tighten the nut.
Step 11: Align the knuckle properly into the strut and tighten the bolts
View attachment 272101
View attachment 272102
Before Installing the bolts,clean the threads using a metal wire brush.
View attachment 272103
Apply a little bit of thread locker to the threads of the bolts to prevent it from loosening up due to vibration
View attachment 272104
Tighten the bolts.
View attachment 272105
Step 12: Install the Stabilizer Link
View attachment 272106
Insert the stabilizer link into the strut and tighten the nut.
View attachment 272107
View attachment 272108
Step 13: Install the Wheels
View attachment 272109
Step 14: Do the same steps to other side also
While replacing strut mounts, always replace them in pairs.
Kudos Job Completed! No more annoying 'Thud Thud'
View attachment 272123
Recently my Beat was making a 'Thud' sound when driving though potholes in the highways. As i replaced my lower ball joints,tie rod ends and stabilizer links earlier (at around 30K kms), i am pretty damn sure that the sound was not coming from those parts. The only thing i didn't replaced at that time was the mount bush. So i am sure that the culprit is the Strut Mount Bush. But for a confirmation, i checked it and found that my assumption was correct!
What is a Strut Mount?
Strut Mount a component that attaches the suspension strut to the vehicle.It insulates the tire noise & vibrations from the vehicle. Many (front) strut mounts also contain a bearing or bearing plate that serves as the steering pivot.A strut mount is like a sandwich. One side bolts to the vehicle, the other side to the strut. In the middle is a rubber-like insulating material. So as the vehicle moves and goes over bumps, the up & down impact pushes and pulls at the mount. The mount’s job is to cushion the impacts to reduce the jarring effect, noise and vibration that could transmit into the vehicle.On many front struts, the mount also includes a bearing that the strut attaches to. With one on each side of the vehicle, these bearings act as the steering pivots. The bearing is a critical component that affects steering movement smoothness and response.
Symptoms of a Bad Strut Mount
- Clunking noises
- Vibration
- Loose, stiff or noisy steering
- Tire alignment
- Tire wear
Okay, so that's enough talking; Lets jump into the DIY!
THINGS NEEDED:
Mount Bush Kit
Flat Head Screw Driver
1/2 inch Socket set and its handles (L & T) and extensions
T50 Torx
T40 Torx
Hex Bits set/Allen Key Set
Ring Spanners
Jack
Jack Stands
Thread Locker
Multipurpose Grease
Spring Compressors
WARNING: Before we get started, i need to mention that the coil spring compressor used in this diy is a very dangerous tool. Improper usage of these coil spring compressors may cause serious injury or death. If you don't know how to use a coil spring compressor properly, do not try to do this diy. I am not encouraging newbies to use this dangerous tool. I am just explaining the procedures of how to replace a Strut Mount to prove that these jobs can also be done at home by ourselves
. If you are planing to use this coil spring compressor, use it carefully AT YOUR OWN RISK. I am not responsible for any damage that happens due to the mishandling of this tool. If you don't know how to safely use these compressors, you can take the struts to your FNG and replace the mount bushes from there.PROCEDURE:
Step 1: Jack up the front of the car and support it on Jack Stands
View attachment 272110
While jacking up, make sure the floor is strong enough to hold the weight of the car. ( Do not try to jack up the car in a sandy floor)
Step 2: Remove the Wheels
View attachment 272048
View attachment 272049
View attachment 272126
Step 3: Remove the a Caliper mounting bracket bolts and remove the whole caliper assembly
View attachment 272113
Before removing the bracket bolts,remove the brake hose from its guide by simply pulling it outwards
View attachment 272112
Remove these two bracket bolts
View attachment 272052
Bolts removed
View attachment 272054
Keep the caliper assembly aside without giving stress to the brake hose.
Step 4:Remove the stabilizer link
View attachment 272055
View attachment 272056
Use an appropriate hex bit/allen key to hold the ball joint and use a ring spanner to remove the nut
View attachment 272057
Stabilizer link removed!
Step 5: Remove the bolts holding the strut and knuckle and separate it
View attachment 272058
Remove the two bolts holding the strut and knuckle
View attachment 272059
View attachment 272061
Step 6: Remove Wiper and its complete panel assembly
I am sorry that i forget to take the picture of this process.
The process is quite simple, just remove some nuts,clips and wiper motor wiring harness and you can easily remove wiper and its related panels. By removing this, we get a lot of room to use the tools.View attachment 272062
Step 7: Remove the nut holding the strut assembly and remove the complete strut assembly
View attachment 272063
View attachment 272065
Use T50 torx bit to hold the strut and use ring spanner to remove the bolt
View attachment 272066
Bolt removed!
View attachment 272067
Remove the strut assembly
View attachment 272068
After Strut removed!
Step 8: Compress the Spring
View attachment 272069
Strut Assembly!
View attachment 272072
Insert the jaws of the spring compressor into the springs and tighten the compressor.
View attachment 272073
View attachment 272074
Keep in mind that if the jaws of the compressor slips while tightening (Check the above pic), the spring may shoot at you at an EXTREEEME force and that is enough to kill you. So be very careful while doing this. While tightening the compressor tighten both compressors evenly. If you try to compress from one side completely the spring may bend to one side and slip from the jaws of the compressor and thus creating a dangerous scenario. So compress it evenly.
View attachment 272075
Spring compressed!
Step 9:Replace the mount bush
View attachment 272076
Remove the nut holding the strut mount. (Do not try to remove the nut without compressing the spring)
View attachment 272077
View attachment 272078
Nut removed
View attachment 272093
Old damaged strut mount
View attachment 272080
New One!
View attachment 272081
Old vs New
View attachment 272082
Check out the height of the bushing material,this gap is creating the 'thud' sound while hitting potholes.
View attachment 272083
Clean the old grease and dirt and apply fresh new grease
View attachment 272084 View attachment 272085
View attachment 272086
View attachment 272087
View attachment 272088
Do not forget to apply grease to the bearing too..
View attachment 272089
Install the strut mount back and tighten the nut.
View attachment 272090
View attachment 272091
View attachment 272092
Loosen the spring compressor carefully and evenly to avoid casuality.
Step 10: Install the strut back
View attachment 272094
View attachment 272095
View attachment 272096
View attachment 272097
New strut mount kit comes with new mount plate also
View attachment 272098
New mount plate.
View attachment 272099
View attachment 272100
Tighten the nut.
Step 11: Align the knuckle properly into the strut and tighten the bolts
View attachment 272101
View attachment 272102
Before Installing the bolts,clean the threads using a metal wire brush.
View attachment 272103
Apply a little bit of thread locker to the threads of the bolts to prevent it from loosening up due to vibration
View attachment 272104
Tighten the bolts.
View attachment 272105
Step 12: Install the Stabilizer Link
View attachment 272106
Insert the stabilizer link into the strut and tighten the nut.
View attachment 272107
View attachment 272108
Step 13: Install the Wheels
View attachment 272109
Step 14: Do the same steps to other side also
While replacing strut mounts, always replace them in pairs.
Kudos Job Completed! No more annoying 'Thud Thud'
View attachment 272123
I know it all because I too changed all 4 struts of my Swift ,and one of the front strut of my petrol Ritz at home in 2016 , all by myself. I purchased them from the parts catalogue no. and went about doing it. And I would not like to repeat that exercise ever. I did it over a period of 4-5 days.I used to get too tired after all that.I am happy You took all the safety precautions.Still there is a fear that spring compressor tool may slip,or the car may fall down.
How do you take pics of each step,when you are so keenly working on the struts and all.Just curious.
Last edited: