Royal Enfield 350 Electra 2008: Restoration and Upgrades


Thread Starter #31
Joined
Aug 17, 2012
Messages
222
Likes
172
Location
Chennai
Re: Enfield Bullet Tacho signal Options

I was seriously considering an Acewell Speedometer which is a thing of beauty but , too expensive.
When selecting a 27 gauge copper wire, did you try & match the gauge of wire in the existing coil ? And how many windings are necessary? I haven't checked my coil yet and hope to during the tacho installation.

Who knows, I am so excited about your progress that once you are done, I am inclined to copy whatever you 're doing to my UCE electra (if it doesnt spoil the looks of course)
Even I was thinking of a digital speedo setup on my Vijai Super. Check the links below.
http://beedspeed.com/lambretta-speedometer-revstemp-sipkoso-black-p-10154.html
Acewell - Acewell Speedometers - ACE-2xxx - ACE-RLx Lambretta GP and Series 3 adaptor | Digi dash | Digital Speedomter | Motorcycle Computer
The SIP Speedo is a complete unit with tacho, speed, trip, & engine temperature. But it is as expensive as the scooter itself. So added this in my wish list and wait till either the price of the speedo drops down or my scooter appreciates more such that the speed's price becomes justifiable.

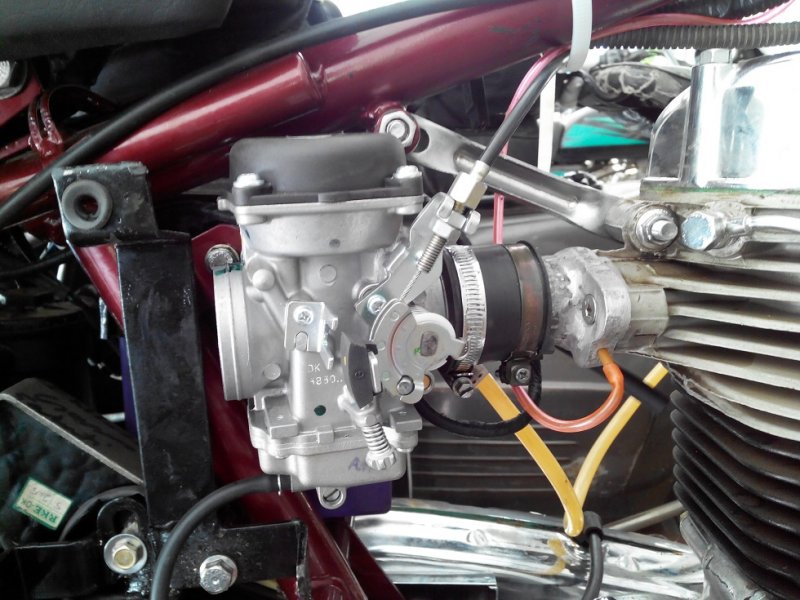
The copper wire in the alternator is really thick that it can carry a few amperes of current without any struggle. There was no calculation behind choosing the 27 guage. Went through a wire shop, scanned around for the wires he had and picked one which I could wind myself without much trouble.
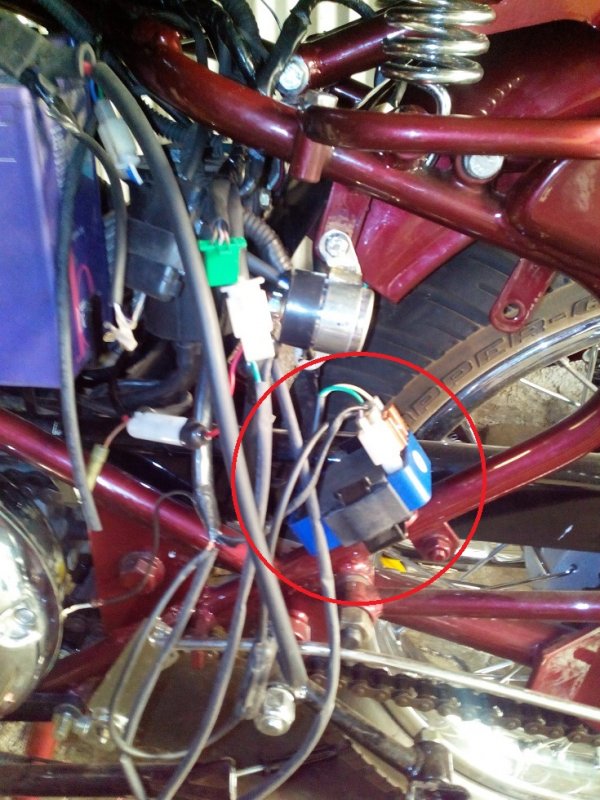
And about the number of turns, some internet search on DIY coil winding, I got to know that a stator of the size of Bullet's with 44 turns can make 20V at idle and 40V at some 4000 rpm. So I made 40 turns per pole as a rough number. Still to protect the tacho & BCU, this AC signal will be routed through a Bajaj Chetak AC regulator which can control and deliver only 12V AC. So no risk of overvoltage as the engine revs up.
 
Last edited:
Thread Starter #32
Joined
Aug 17, 2012
Messages
222
Likes
172
Location
Chennai
Standard 500 carburetor flange adaptation for RE350 & BS carb combo

The engine has been assembled as per standard specs with a new 350cc cylinder, piston & head with new valves. As planned, and after brain storming with various options to fit a BS carburetor in the CI 350 engine under the constraint that the length of the carburetor mouth from the engine head has to be minimal, the following was executed.
1. The UCE 350 carb flange - Needed some machining to match the holes. But the flange was too thick and the nuts holding it would foul with the rubber pipe. So it was dropped
2. Avenger 220 flange - Again needs more Aluminium welding. Still the same problem as above.
3. This was the one that became more feasible - A CI 500 carburetor flange.
The existing mounting holes were sealed with Aluminium welding. New holes were drilled for 6mm bolt (against the 8mm standard size).
As provision for O-ring was also machined for proper sealing, still a paper gasket will be needed.
A Helicoil was inserted into the M8X1.0 mm hole in the engine head. This item brought down the threads from M8X1.0 mm to M6X1.0 mm.
We had also made a countersink in the flange so that a M6X1.0 Countersunk bolt would sit flush and wouldn't protrude out as in the case of a stud & nut.
Attached some pictures for your reference & comments.
-Ilango
 

Attachments

Last edited by a moderator:
Joined
Dec 15, 2011
Messages
2,546
Likes
1,315
Location
M.P.
Countersink idea was a brilliant flash in the pan. Arrangement looks neat without any ugly protrusions. Yes, you shall need a gasket but that should be an easy job. Please post some snaps of the carb attached to the setup from various angles.

Exciting!
 
Thread Starter #34
Joined
Aug 17, 2012
Messages
222
Likes
172
Location
Chennai
Classic 500 handle bar and Pulsar switches

As the painter notoriously delays his commitment, we were working at our end on things which we can from home. After some 15 days of waiting the Classic 500 handlebar has arrived.
The left side grip was too tight. As I did in my Lambretta restorations, left the left side hand grip in warm water for some time and slid it into the handlebar with ease. Mounting the Pulsar switches needed some measurements, patience and drilling.
The locating notches in Pulsar Switches are on the underside while in Bullet they are on the upper side itself. And this is what was done.
1) Applied masking tape around the pipe across the switch area
2) Marked a line running along the existing locating hole
3) Marked the centre point in the upper half of Pulsar switch cover
4) Applied some ink in the locating notch in the lower half of Pulsar switch
5) Held the switch tight at the place & orientation as it should be. This left a round dot in the masking tape on the underside of the handlebar pipe
6) Hammered a sharp mark at the centre of this dot and drilled a 5mm hole.
That's it and the switch was perfectly mounted.
Meanwhile we had also checked the wiring harness for its functionality with its switches and all lamps. Sorry, haven't clicked its picture though.
Has anyone tried the UCE350 TCI unit in a CI 350 engine?
Hoping to receive all the painted parts in a day or two.
 

Attachments

Joined
Dec 15, 2011
Messages
2,546
Likes
1,315
Location
M.P.
Good jugaad, even though I just hate the Classic 500s handlebar.

Hope you have painted the egdes of the drilled holes; else you are in for a very rusty surprise. I've been through this so I know.
 
Thread Starter #36
Joined
Aug 17, 2012
Messages
222
Likes
172
Location
Chennai
Hope you have painted the egdes of the drilled holes; else you are in for a very rusty surprise. I've been through this so I know.
Thanks Sam. I ll ensure I apply some paint before the handlebar goes into the vehicle. The Classic 500 handle bar was more of my friend's choice and he owns the bike.
 
Thread Starter #37
Joined
Aug 17, 2012
Messages
222
Likes
172
Location
Chennai
The painted parts have arrived. 120/80/18 rear tyres & 90/90/19 tyres for front have been fitted. Both tyres (with tube & fitment charges) from MRF together costed Rs 4160/-.
The 2" tachometer bought by us did not have a water proof housing. So we had do devise our own from 2 old fuel meters from scrap yard.
As seen from the pictures, all 3 parts have to be glued / welded / somehow joined together for a single long water proof metal housing with a chrome ring.

Good jugaad, even though I just hate the Classic 500s handlebar.
Sam, whole of this modification has been done with proper understanding of what is being in done & I wouldn't agree to be called a Jugaad. It is by all means, at least a level more than what a veteran Bullet mechanic can do. [gun]
 

Attachments

Last edited by a moderator:
Joined
Dec 15, 2011
Messages
2,546
Likes
1,315
Location
M.P.
Zapper is a good tyre; anyday better than the OEM 3.25/3.5 inch thingies. If I were you, I would let the rear 19 inch rim remain; but I sort of understand why you have gone in for an 18 inch one. How much did the Classic rim cost?

From my experience I have found that Araldite is the simplest and most cost effective/durable way to get a waterproof housing.

Good sense of humour there - Type R logo on the rpm meter of an Enfield:lol!:.

About the jugaad thing - it was meant to refer to the drilling of the locating holes on the handlebars for fitment of Pulsar switches. No bad blood - pardon me if you felt bad about it.
 
Thread Starter #39
Joined
Aug 17, 2012
Messages
222
Likes
172
Location
Chennai
Zapper is a good tyre; anyday better than the OEM 3.25/3.5 inch thingies. If I were you, I would let the rear 19 inch rim remain; but I sort of understand why you have gone in for an 18 inch one. How much did the Classic rim cost?
I think he paid around Rs2800/-, Will check with him and confirm
From my experience I have found that Araldite is the simplest and most cost effective/durable way to get a waterproof housing.
Yes, I ll be using it to join the rings together, after devising a means to plug in the tacho illumination bulb. With the circuit board being too wide at the base, placing the bulb gets tricky
Good sense of humour there - Type R logo on the rpm meter of an Enfield:lol!:.
Who cares, Its China stuff. No surprise even if we see a Benz or BMW logo in it. Anyways I am thinking of placing a small RE logo like in the points cover of old bullets. The RE logo could be cut easily as compared to "Royal Enfield" [:)]
About the jugaad thing - it was meant to refer to the drilling of the locating holes on the handlebars for fitment of Pulsar switches. No bad blood - pardon me if you felt bad about it.
No hard feelings Sir. "Pardon me" is a big word. [:)]. Lets meet someday.
 
Last edited by a moderator:
Thread Starter #40
Joined
Aug 17, 2012
Messages
222
Likes
172
Location
Chennai
Vehicle building

While I had been out of station my colleague Ravi who owns the bullet has been busy handing over painted parts & proceeded with the assembly. As of now majority of the assembly has been done. All the parts of front side of the bike has been mounted. The new learning was that the mudguard supporting stay was different in CI Electra & Classic 350. The lower mounting point was a little short of length. After brainstorming he decided that the long arm from the Electra stay will be cut & welded with the new piece. To ensure proper fit & finish the welder was brought to the work shop and the fittings were tacked in their proper positions. The welded had done a good job, and the painter has sprayed it red matching the vehicle colour.
The gladdest part is that the engine was maiden fired with twin spark setup and CV carburetor. One could notice 2 sparkplug leads from the Santro Ignition coil. On the downside, the carburetor seems to sit straight underneath the fuel tank mounting boss. Ravi has thought of using a longer connecting hose between intake flange & carb and get rid of the resonator. He has the UCE500 oval box which will occupy the place of resonator. The UCE500 EFI air hose will connect the filter box directly to the mouth of the carburetor. The most eagerly awaited pictures follow.
 

Attachments

Joined
Dec 15, 2011
Messages
2,546
Likes
1,315
Location
M.P.
Re: Vehicle building

Are you getting the Classic seat too? In the pictures I see what look like welded on bracket/bosse(?) on the frame; I think it is meant for the Classic seat. Would it acomodate M8 bolts?

Why do I see sliders (Classic?) on the front mudguard? You could surely have made 'em look sleeker with Machismo type clamps.

The new learning was that the mudguard supporting stay was different in CI Electra & Classic 350.
And people say Royal Enfield does not have a R&D department:lol!:.
He has the UCE500 oval box which will occupy the place of resonator.
It seems the Oval box lets in some dirt/grime. Do seal it properly.
The most eagerly awaited pictures follow.
[clap][clap]
 
Thread Starter #42
Joined
Aug 17, 2012
Messages
222
Likes
172
Location
Chennai
I think he paid around Rs2800/-, Will check with him and confirm
He paid only 800Rs for the rim & used the old spokes & hub.
Are you getting the Classic seat too? In the pictures I see what look like welded on bracket/bosse(?) on the frame; I think it is meant for the Classic seat. Would it acomodate M8 bolts?
Sam, Probably you missed out this post.
http://www.theautomotiveindia.com/f...tra-2008-restoration-upgrades.html#post357718 . Yes, M8 bolts of appropriate size came with the seat & clamp itself.
Why do I see sliders (Classic?) on the front mudguard? You could surely have made 'em look sleeker with Machismo type clamps.
And people say Royal Enfield does not have a R&D department:lol!:.
It seems the Oval box lets in some dirt/grime. Do seal it properly.
Wanted the authentic looks of classic 350. That's why. :). Sure, we will ensure sealing it properly.
 
Thread Starter #43
Joined
Aug 17, 2012
Messages
222
Likes
172
Location
Chennai
BS32 Carburetor adaptation

Hi all,
The project took some turns as there were some hickups with fitting the BS32 with the flange prepared using CI500 carburetor flange. Also Ravi wanted the petrol tank to be modified to accommodate the Classic style fuel cap. Most of the bike is assembled, except for the fuel tank & side boxes. Also the wiring is complete and fully functional. Keeping Gudi Padva / Ugadi as the ultimatum for bringing the bike to the road, we headed to the mechanic on 31st march with the fuel measuring jar. After some last minute checks we identified that the BS carburetor wouldn’t sit comfortably in the hose adaptor with the fuel tank mounting boss constantly pressing the carburetor downwards. As we were desperate to move the vehicle out of the mechanic’s shed on this day, we just reverted back to VM24 and drove the bike home. The ladies of our home were eagerly waiting with Puja stuff & flowers to welcome the restored ride.
The thump was awesome and it was like Ravi’s dream come true. So again we had to brainstorm for fitting the BS32 carburetor. A carburetor flange of Pulsar / Avenger 220 procured by Ravi was helpful today. Upon a closer look we noticed that the pipe part of P220 flange was not a straight, but a little offset from the centre. Ravi headed to a Lathe shop and got the flange & pipe separated from the manifold. The RE500 flange which was prepared previously had also the flange & pipe separated. The idea was to use the RE500 flange with the P220 pipe. As the initial fitment trials proved convincing, both parts were aluminium welded and Bingo !!!, the BS32 carburetor was in place, clearing all fouling points. After a few kicks the bike roared with the BS32. The throttle response is very crisp & quick in comparison with the VM24. To ensure a faster acceleration, the TCI unit with TPS from UCE350 has been added now. The adaptation of UCE350 TCI on the CI350 is fairly simple & straight forward. If more are people interested in going for UCE350 TCI, I would be glad to share a write up in a separate post in this thread.
Also please check these videos of the twinspark & BS32 in action.
https://www.facebook.com/photo.php?v=741401295891909
https://www.facebook.com/photo.php?v=739758509389521
 

Attachments

Last edited:
Joined
Dec 15, 2011
Messages
2,546
Likes
1,315
Location
M.P.
Congrats on cometing a worthwhile project[clap]. The carb setup looks good. Lets see how the entire mechanism holds on in the long run. What colour are the spark plug electrodes?

Do share the conversion writeup on this thread only - would save botched attempts by many members wishing to do the same.
 
Thread Starter #45
Joined
Aug 17, 2012
Messages
222
Likes
172
Location
Chennai
UCE350 TCI on CI Electra 350

Installing a UCE 350 TCI unit on a CI electra is a matter of little patience and understanding the following text & pictures. The sketch drawn on the ruled paper shows the back side of the 4 pole connector which gets into the TCI unit. This connector is the same in UCE & CI, but simply swapping the TCI does not produce any spark at the spark plug because the position of wires are different. Royal enfield has followed the same colour codes for the ignition wiring in UCE & CI.
Black – Ground
Brown – 12V from Key ON
White-Red – Ignition coil
In order to make the UCE TCI work in the CI setup, the black & brown wires have to be shifted by 1 hole in the clockwise direction as looking from the wire side of the connector. You can notice that there is 1 empty location in the CI TCI connector. The black wire has to occupy this space & the brown wire will be shifted to where the black wire was removed from.

To remove the black & brown wires in a safe & reusable form, refer to the location marked by a red dot in front side of the connector. Insert a safety pin or tip or a compass at this location and lift the notch gently. You may take help of a friend to pull the wire out of the connector from the other side, while you lift the plastic notch with a sharp tip. Remove the black wire first and gently press it into the empty space in connector. The metal tip will lock with a mild click. If it does not happen and you feel like the wire is going to be loose, you will have to lift the metal notch in the end of the steel pin a little.
For the Throttle position switch (TPS), you can use the TPS from UCE350 and use its 1-2 accelerator cable. Alternately you can also use the TPS mounted in the P220 carburetor, but after shifting its position. The magnet in the throttle actuator has to meet the reed switch at 40% throttle or more.
The Pickup coil connector fits directly.
 

Attachments


Top Bottom