Installation Instructions [Hardwire Method]
This method is used when you want to make direct and permanent power connection to the dashcam.
Kindly note; this diy requires knowledge and experience in electronics, if you are not familiar, please get help from expert who knows how to do it.
Things required for installation -

Hardwire kit - You can find this in ebay.com and Aliexpress. Costs around 2.5 USD and above. There are two different types of USB connectors (i.e Mini and Micro) so make sure you get the correct one that suits your dashcam USB port. Most of dashcams have Mini USB but some are Micro. Also check the design of the USB connector because some are 90 degree bent. Amperes of 1.5A or 2A is sufficient and voltage from 12v-24v standard.
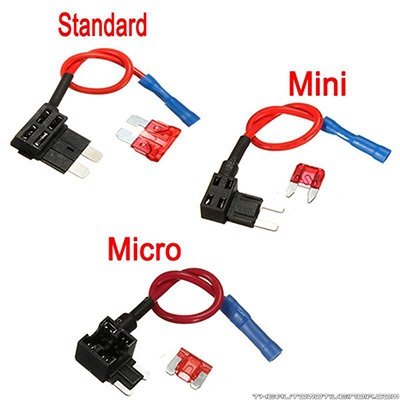
Fuse tap - This is used to tap positive voltage from fuse box and negative is taken from bolts near fuse box. So that the installation would be easy, safe and also reversible anytime. Costs around 1 USD and above. There are different sizes of fuses taps. Buy the correct one that fits in your car fuse box. Honda City uses micro aka low profile fuses. Some cars use mini fuses and some large aka standard.
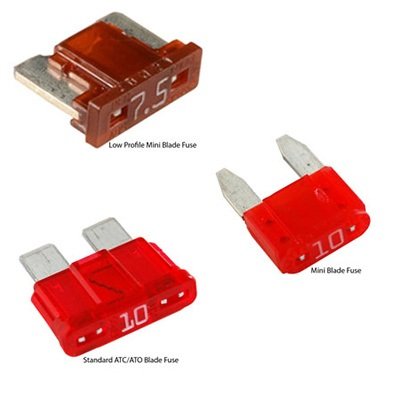
Extra fuses - Usually one or more fuse come with fuse tap but if not, you have to buy one. Fuse tap consists of two fuse slots, one for existing connection (i.e acc. fuse) and the other for tapped connection (i.e Dashcam in this case). Again, make sure you buy correct size fuses. Acc. fuse amps is normally 15A and for dashcam you can use 10A or 15A.
Soldering iron, lead and paste - Incase hardware has no cable lug.
Insulation tape, shrink tube, cable tie, cable clips
Large plastic pry tool - To pop panels.
Lets start the installation -
Step 1. Soldering joints
Note: If your hardwire has cable lug on the input wires then you don't need to solder. Just connect them, insulate and skip to step 2.
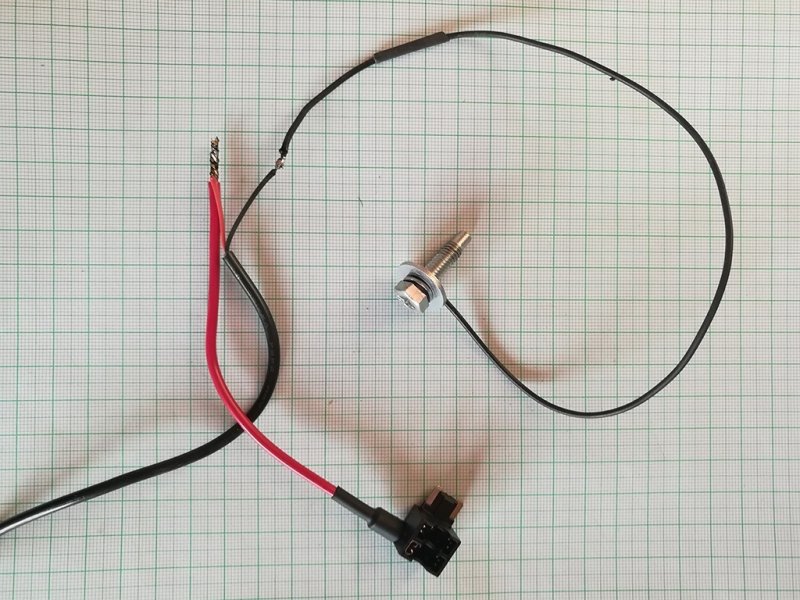
The hardwire input cable has two wires. One is positive (Red color) which needs to be soldered with fuse tap wire and another is negative (black color) that should be extended to connect to a bolt near fuse box. Make sure you insert shrink tube on the wires before soldering the joints, so you can seal the them later.
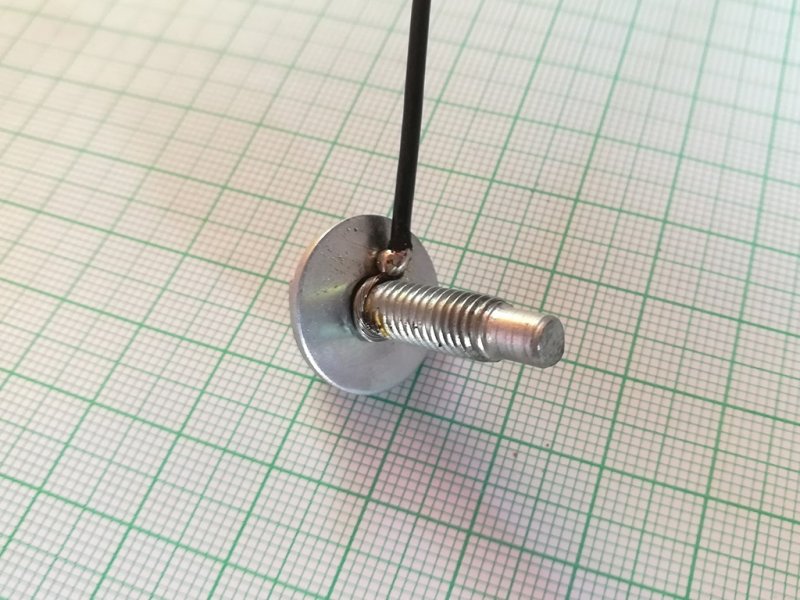
Remove any bolt near fuse box that is screwed to metal and solder the negative wire around it. You can also use cable lug.

Once done, use insulation tape to tie the wires. Now you have finished the soldering work and hardwire is ready to install.
Step 2. Removing driver side glove box and firewall panel
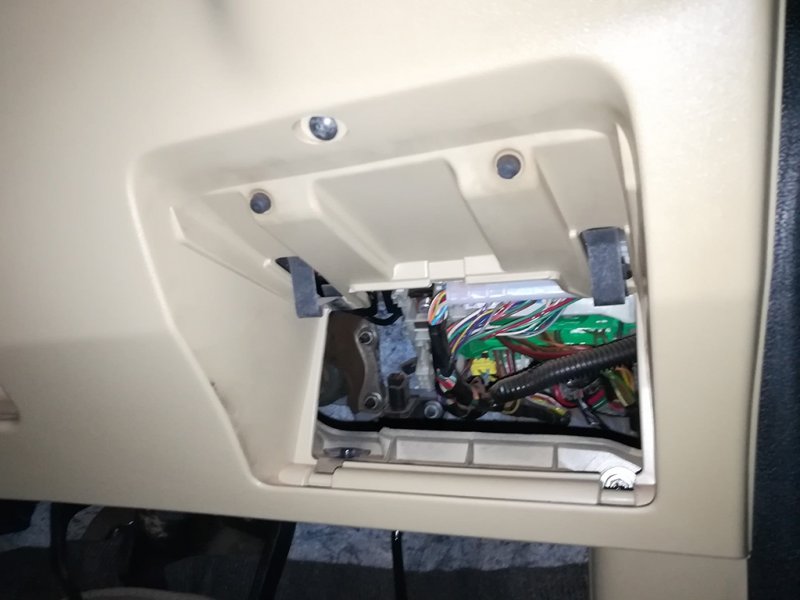
In the Honda City 3rd gen, the fuse box is hidden behind driver side glove box.

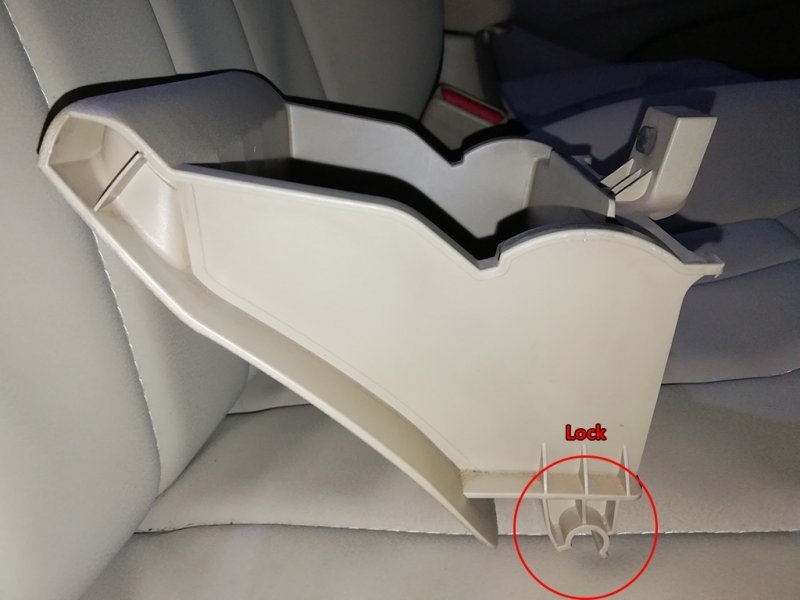
To remove glove box, push/pull on both sides (upwards) and it will pop out. Take out the glove box and keep aside. Reinstalling is little difficult so watch how you remove it so you can reverse the process easily.
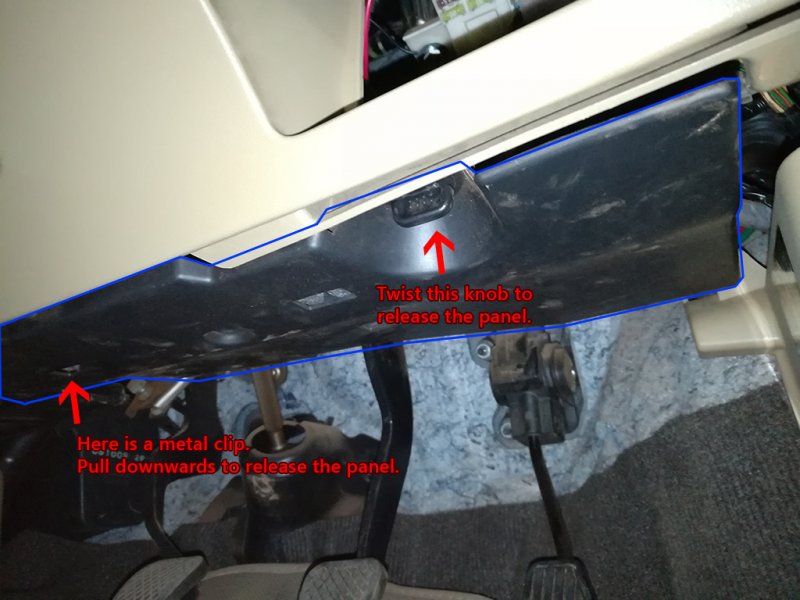
Firewall panel which is above ABC pedals also needs to removed so that there is easy access to fuse box and to unscrew a bolt for negative connection. The panel has two locks, one is knob that needs to twisted to unlock and another is metal clip that can be released by slowing pulling the panel downwards.
Step 3. Routing the output power cable
Ok lets route the hardwire. Insert the output cable in the corner of dashboard and take it out from the top (Use rope or wire to tie and pull). There is a existing wire going through A-pillar, route the power cable along with it. You don't have to take out whole cable, just a enough length from A-pillar to roof liner to dashcam. Excess cable can be tied inside the dashboard/glove box.
Step X. Placement of the dashboard camera and removing A-Pillar panel
Please check installation for Plug & Go Method in my previous post because here I would skip these steps.
Step 4. Affixing hardwire adapter, connecting fuse tap and fastening negative wire

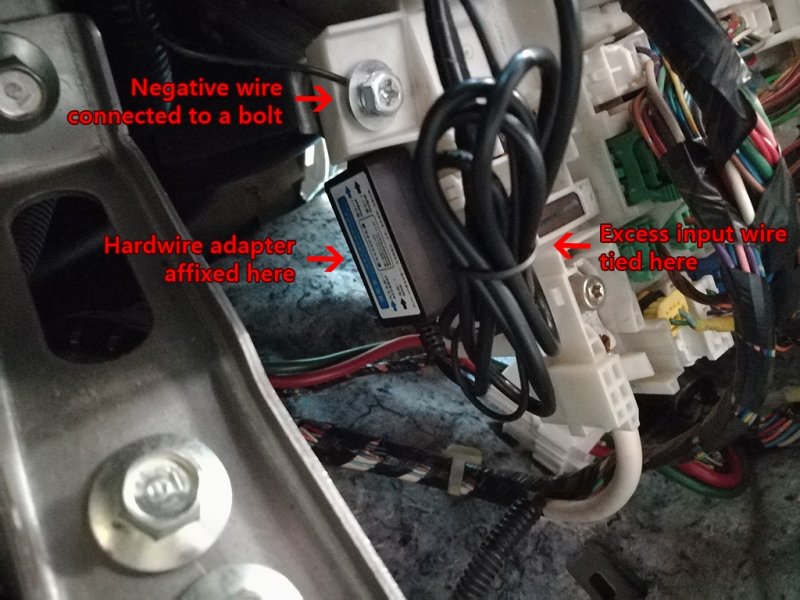
Stick 3m double sided tape to the adapter of hardwire and affix the same near fuse box. Make sure it doesn't interrupt with other parts.
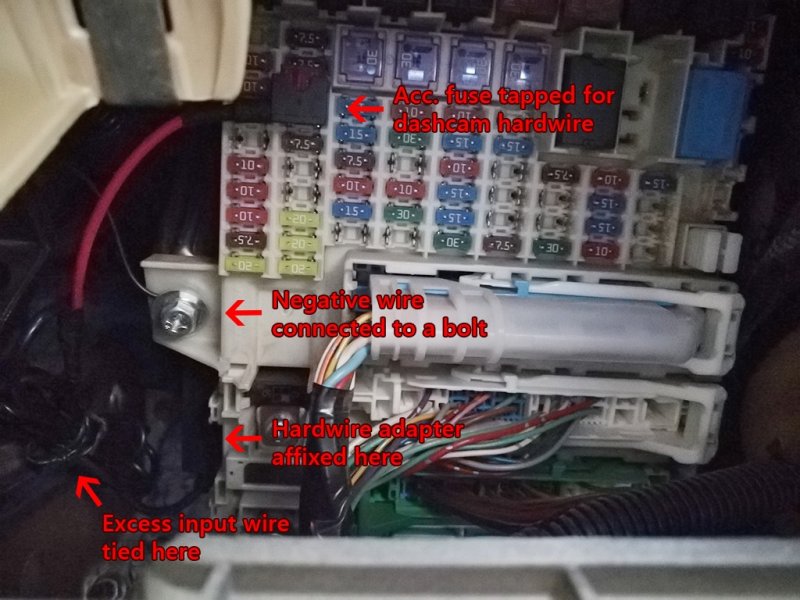
Locate accessories fuse and remove it using fuse puller. Use the same fuse and install it in fuse tap. Install another fuse (10A or 15A) for dashcam connection in the fuse tap. Once done, put the fuse tap into accessories fuse holder location and make sure it is secure. Next screw the negative connection bolt or cable lug and tie the excess wire to nearby metal holes or rod.
Step 5. Testing the dashcam and finishing the work.
Do a quick test of dashcam to see if it is working and do reverse steps to refit A-pillar panel, door rubber beading, glove box and firewall panel. Make sure the power cable doesn't crush when you refit the A-Pillar panel or glove box.
You have successfully installed the dashcam via hardwire. Congrats and enjoy it.
![[clap]](https://www.theautomotiveindia.com/forums/images/smilies/Clap.gif "Clap [clap]")
Hope my guide was easy to understand and if you need any details, feel free to ask.
Thanks...
Best Regards
![[:)]](https://www.theautomotiveindia.com/forums/images/smilies/Smile.gif "Smile [:)]") .
.![[sleep]](https://www.theautomotiveindia.com/forums/images/smilies/Sleep.gif "Sleep [sleep]")

![[:D]](https://www.theautomotiveindia.com/forums/images/smilies/Big%20Smile.gif "Big Smile [:D]") :
:
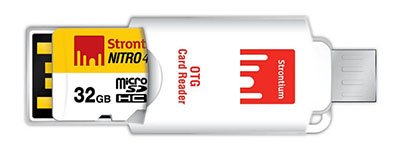


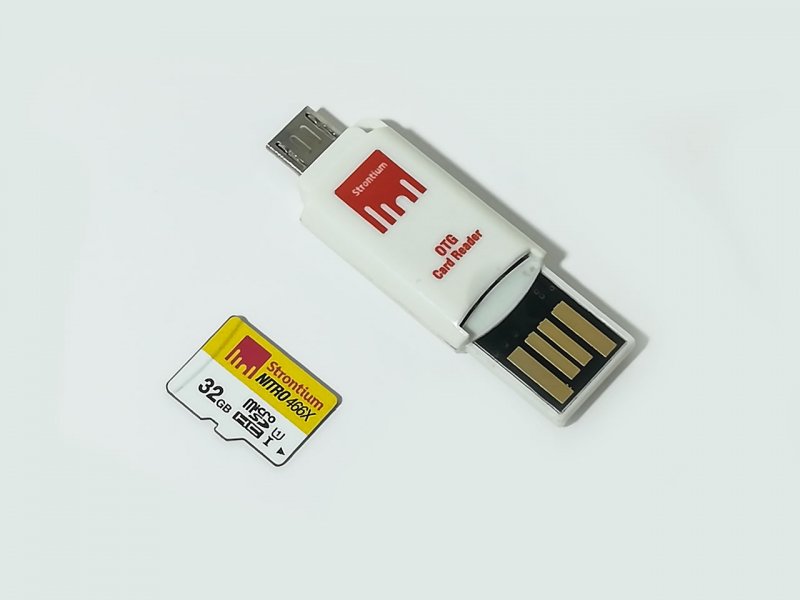
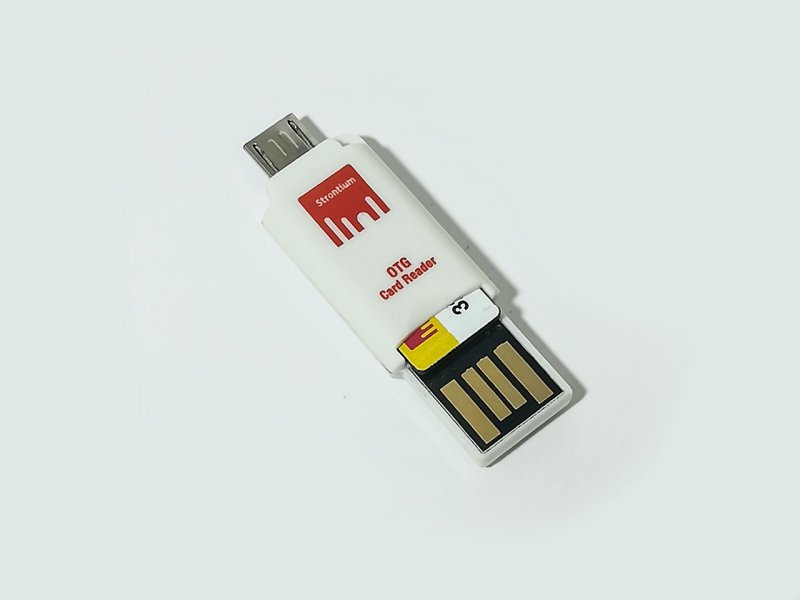
![[lol]](https://www.theautomotiveindia.com/forums/images/smilies/Laugh.gif "Laugh [lol]") . Thankfully, my phone has a card slot in case I have to play the recordings on the spot.
. Thankfully, my phone has a card slot in case I have to play the recordings on the spot.