Thread Starter
#1
What is Gain setting in an amplifier?
The output voltage from the Head Unit is matched with the Amplifier input to get the best output from the setup. The common HU output voltages are 2V-4V.
(You can find some Pioneer HUs lists "Hi-Volt Preouts (4 V)" as a special feature). The higher gain setting not necessarily makes your setup louder.
If the output voltage of the HU is less, then the gain need to be set high in the amp, and if its is high (4V etc) the amp need a low gain setting. The higher the gain then the amp is more sensitive to what is fed from HU.
Similarly you can find information like below in the amplifier specification:
Maximum input signal: 6V
Maximum sensitivity (minimum input signal for rated output): 200mV
(Source: JBL GT X-646 Manual)
So the idea is to set the gain as optimum without pushing either amplifier or HU to its limits and deliver a good sound output at the same time. Unlike the crossover settings and bass boost it is not a great idea to set the gain just by sensing with 'ears'.
P.S: There is a crude method of increasing the gain till the speakers starts to distort.
Prerequisites & Notes:
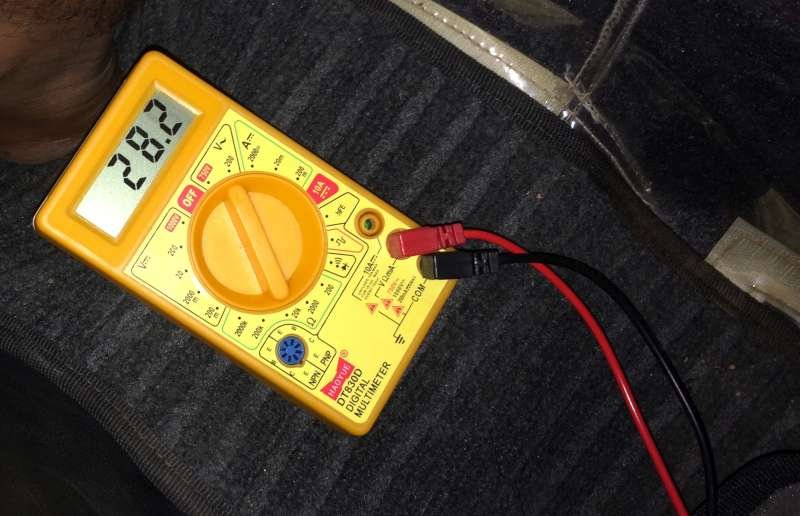
• Digital multi meter which reads AC voltage.
• Screwdriver.
• 50Hz (For Subwoofer channels) and 1000 Hz (For front channels) sound files burnt in CDs or copied to USB drives.
(Download the files from the below post). Optionally you may generate the frequency tones as required specifically for your
setup using Audacity (an Open Source freeware).
• Double check the calculations before setting the gain voltage.
• Make sure you are not exceeding the rated values of speakers and amplifier.
Calculating the Gain
Basis of this calculation is derived from Ohm's law.
Voltage = Square root ( RMS power of amplifier channel x Connected Speaker Impedance)
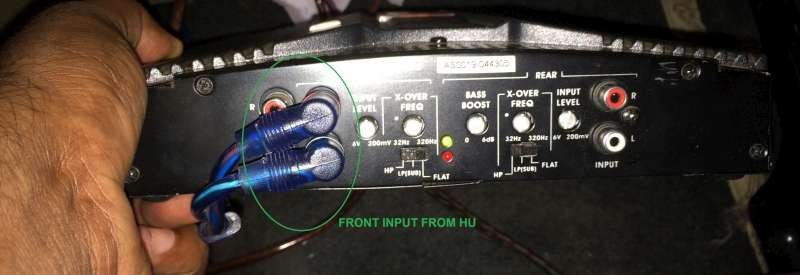
I have used the 4 channel amp, JBL GT X646 here in the calculations.
2 channels are connected to front components and other 2 are bridged to connect a subwoofer.
The values will change specific to your amp make and model.
Amplifier channel-Front
No of channels=2
RMS output per channel of AMP=70W
Impedance of Speakers connected=4Ώ
A= (RMS out of amp* Speaker Imp.)=280
√A=AC Voltage (Corresponding to Gain)=16.74 VAC per channel
Amplifier channel-Rear/ Subwoofer
No of channels=1 Bridged
RMS output (with Bridge tied load)=200W
Impedance of subwoofer connected=4Ώ
B= (RMS out of amp* Speaker Imp.)=800
√B= AC Voltage (Corresponding to Gain)=28.29 VAC Bridged channel.
Make necessary modification in the calculation when 2Ώ speakers, rear component speakers, 3 preout HU, 2/5 channel amplifiers etc are used.
The output voltage from the Head Unit is matched with the Amplifier input to get the best output from the setup. The common HU output voltages are 2V-4V.
(You can find some Pioneer HUs lists "Hi-Volt Preouts (4 V)" as a special feature). The higher gain setting not necessarily makes your setup louder.
If the output voltage of the HU is less, then the gain need to be set high in the amp, and if its is high (4V etc) the amp need a low gain setting. The higher the gain then the amp is more sensitive to what is fed from HU.
Similarly you can find information like below in the amplifier specification:
Maximum input signal: 6V
Maximum sensitivity (minimum input signal for rated output): 200mV
(Source: JBL GT X-646 Manual)
So the idea is to set the gain as optimum without pushing either amplifier or HU to its limits and deliver a good sound output at the same time. Unlike the crossover settings and bass boost it is not a great idea to set the gain just by sensing with 'ears'.
P.S: There is a crude method of increasing the gain till the speakers starts to distort.
Prerequisites & Notes:
• Digital multi meter which reads AC voltage.
• Screwdriver.
• 50Hz (For Subwoofer channels) and 1000 Hz (For front channels) sound files burnt in CDs or copied to USB drives.
(Download the files from the below post). Optionally you may generate the frequency tones as required specifically for your
setup using Audacity (an Open Source freeware).
• Double check the calculations before setting the gain voltage.
• Make sure you are not exceeding the rated values of speakers and amplifier.
Calculating the Gain
Basis of this calculation is derived from Ohm's law.
Voltage = Square root ( RMS power of amplifier channel x Connected Speaker Impedance)
I have used the 4 channel amp, JBL GT X646 here in the calculations.
2 channels are connected to front components and other 2 are bridged to connect a subwoofer.
The values will change specific to your amp make and model.
Amplifier channel-Front
No of channels=2
RMS output per channel of AMP=70W
Impedance of Speakers connected=4Ώ
A= (RMS out of amp* Speaker Imp.)=280
√A=AC Voltage (Corresponding to Gain)=16.74 VAC per channel
Amplifier channel-Rear/ Subwoofer
No of channels=1 Bridged
RMS output (with Bridge tied load)=200W
Impedance of subwoofer connected=4Ώ
B= (RMS out of amp* Speaker Imp.)=800
√B= AC Voltage (Corresponding to Gain)=28.29 VAC Bridged channel.
Make necessary modification in the calculation when 2Ώ speakers, rear component speakers, 3 preout HU, 2/5 channel amplifiers etc are used.
Last edited:
![[music]](https://www.theautomotiveindia.com/forums/images/smilies/Music.gif "Music [music]")